Showing posts with label works-complete. Show all posts

Thursday, December 31, 2020

Revisiting 2020 Resolutions

This time last year, my intended projects were:

Embroidered coif and forehead cloth. Started and slowly progressing.
Tablet-woven garters
15th/16th century purse
Belt for 16th century garb
Turnshoes that fit better Ended up purchasing some that met my requirements.

18th century stays. Started. 
18th century petticoat.
Pockets. Did some reading on the subject.
One of the 18th century dress lengths I have lying around.

1800s/1810s Spencer
1810s Caped Pelisse

Some of the 1830s dress lengths I have lying around
Sleeve plumpers for 1830s use

1859 net cap
Fancy 1850s undersleeves These have been half-sewn since last January argh....
Black wool crinoline-era dress
Dancing slippers

1889 day dress
1880s/1890s corset [Custom pattern acquired]
1870s Natural Form Petticoats
1890s Petticoats
1879 Opera Gown
1897 Opera Gown

Draft Folder Below 100: Achieved August 30
Current drafts on this blog: 72


Additional projects:

Fixed up both my 16th century smocks.
Made somewhat in excess of 100 cloth masks in various styles.
Red printed cotton Regency dress (for an event cancelled right at the beginning of the pandemic).
Finished the Berlinwork card case.
Not costumes, but I tried hair lacing, iron age hairpins, and Roman hairstyling.
Also sewed two sewing kits and whole doll's wardrobe.
Wove a woolen shawl.
Finally made up the hand balls.
Made some shoe roses to match my red stripe evening gown.


I definitely fell behind on the costuming projects this year--for the first six months of the pandemic shutdown, I didn't really post any sewing except for masks. At the same time, all of the specific events I was sewing for were cancelled, so I didn't need any of the neglected projects right away.

I also didn't really do much of the hairdressing I hoped to get to. On the other hand, I found some different techniques to attempt (which were fun). I did complete all 26 Historic Food Fortnightly challenges, as well as staying reasonably on top of the books I hoped to review, so there's that.

Tuesday, December 31, 2019

2019 Resolutions in Review

On the 7th Day of Christmas, I got introspective about my 2019 costuming resolutions. This time last year, I wanted to complete:  

Late 18th century chemise, maybe one more 16th century smock [de-prioritized since my early 1800s will do, and I haven't completed other 18th century gear]
That linen gown*
Partlet
Tablet-Woven Garters* [maybe next year]
Another pair of turnshoes [still needed, hopefully for next summer]

1770s corset* [nope, got the supplies though!]

Empire ballgown remade
Dancing slippers [in progress]
Bib-front Empire dress*

1848 Dress and Bonnet [bonnet form made up]

Fix mid-19th century corset [repeatedly, replacement in progress]
New sets of 1850s undergarments
Braidwork coat* [some preliminary planning complete]
Blue Wool* Sleeves Reworked
Black or red plaid wool worked up* [some work done]
Gaiters*
That knitting apron*

1890s corset*

Items completed that were not on the list:
1790s Short Stays
Regency Shoe Roses
16th century apron
1830s reticule
1840s Walking Parasol
Plaiting kit
The Eternal 1850s Chemisette
16th Century Infant Clothes
Elizabethan Hood with Bongrace
1857 Opera Gown (complete, to be posted)
And 18 medieval to early 19th century hair coverings

Monday, May 1, 2017

Brown print yoked dress, 1850s

I could use another washable dress for dirty work at the fort, and haven't made an adult-sized yoke dress before. This should fit the bill nicely:

Brown cotton yoked dress for 1850s wear
It really shouldn't show the dirt.

Full yoked bodice, bishop sleeves, and gauged skirt (all self-drafted). Fastens at center front with hooks and eyes, and at the wrist with shell buttons. The print is the brown floral from Marcus Fabrics' "historical stripes" line; lined with white muslin, scrap fabric facing.

Friday, September 16, 2016

Wool Side-Lacing Gaiters, c.1856

Pattern and instructions from Every Lady Her Own Shoemaker (1856), with advice from Mrs. Ryan, Mr. Kempe, and an anonymous brigader.

Wool gaiters or ankle boots from "Every Lady Her Own Shoemaker" (1856)
Plaid wool ladies' gaiters, style of mid/late 1850s. 
Sideview of ankle boots (gaiters).
Side Laces.
The fit could use further refinements, but I'm generally quite pleased with how they turned out.  I'll try a stiffer lining on the next ones.
Front view of Victorian-style ankle boots (gaiters) with chevron.
This is how I match plaids. :)

The outer material is wool (from S. R. Harris); the lining is pimatex cotton.  The silk bias binding and cotton laces were dyed to match.  Scrap leather for the soles and heel-stiffener.  Upper sewn with silk thread, soles attached with coarse linen (waxed).

Saturday, August 13, 2016

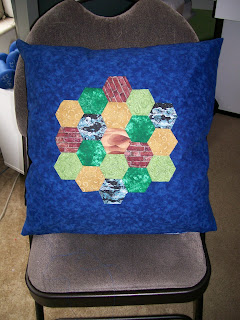
Throw Pillows

Appliqued hexagon throw pillow
Fun fact: no actual sheep were employed in the
production of this item--not even in trade for wood.
A modern, if somewhat nerdy, version of the hexagonal patchwork I've taken up.  Hexes are 2/3 standard playing size, all the decoration is (necessarily) hand-sewn.  This pillow is one of a pair made for some awesome newly-married friends of mine.

Thursday, July 21, 2016

White Waist

Here's my new white waist for early 1860s wear.  The inspiration piece is a basic gathered body with full bishop sleeves (from The Graceful Lady, first on the page).  I'm kicking myself over the fabric--I have a piece of barred cotton very similar to the original which I had just cut up for a fancy knitting apron before I decided to make a white body.  Alas.  Instead, I ended up using a piece of plain cotton batiste that was on hand.
Repro 1860s Victorian White Waist

I decided to make a detached half-high lining for this body: none of the originals I've found pictures of have attached linings, and my material is so sheer that an intermediate layer is needed to conceal unsightly corset and chemise lines.  I did not opt for a "corset cover" because I've still found little evidence that they were in use before 1865.  The lining is white pimatex; both it and the body are draped-to-fit, with dart and armscythe adjustments courtesy of Nancy.

The silk waist has an interior structure of crinoline, with 1/4" steel boning in the points.  It fastens with hooks and eyes on the side.  It is displayed (and worn) with the green wool skirt that also accompanies my 1850s velvet and lace basque.

Repro 1860s Victorian White & Silk Waists


Wednesday, June 8, 2016

1850s Wide Collar

I'm still working on some larger projects, but meanwhile I completed a basic white collar for the mid-1850s. Since that's where I'm spending most of my time, it seemed necessary; narrow 1860s collars don't quite fit the aesthetic of c. 1855.

1850s Reproduction Basic White Collar

This collar is a single layer of pimatex broadcloth, which is slightly heavier than the pima lawn I'm using in the never-ending-broderie-anglaise-collar.   It's fitted to the neckline of my yellow dress, measures 2.75" wide, and is finished with narrow hand-sewn hems.


Sunday, March 13, 2016

Tucked Petticoat

I made it for the Civilian Symposium needlework contest--and also to have something pretty to wear.
White cotton petticoat with diagonal tucks.
Some wrinkling occurred
while travelling across the country.
Diagonal tuck insertion between two sets of four quarter-inch horizontal tucks.
A closer look at those tucks.

It's four panels of 44" wide pima cotton broadcloth, which gives a nice full petticoat for wearing either over hoops or over my pile of 1850s pettis. 

The decoration is based on this 1850s original from The Met:
Original Victorian white petticoat from The Met.
Cotton petticoat, c. 1850-60.
Decorative tucks on the original 1850s petticoat from The Met.
Tucked detail on the original.
Unfortunately, my item information request was never answered; so, I used the given center back length (41") to scale the other design elements on the image of the petticoat.  From that, I calculated the following:

Height of ruffle: 2.5"
Ruffle hem: 3/8"
Hem of petticoat: Greater than 9/16" (1.5 ruffle-hem-depths) but less than 2.5" (total ruffle depth), based on the solid, whiter shadow which shows under the ruffle where it stands out, which does not extend above the cord.
Fullness of ruffle: The gathers below the cord are neat, regular, and fairly compact. Without measuring the skirt and ruffle hems I can't know the ratio, but I suspect the ruffle is around 1.5x the petticoat width.
Cord diameter: Less than 1/16" width, looks closer to 1/32" (scaled to ruffle hem depth, at highest magnification).
Distance from ruffle top to first tuck: 1/2"
Width of tuck: 1/4"
Distance between tucks: 1/4"
Distance from top tuck to insertion band: 1/2"
Width of insertion border: 1/4"
Width of insertion between borders: 2.5"
Total insertion width: 3"
Width of diagonal tuck in insertion: 1/4"
Space between diagonal tucks in insertion: about 1/16" (three tucks and the space to the right of each takes up approximately 1").  In some places, this spacing increases to 1/8".
Distance between insertion and next horizontal tuck: 1/2"
Waistband width: 1"
Material overlap in waistband (shadows through): about 3/8"
Waist material controlled with gathers.
Machine top-stitching through tucks and on the insertion edge-bands measures approximately 16-18 stitches per inch.

The width of the petticoat at the hem is not given. The shadow-through of a seam on the right side of the picture suggests that the seam allowances are approximately the same width at the horizontal tucks (1/4").  Interior seam treatments at not visible.

For my petticoat, I ended up reducing the tucked design elements from 5 to 3 (I miscalculated the yardage, and ended up about 20" short on the second diagonal band).  Though I did make a ruffle, I decided not to add it to the skirt, as I didn't think it looked well with the smaller number of tucks--and, honestly, I don't care for it much on the original, either.  The fullness is controlled with stroked gathers at the waist, and fastens with a bone button.

It ended up winning both the faculty and popular ballots in the Needleworker's (open) division of the contest.  My thanks to the judges and everyone who voted. :)

Thursday, February 18, 2016

Tiered Dress, mid-1850s

This fun dress was made at the request of a friend, using a gorgeous lightweight floral print she found at Reproduction Fabrics. The design is copied from an original (unfortunately, the picture was in a book of Russian museum items, so I can't link to it).  The original dress has a three-tiered skirt in a 2:1:1 ratio (bottom/mid/top).  The bodice was cut very full and shirred at shoulder and waist.  There's a piped bodice edge, no waistband, with a narrow self-fabric bow or tie at the center front of the original. The sleeves are wide open from the elbow, where they are controlled with shirring, but are
smooth above.  The center front opening has no buttons, and presumably closes with hooks and eyes.

1850s style dress with three tier skirt, open sleeves, shirred bodice.
 We decided to use smooth sleeve caps over a full open sleeve with shirring to the elbow, to follow the observed sleeve effect--we also tried mocking up a capless sleeve that was tight above and loose below, but it looked like a colonial-era costume piece, so the cap version was selected.  The narrow (apparently tatted) lace on the original was replaced by silk ribbon for the reproduction.  It was present on the two upper tiers of the skirt, and along the edge of the open sleeves.

Bodice waist shirring and gauged skirt.

Tuesday, February 24, 2015

New Wrapper

Returning to the KayFig Wrapper Pattern with a new addition to the Ft. Nisqually dress-up station. Detachable collar from Simplicity 7212.

Paisley wrapper from Kayfig pattern.

Front top portion of Kayfig wrapper.

Wednesday, February 11, 2015

Regency/Empire Stays, part III

With the front panel complete, it's time to assemble the rest of the stays.1

Working from front to back, I "sandwiched" the completed section between each two new layers.  So, for the first in-seam gusset (cut in two layers to permit the sandwich), the outer layer of the gusset is laid right-sides-together with the outer front panel, and the lining layer is set right-sides-together on the front lining.  I then stitched the seam through all four layers (gusset shell/front shell+lining combo/gusset lining), and pressed the gusset out.  The front+gusset is now the completed section and is treated as one.  To add the side section, the side shell is laid right-to-right over the front+gusset, the lining is treated the same, and the process is repeated.  The hip gusset in the side piece was made in a single layer, and treated as the bust gussets in the front panel.  Boning channels were stitched between the shell and lining after the two were attached and pressed flat.

To make the back section, I joined the shoulder straps to the back pieces (L shell to L shell, R shell to R shell, R lining to R lining, L lining to L lining), and then joined each back piece to its lining, along the center back opening.  I did this to make a clean center back, without binding (leaving more space for the bones and eyelets).  Pressed the back pieces flat and stitched the back boning channels (butted into the CB seam, and another 1/4" away, leaving space for the eyelets in between.  Made the eyelet holes with an awl and applied 2-piece metal eyelets (size 00) with a setting anvil.  Following the method in Period Costumes for Stage and Screen, the eyelets are paired, but with an extra off-set at the eyelet at top and bottom for internal spiral lacing.  [My initial attempts to don the garment with spiral lacing were unsuccessful, so it's displayed below with cross-lacing.]

Made remaining back-boning channels as before.  I then joined the back and side+gusset pieces by sewing the shell only (usual right-to-right and open method).  The lining was folded over (to cover the raw edges) and topstitched.

The straighter boning channels (short slanted bones on the front, center back pairs, side hip) received 1/4" straight steel bones.  Curvier sections, particularly along the panel joins, used 1/4" spring steel.
(To see the difference, I've put up explanations of the different steels here).

Prepared bias edging of tightly-woven cotton (also used for some of the lining pieces), and attached it along the top edge--including both straps--and the bottom, encasing all remaining raw edges.  Added 8 thread eyelets to fasten straps (two per strap, and two at each side of the bust).


Completed Regency/Empire Stays.
Finished stays, front

Side back view of 1820s Stays from Period Costumes for Stage and Screen.
Finished Stays, side back

Front side view of early 19th century-style stays.
Finished stays, side front

1. For the record, I know that the French First Empire dates 1804-1814 and the English Regency period ran 1811-1820, but I am using the terms in the expanded sense, to cover the neo-classical fashion of dress which was popular approximately 1795-1830.  My apologies to anyone who is bothered by this construction.  I have been known to flip out over similar misuses of the term "Victorian" (1837-1901) to denote "pre-1920", "1870 or later", and/or "looks sort of old".


Tuesday, February 3, 2015

Making a Regency Petticoat

The petticoat bodice combines the petticoat with a sort of short stays; but for use with my long stays and chemise, I need an actual petticoat.

Period Petticoats:
Early 1820s petticoat from the Museum of Fine Arts Boston.
 Petticoat, c. 1820-1825, MFA
Early 19th century petticoat, from The Met.
Petticoat, early 19th century
from The Met.

Early 19th century petticoat, front and back view, from janeausten.co.uk.
Petticoat, early 19th century, janeausten.co.uk,
also featured on 
The Oregon Regency Society,
but an original post with context has not been found.
 

The petticoat is basically a skirt.  Given that the stylish "waist" of the period falls at the underbust, the petticoat may have shoulder straps to hold it in place, or even an abbreviated sort of bodice.  The two (admittedly not closely-dated) examples with back views show significantly more gathering at the back of the petticoat than at the front, with what may be a drawstring or tie fastening the center back.  The description of the MFA (bodiced) petticoat mentions waist and neckline drawstrings and a tie closure at the back.

For my petticoat, I cut a rectangle of white cotton 45" x 90"; sewed it into a tube, leaving a 12" opening at the top back; and hemmed the bottom (1.5" doubled).  I then gathered upper edge by hand, prepared a waistband to my underbust measurement (measured over the corset), and enclosed the raw edge of skirt in the waistband.  While doing so, I concentrated the gathers towards the back, as with the bodiced petticoat--ie, half of the skirt gathered to the back quarter of the waistband.  Twill tape ties fasten the center back; this seemed easier than a button closure for dressing oneself.  Shoulder straps of twill tape are attached to the waistband.
Reproduction Regency petticoat with shoulder straps.

Reproduction Regency petticoat, full gathered back with tape closure.


Wednesday, January 21, 2015

Red's Regency Dress, #2

Continuing from part I: the actual dress construction.

Custom-fitted bodice pattern for Regency dress.
Start: Fitted and/or Draped Pattern Pieces 

To make the bodice, I cut out the front and back pieces in the lining and fashion fabric.  Sleeves are unlined.  The sleeves were sewn along the underarm seam, then the (lower edge) hem was pressed and hand sewn.  I experimented with adding decorative tucks parallel to this seam, but decided it made the sleeve too visually "heavy". For the front piece, I cut the fashion fabric with extra space in the center front, and then folded out the excess in six knife pleats (or four knife pleats with a center box pleat), and stitched the pleats down by hand.  They are completely flat, but add subtle visual interest to the body.
Decorative tucks on front of Regency dress bodice.
Bodice Pleating
Hand-sewn tucks.
Hand sewing on the tucks
The back lining was darted out, for use as a guide.  On the back fashion fabric, I opted for a faux "three piece" (well, "four piece", as it's back-opening) effect, by making a small diagonal tuck running from the shoulder seam to the waist.  On the originals examined in part one, I noticed that these don't have to be as curved as on an 1850s or 1860s-style dress; some of the 1810s dresses have very straight side-back seams, making the back itself diamond-shaped.  This faux seam took up additional material towards the waist, acting as a dart.
Back bodice lining.
Plain dart on back lining
Dart concealed in faux-seam.
Dart concealed in faux seam
The front and back pieces were then joined at the shoulder and side seams; the lining was treated likewise.  The fashion fabric and lining were then placed right-sides-together, and joined along the center backs and neckline.  The fabric was turned right-sides-out, pressed, and the sleeves were set into armholes.  Hooks and eyes were added along the center back.

To make the skirt, 2.5 panels (of the fabric width, 44") were cut, and made up in the usual manner with the placket at the center back. [Usual manner: sew panels into a tube, fell the seams, press hem and stitch, narrow-hem the placket opening].  Three 1" tucks were made  near the hem, again adding subtle decoration and a bit of weight to the bottom of the skirt--the fashion plates I was looking at tend to favor trim around the bottom of the skirt, especially in the later 1810s into the 1820s.  I did the tucks by machine, as the matching thread made the stitching blend in, and my wrist was already protesting the hand-sewn hem.
Tucks in skirt of Regency dress.
Skirt tucks
The raw upper edge was gathering with two rows of running stitch, and then were machine stitched to the raw lower edge of the bodice.  As with the bodiced petticoat, the back gathers were set close and the front gathers were spread out (half of the skirt width over the back quarter of the bodice, the other half over the front/side three quarters).

Voila:
Completed Regency/Empire/Neoclassical dress.


Friday, January 16, 2015

Regency Bodiced Petticoat

Getting ready to attend a Regency ball with a certain dear sister.  I've already made my chemise and have a corset in the works.  To save time (in construction and dressing), I'm attempting an all-in-one boned-bodice petticoat for Sis.  Then it's on to the frocks...

The bodice pattern used is a modified version of the Simplicity 4055 bodice (view A).  I converted the 4-piece back into a 2-piece by joining the back and side-back pieces, and taking up the excess material at the waist with a dart; the neckline was also raised to suit the style preference of the intended wearer, and the front darts, side seams, and shoulder seams were all custom-fitted.

Following the bodiced petticoat instructions on sensibility.com, I cut out a version of the bodice with the neckline 1" lower, an expanded center front (1" added at the top, by angling the front bodice piece on the center front fold before cutting), and an extra 2.5" length.

Drafting a bodiced petticoat from a Regency bodice toile.
Fitted bodice toile and longer petticoat bodice
Here's where my method diverged.  Instead of using bias tape to make a casing for the front drawstring, I decided to make a channel between the lining and outer layers.  To do this, I joined the front and back pieces at the side seams for each of the two layers.  After pressing the seams to the back, I joined the lining and outer layers along the neck, center back and under-arm edges (leaving the shoulder seams and waist open). Pressed, and then top-stitched along the front neckline, 1/2" from the edge to form the channel.

Assembling the petticoat bodice.
Joined side seams
At the center front, two eyelets were made in the channel, and the twill tape fed through.  The ends were secured at the open shoulder.  The back shoulder seam allowances were pressed in, and the front and back joined with top-stitching.


Petticoat bodice upper drawstring.
Threading the drawstring
Drawstring casing along upper bodice.
Drawstring in casing, shoulder to center front.
Petticoat bodice shoulder seam.
Shoulder Seam
The darts were then stitched through both layers, and pressed to the outside.
Bodice for petticoat.
Almost-completed bodice
For the skirt of the petticoat, I cut a 42" by 84" rectangle of cotton, joined it into a tube (leaving a 10" placket at the top) and put a 2" hem at the bottom.  I finished the raw edge of the placket opening, and gathered the upper edge with a running stitch. Per the originals dresses and petticoats I've seen, I decided to concentrate the gathers towards the back of the skirt.  In this case, I put the back half of the gathered skirt into the back quarter of the waistband. The raw top edge was encased in a waistband, the top of which was left open (it will eventually enclose the raw lower edge of the bodice).
Skirt for Regency bodiced petticoat.
Skirt on outer layer of waistband.
At this point, I basted the waistband to the lower edge of the bodice and had Sis try it on.  As hoped, things fit pretty well, especially with the drawstring to snug up the neckline.  I increased the overlap at back closure slightly (less than 1/2") to ensure a close fit.  With the added bodice length, the waistband fell a bit low, so I decided to move it up, and marked the desired lower-bound on the bodice.  The distribution of the skirt gathers were a good call: there's plenty of room for movement, and the line is very elegant.  I'll probably use a similar proportion on the dresses' skirts.

Fitting accomplished, I removed the basting stitches, and re-attached the waistband along the new marked lower bodice boundary, and trimmed the excess bodice length; the back waistband "lining" was then folded over the the raw edges of the bodice, concealing it within the waistband.  I then added 3 buttons to secure the back.  Featherlight boning was basted over the front darts.
Trimming the bodice.
Trimming the excess bodice length.
Bodiced petticoat waistband.
Final waistband placement.
Finishing the bodice placket.
Waistband lining pinned in place, raw edge of bodice overlap folded to inside.
Buttons down the back of the petticoat bodice.
Back buttons
Boning on front of bodiced petticoat.
Front bodice with applied boning.
Regency or Empire style boned bodice petticoat.
Finished petticoat.

Monday, October 6, 2014

Dinner Party Menu: Candlelight Tour (scroll down for pictures)

Washington Territory. Early October, 1855.

At the Hudson Bay Company's Fort Nisqually, Chief Trader W. F. Tolmie is entertaining a few friends with a dinner party.  Dr. and Mrs. Tolmie have many reasons to celebrate: their beautiful new house was completed in April, their fourth child--named James--was born in early September, and now word has come from London that Dr. Tolmie is being promoted to Chief Factor.  Mrs. Tolmie's parents, Mr. and Mrs. Work, have been visiting; very soon, Mrs. Work and her younger daughters will be returning to Fort Victoria, while Mr. Work proceeds proceeds to Olympia, the territorial capital, on business.     


For menu formatting, I consulted Mrs. Beeton's Book of Household Management (1860), What Shall We Have For Dinner? by Lady Maria Cutterbuck (1852), Eliza Leslie's New Receipts For Cooking(1854), and a selection of Godey's Bills of Fare reproduced in Civil War Recipes by Lily May and John Spaulding.

General Meal Outline (for a dinner party, according to Mrs. Beeton):

  • First Course: 1-2 soups and 1-4 fish or seafood dishes (for parties from 6 to 18)
  • Entree: 2-4 Meat dishes (one may be substituted for fowl, fish, or a vegetable dish)
  • Second Course: 1-2 Meat and 1-4 Fowl dishes, plus vegetables
  • Third Course (Entrements): 1 or more Fowl Dishes, 5+ puddings, jellies and sweet dishes; for larger groups add a meat dish, a seafood dish and/or a salad
  • Desserts ("and Ices" for parties of 8+) 

For the larger groups, some of these dishes are "removes" which replace an earlier dish in the same course: ie, the Beeton first course for a party of 18 reads something like "Soup-1, removed by Fish-Q, Soup-2, removed by Shellfish-A, Fish-X, Fish-Z".

Many other sources do not delineate the course numbers, but follow a similar outline (soups, fish, meat, fowl, puddings, dessert).  For example, on page 386, Miss Leslie gives an autumn dinner menu (for company): "Mock turtle soup; stewed rock-fish; roasted ham; boiled fowls; stewed ducks; fried rabbits; stuffed egg plant; broccoli and eggs; fried artichokes; stewed mushrooms; potatoe [sic] snow; sweet potatoes--Chocolate pudding; meringued apples; cake syllabub; peach ice-cream."   One thing I'm not sure of is whether this presentation is a way of saving space ('everyone know we mean "serve the fish and soup as the first course, then the ham and fowls, then the..."') or whether the authors expected all of the dishes to be on the table from the start.

The number of dishes in a given meal varies wildly as well; though Miss Leslie didn't specify a number of people for her 16-dish dinner with guests (compare to her 'family supper' of 1 meat dish, 4-5 veggies, and a pudding), Lady Clutterbuck's menus for a party of 8-10 persons range from 8 to 33 dishes.  Mrs. Beeton stays a bit more consistent, with each non-dessert course averaging 1 dish per 2 persons (or five dishes per course for a party of 10).

When I've attended a period dinner served ala Francais, all the main courses were on the table at the outset; servants brought soup to each person and removes were used to replace certain dishes as they emptied.  This was at a ball, so a dance set between dinner and dessert allowed the table to be reset and re-supplied.  Standing buffets (as in Beeton's "cold ball supper") also mix the dishes of 'different courses' freely.  The only time I've seen the course distinction maintained in practice, was while serving at dinners ala Russe, in which each course was plated up in the kitchen, and then served to the individual guest (this is a little different from Beeton's version, in which the guests select their dishes from a menu, and servers fill each plate at a side board containing the dishes).  Which all goes to say, that while I wish I could find explicit documentation for mingling courses 1-3 and the entrees on a table, I feel comfortable enough with the ambiguity to go ahead with it, as the best option for handling a dinner party with few servants, little local staging space, and a long walk to the kitchen.

And so, a (simplified) Bill of Fare for a party of 10 in October:

Dinner (courses served more-or-less concurrently)
"First Course"
Soups: Mullagatawny Soup (sample receipt; Thornhill has his own methods)

"Entree"
Pork Cutlets (prepared by Mrs. Repp) with Tomato Sauce
Beef Fricandeau (prepared by Trapper Dave, Mrs. Rowan)
Potatoes (German Method)
Squashes

"Second Course"
Roast Goose (prepared by Mrs. Keller-Scholtz) with Apple Sauce
Savoury Vegetable Pie
Boiled Kale 
Boiled Beetroot with Onions

"Third Course"
Chicken Salad
Damson Pudding (used yellow plums, Suet Crust); day 2: Melons
Flanc of Apple
Raspberry Cream (using raspberry jelly)

Company rises and table is re-set

Dessert
Dish of Fruit (Grapes, apples, plums, pears)
Dish of Nuts  (Hazelnuts, walnuts)
Lemon Cake
Pumpkin Pudding
Chocolate Cream
Baked Apple Custard

Number of meat dishes reduced to meet budgetary restrictions and to take maximum advantage of the heirloom foods produced on site (including kale, golden beets, squash, melons, pumpkin, cucumber, yellow plums, citron, apples, potatoes, and eggs).  Note that vegetarian recipes were available during the mid-19th century.

And finally, the pre-event pictures.  Professional photos were also taken during the event proper.
Long table set for 10 with Spode Blue Italian dishes.
The Factor's House Dining Room, table setting by Mrs. Keller-Sholtz

Blue Italian place settings and soup tureen; candlesticks.
Fort Nisqually's Beautiful Blue Italian Dinner Service
Victorian pumpkin pudding and plum pudding.
Pumpkin and plum puddings for Friday night

Side board with dishes: raspberry cream, apple custard, lemon cake.
Friday Sideboard Close-up, including raspberry cream, apple custard, beets, bread, and lemon cake 
Sideboard dishes: flanc of apple, kale, cheese.
Friday Sideboard: apple custard, beets, bread, lemon cake, flanc of apple, kale, and cheese

Slice Prescott melon and faux wine.
Lemon cake, sliced melon, and decanters of faux wine

Side board with vegetable pie, chicken salad, boiled beets.
Saturday Sideboard Selections, including raspberry cream, flanc of apple, pumpkin pudding, apple custard, vegetable pie, chicken salad, beets, kale, apple sauce and tomato sauce (in pitcher); cheese behind the rightmost candle