Showing posts with label Fort Nisqually. Show all posts

Friday, September 5, 2025

Foods in Season: September, 1861

It's a new month, so it's time to once again check Beeton's Book of Household Management to see what's in season (in/around London) in September:

Fish- Brill, carp, cod, eels, flounders, lobsters, mullet, oysters, plaice, prawns, skate, soles, sturgeon, turbot, whitling, whitebait.

Meat- Beef, lamb, mutton, pork, veal.

Poultry- Chickens, ducks, fowls, geese, larks, pigeons, pullets, rabbits, teal, turkeys.

Game- Blackcock, buck venison, grouse, hares, partridges, pheasant. 

Vegetables- Artichokes, asparagus, beans, cabbages sprouts, carrots, celery, cresses, lettuces, mushrooms, onions, pease, potatoes, salading, sea-kale, sprouts, tomatoes, turnips, vegetable marrow, various kitchen herbs.

Fruit- Bullaces, damsons, figs, filberts, grapes, melons, morella-cherries, mulberries, nectarines, peaches, pears, plums, quinces, walnuts.

While overall diversity remains high, September sees multiple changes in almost every cateogry. Fish saw extensive turnover, with 11 removals and 5 new varieties added. Pork has come into the meat category, making the first change there since May.  Buck venison did come off the meat list, but only because it moved to the game category, which saw the addition of partridges and pheasants. Poultry saw ducks and turkeys replace ducklings and turkey poults (understandably), as well as larks and teals replacing plovers, wheatears, and wild ducks. Cauliflower, cresses, endive, and radishes are all off the vegetable list, though tomatoes have come onto it. Bullaces, damsons, morella-cherries, and quinces have replaced currants, gooseberries, pineapples, and raspberries on the fruit list.

The "green goose" listed back in August refers to its diet: a goose culled in summer that has been eating green grass versus the "stubble goose" of the autumn that is turned loose on on harvested grain fields to feed. It's not clear to me whether Beeton is using "goose" in the list here to mean "stubble-fed goose" or in a more general sense indicating that multiple varieties are available. Stubble-fed geese, I am told, are traditional at Michaelmas in late September, so this might be a case where there's variation between what is available at the beginning and end of the month.

Wednesday, March 26, 2025

1840s Shoes

My last two pairs of 1850s shoes are both in need of new soles, and as none of the vendors currently have my size in stock, it became necessary to try making another pair.

The end result has much rounder toes than expected.
 
This time went better than before, notably because I now have some lasts, and was able to follow the general process in Nicole Rudolph's "How to Make Regency & Victorian Shoes" video instead of just relying on Every Lady Her Own Shoemaker alone. Nicole recommends making a low shoe rather than a boot in her video, so my options were rather limited. The inspiration shoes are a pair of 1840s cotton shoes from the Met. I chose them because the foxing and lacing effects look similar to the popular gaiters of the 1850s, and they were one of only two pairs of women's non-slipper shoes from the mid-19th-century I could find in my searching. While slippers appear to have been used for daily wear earlier in the century, by the 1850s they really seem relegated to formal dress for adults. 
 
The original shoes have a figured cotton upper, which is cut in two pieces (left and right) and seamed at the center front and center back. For mine, I used a wool twill "lasting" from Burley & Trowbridge, with scrap leather for the foxing, and white pimatex cotton for the lining. 
 
No interior images are available, but bit of the little the center back lining seam that's visible has no raw edges; I chose to interpret this by making the lining and outside upper separately, then joining them at the binding with all the raw edges sandwiched between the layers. The shoes have six whip-stitched eyelets in their center lacings; on the originals this closes the shoe, and no tongues are visible (though they could be present and hidden under the ties, I see no evidence of this).

I originally enlarged the historic shoe image to match my shoe length, then took a series of proportions off of it (foxing should extend 1/2 way up the ~4.75" center front seam, then 1/6 of that length is a plain seam, then the final 1/3 the open placket). I'm not satisfied with how these compare in the final product to the original, but I did repeat this process for the sides of the foxing, the heel foxing, and the height of the shoe, and when taking the pattern on the last, it looked a lot closer to the original.
 
For the uppers, I mostly followed the process from Every Lady Her Own Shoemaker, along with what I could reason from the historic picture. After seaming the wool layer of the upper, I bound the foxing pieces with the twill tape, then laid them over the wool and topstitched into place. Close-up view of the original show 2 close rows of lockstitch or backstitch going over the tape on the foxing. After this, I lined up the lining and outer layer, a joined them by binding their upper edges. I did this by hand in order to avoid turning sharp corners on the sewing machine. I couldn't find a seam in the binding on the original, and interpreted this by putting it at the front inside corner, where the bows conceal it. It's definitely not at the center front opening, though it could have been at the center back, where the binding almost entirely worn away on both originals. The six eyelets are worked in whip stitch in a black silk buttonhole twist.
 
I followed Nicole's video to cut the soles and insoles, attach the upper to the last, and put everything together. She mentions in the video that using rubber cement instead of stitching the soles wouldn't become popular until 40-50 years after the Regency shoes she is making, which was nicely reassuring for me trying to make shoes from that later period.

Better than my previous pairs, but I have much to learn.

I wore the shoes to cook at Fort Nisqually last Sunday. It poured rain all day, but I contrived to stay indoors most of the time. I did end up crossing the yard ~3 times, and found these adequate. They only felt a little damp on the second two excursions, and dried out very quickly (in fairness, I was keeping to the paths and trying to avoid puddles and wet grass). The shoes were a little looser than I feared/expected, though nowhere near as floppy as the plaid gaiters I made before. There is room for my insoles, which made them much more comfortable than most of my other period shoes, though they feel lighter and flimsier than my purchased shoes.
 
Appearance-wise, I have a laundry list of problems, from the very rounded appearance of the toe (the last actually has a square toe, albeit with more of a curve along the outside edge than I'd like) to the crooked foxing, to the two places where I shaved of the turned leather too close to the edge of the sole. Despite edging and burnishing, the soles are a bit rougher around the edges than I'd like. The sole-upper-insole layers were rough and clumsy-looking despite my attempts to even things out, but somehow this didn't end up making the shoes uncomfortable.
 
In the end, I'd call this "serviceable" and "the most accurate shoe option currently available to me," but I'm also going to try getting my Balmoral boots and/or walking shoes re-soled for outdoor use. These lighter shoes I'll keep for indoor and summer events (where the light uppers should be very comfortable). 

Tuesday, March 25, 2025

A Bachelor's Bread Pudding (1855)

And a final receipt from Sunday at the Fort.

A Bachelor's Bread Pudding

The Recipe: A Bachelor's Bread Pudding from The Practical Housekeeper and Young Woman's Friend

A Bachelor's Bread Pudding--Four oz of grated bread, the same of currants and apple, two oz of sugar, three eggs, a little essence of lemon and ground cinnamon. Boil it three hours. 

The Date/Year and Region: 1855, Toledo, OH
 
How Did You Make It: As the receipt gives no instructions, I basically winged this one. I started by grating about half a loaf of sour dough bread (not quite as stale as expected), which readily got me to 4oz. I cored and diced one apple (also 4 oz), and mixed all this together with the 4oz of currants, 2 oz granulated sugar, several dashes of ground cinnamon, and a splash of lemon extract. I beat 3 eggs and mixed them into the dry ingredients, then put all of this mixture into my smaller melon mold. This went into a pot of water on the stovetop, and remained there about three hours

Time to Complete: A half hour to prepare, 3 hours to boil.
 
Total Cost: About $3.50 at the current price of eggs and the currants (bread was left-over, apples and the rest on hand).
 
How Successful Was It?: Very well received. The flavor was nice and interesting, but not overwhelming (one of the interpreters compared it to applesauce), and several complimented the texture. One friend even took some home for a spouse who likes boiled puddings. Suggestions were made of adding a custard, whipped cream, or whiskey sauce over it. 
 
I was worried about the apples, since I've seen apple pudding receipts ranging from 'boil the apples down entirely before mixing with breadcrumbs' to 'core but don't otherwise peel or cut the apple.' Dicing them small, without peeling, was my compromise idea (and a lazy one, since I had no peeler but also don't like solid chunks of apple in my bread puddings), and it seemed to work fine.
 
How Accurate Is It? The ingredient list is all I have to go on, so I'd say this is as close as I can get, baring a more detailed set of instructions, particularly dealing with the apples. From the proportion of the ingredients, I assumed that laying the fruit nicely and then filling in the mold wouldn't be practical, thus mixing everything together. Finding heirloom apples (not the pink lady apples I got at the store) and drying real currants (not the zante currants I can purchase) are the only two changes I can think of at this time that make this more accurately.

Monday, March 24, 2025

Carrots au Beurre or Buttered Carrots (1854)

 Another receipt from Sunday at the Fort.

Carrots au Beurre or Buttered Carrots.


The Recipe: Carrots au Beurre or Buttered Carrots from Eliza Acton's Modern Cookery

The Date/Year and Region: 1854, England
 
How Did You Make It: I cut the last of my winter carrots into sticks about 1/4" wide, and set them to boil on the stovetop. Once soft, I strained the carrots, then melted ~3oz of butter on the stovetop, with a handful of minced parsley, and a dash of salt and of pepper. As I couldn't find the cayenne, I substituted black pepper. Once the butter was melted, I added the carrots back in, stirred about a minute, and then served it.
 
Time to Complete: About half an hour, including boiling the carrots. Estimate because no clock in the kitchen, etc.
 
Total Cost: About $1 for the butter. Carrots from my garden and parsley from the Fort's.
 
How Successful Was It?: Tasty enough. It was a bit overshadowed by the other fare, but the carrots were cooked through, the butter-and-parsley sauce suited them well. I don't often have the opportunity to serve hot vegetable side-dishes at period events, but this is a very pleasant way to serve them.

How Accurate Is It? I used heirloom carrots, and cooked everything on a wood-burning stove, so it's about as close as I can get. I would use the correct pepper next time, but that's the only obvious thing I can think to make it more accurate. I might be wrong about "dissolve" meaning "melt", but as no mention was made of water or another solvent in the sauce, I think my interpretation was correct.

Sunday, March 23, 2025

Sausage Rolls (1853)

It's not a Historic Food Fortnightly challenge, but I was back at the Fort kitchen (and working solo for the first time in a while), so I decided it was time to write up some new receipts.


Sausage Rolls

The Recipe: Sausage Rolls from Household Hints to Young Housewives

SAUSAGE ROLLS. Sausage meat rolled in crust and cut in lengths about 2 inches. the outside brushed with yolk of egg . 

The Date/Year and Region: 1853, London
 
How Did You Make It: I made a paste from the receipt in this same book (half scale 1 lb flour, 1/2 lb suet, 1/2 tsp salt, water as needed), substituting butter for the suet, as I did not have any. This half scale was ample for the 1 lb of pork sausage meat, to which I added about 12 narrow sage leaves (chopped) and salt and pepper, based on various similar receipts. For future reference, the receipts which go into further detail indicate that the sausage meat should be 2/3 lean pork and 1/3 fat.
 
I rolled out the paste into 4" wide pieces, set on the ground pork, and wrapped the paste around, then cut into 1-1.5" long pieces, and treated the tops with beaten egg. I baked the rolls in the wood-fired oven; it was to be a 'quick oven', but didn't achieve the requisite temperature until Elise took charge of the fire. The rolls were cooked until the pastry started browning and the meat was cooked through.  

About 1/4 of the paste was in excess, so I tossed some sugar and cinnamon on it, and baked it as puits d'amour.
 
Time to Complete: About 20 minutes to prepare, less than an hour to bake (no clock in the period kitchen).
 
Total Cost: About $6.50 for butter and meat.
 
How Successful Was It?: Tasty. Most of the interpreters took two. I'm not sure they were a good as Quin's, but they were quite nice hot out of the oven. I tried not to overwork the pastry crust this time, and it wasn't particularly tough, but it also wasn't as flaky as I would have liked (though some of that might have been the oven temperature).
 
How Accurate Is It? I used pre-ground pork, but most versions of this receipt assume you'll purchase it from a butcher, which is functionally what I did. I based on the flavoring (sage leaves, salt, pepper) on similar receipts, and again feel pretty good about that. The use of butter for suet was an intentional deviation, but that would provide one way to get closer to the original.

Wednesday, March 5, 2025

Comparative Cheese & Also Custard Puddings (1845-1855)

While I'm going through my old pictures: last week's cheese experiments at Fort Nisqually. All three receipts are variations on "melted cheese adjacent to bread" from The Carolina Housewife (1855).

Boiled Cheese.

 We used Quin's homemade sourdough and a mild cheddar cheese for all three receipts, in order to compare them. The boiled cheese involved melting the cheese on the stovetop with milk, butter, and egg. It was served with sippets of toasted bread (made in bulk on the skillet on the stovetop, since toasting it on the forks one at a time would have been prohibitive). The stewed cheese called for cream, butter, cheese, and a salamander to cook it from above. Both ended up tasting like delicious melted cheese, and tended to solidify quickly once taken off the heat. The stewed cheese was a little less intensely cheddar-flavored, but they were very similar in general.

To Stew Cheese.

The toasted cheese again called for grated cheese mixed with cream and butter, but also had salt, pepper, mustard, and breadcrumbs, which worked into a paste with the consistency of play-dough. This was spread over slices of bread and baked in the oven until the cheese started to brown. The flavor was quite good (after eating so much cheese, the slight kick of the mustard made a nice variation), though the texture of the cheese paste was a little too similar to the bread in my opinion. It was however, much easier and neater to eat than the first two receipts. All three receipts went together quickly, and would be easy to make around other receipts (say, for the cook's lunch while demonstrating other dishes).

To Toast Cheese.

For dessert, we made two different versions of a custard pudding. Again, for good comparison, both were flavored with almond [there was a mishap with the lemon flavoring] and served with homemade preserves. One was a common custard pudding from Eliza Acton's Modern Cookery (1845), the other from Cookery Rational, Practical, and Economical (1855). 

Common custard pudding. (Boiled)

The first was boiled, and the second baked, but the only other difference was the exact proportion of eggs, milk, and flavoring. The baked pudding did have an option to substitute flour for some of the eggs, but we decided not to do this. Both receipts produced a nice molded dessert with the texture of a flan and a notable, but not overwhelming, almond flavor. There was a small mishap with the boiled pudding turning sideways enough to have water leak into the mold, but the pudding still held together when turned out. I did end up draining excess water off the plate after it had set a few minutes. I noticed little difference between the two, but Quin preferred the baked pudding (the water leak apparently making the boiled one too moist).

Custard pudding. (Baked.)

All in all, it was a tasty day. Except for the bread being baked in advance in a modern home kitchen, everything was prepared in the Fort's historic kitchen, using the wood-burning stove. All of our ingredients were as close to period as possible, and most can be documented to the place as well.

Sunday, June 16, 2024

Dine We Must

Last Friday, I had the pleasure of serving as sous chef/research assistant for the Fort's second annual "Dine We Must" gala dinner. The main courses were catered, but our intrepid group of volunteers once again put on a full line-up of period desserts prepared in the historic kitchen.


Ready for Service: boiled puddings, baked puddings, cakes & every good thing.

This year's bill of fare included boiled lemon pudding with a stiff sauce, spotted dick with brown sugar sauce, chocolate pudding, baked cherry pudding with cherry sauce, charlotte aux pommes, and cream cakes. 

This year we had a team of five: Quin (cook), me (assistant), E. (bake oven/summer kitchen), M. (kitchen maid), and A. (scullery maid). Over eight hours we prepared six different dessert recipes and three sauces, using a wood-burning stove, clay bake oven, and open fires; by 8pm we'd plated 10 dishes and served three-dozen diners.  

My main accomplishment for the evening was finding source citations for all the ingredients. Serving the public has a very stringent set of ingredient restrictions (and this is the only event were we do more than small samples) so finding an array of dishes with different flavor profiles that use the different available cooking surfaces, meet the health department requirements, and aren't a repeat of the previous year is quite the puzzle. This year, I was also able to document all of the ingredients to our location and mid-1850s time period (including chocolate, lemon juice, and cherries). Head-cook Quin not only did the bulk of the menu-planning, but also successfully made choux paste on a wood-burning stove.

Wednesday, May 29, 2024

Spinach, As in France

I have a lot of spinach coming up in the garden just now, so the obvious solution is to find period recipes for cooking with it.

SPINACH AS IN FRANCE. When well picked and washed (which is most essential in dressing spinach), put it into a stewpan with a good bit of butter, a bunch of parsley, two shallots, a clove, salt and pepper; simmer over a slow fire, stirring occasionally; when ready, add a tea-spoonful of sugar and a bit of butter rolled on flour; well incorporate the whole. Fried bread as a garnish.

-Maria Rundell's The English Cookery Book (1856)

I tried this one last week at the fort.  I started by picking a large double handful of parsley from my container garden and a full vegetable bag of spinach from my allotment. In the kitchen, I rinsed both plants twice, and set them to dry on a sieve. I chopped the shallot (just one since I miscounted) and the parsley, and put ~4 Tbsp of butter on the stove top to melt. I then added the shallot, parsley, clove, salt, pepper, and spinach. I was worried about the limited liquid (and the spinach more than filling the largest saucepan I could find), but the spinach cooked down in short order, and also released enough moisture to keep from burning. Once it had achieved a consistent texture, I added a small spoon of sugar and another ~2 Tbsp butter rolled in flour.


Draining spinach; chopped parsley & shallot.

Meanwhile, with the spinach first cooking and then keeping warm on the back water-tank, Quin and I finally got to use the telescoping toasting forks. We experimented with a few options, but since the whole stove-top was in use, found that the best result involved opening the firebox front a little, and sticking the toast perpendicular on the forks. Unfortunately, this made the oven temperature go haywire, but it is a promising option for when the stove top is in use and the oven is not. 

Spinach as in France (left), with bonus sausages and mashed potatoes (after Soyer).

The spinach ended up being a hit with 3/4 historic interpreters, particularly spread over the toast. I found the flavor quite palatable (the shallots and parsley really added some nice depth and interest to the spinach), but alas did not enjoy the slimy texture of cooked-down leaves. Fortunately, we also had mashed potatoes going on that afternoon, and I found that they worked pretty well to disguise the texture while letting the flavor through.

All told, this dish was easy, cheap, and well-received. I'm not going to make it for myself, but I'd definitely consider it for any future living history events where I need a hot, savory side-dish while the spinach is in season.

Friday, October 27, 2023

Blanc-Mange & Assorted Jellies

Somehow, none of the dishes I prepared for Candlelight Tours actually fit the October HFF challenges. None the less, I want to record them for future reference. 

The most popular and accurate was a pair of Gelatine Blanc-Mange molds I made according to the instructions in Miss Leslie's Lady's New Receipt Book (1850).

As given, this receipt calls for 2 quarts milk, the rinds of 3 lemons, half a nutmeg, 1.5 oz gelatin, and 1/4 lb sugar. I slightly increased the gelatin to 2 oz (giving a ratio of "1 packet gelatin per cup liquid" which was recommended to me as a safe margin to make a molded jelly hold its shape), and omitted the cold water. Instead, I followed the instructions as far as boiling the lemon and nutmeg in 1/4 of the milk, but I sprinkled the gelatin over the rest of the (cold) milk, before pouring on the hot milk. I made this twice: first by then boiling the whole mixture, and a second by not heating it further, and got very similar results both times.

Serving suggestion I received:
use leftover colored jelly to decorate the blanc-mange.

This macedoine of fruits, made with raspberries in a clear (white grape juice) gelatin uses modern methods (ie, prepared gelatin and juice instead of boiling up calves' feet and juicing the fruit myself), but the arrangement and presentation are based on recipes in Beeton's Book of Household Management (1861) and Francatelli's The Modern Cook (1846).

Jelly Molded with Fresh Fruit or Macedoine des Fruits (Beeton) aka Macedoine of Fruits (Francatelli) are simply fruits set into the layers of jelly. Francatelli claims any jelly can be used, while Beeton recommends a clear, sweet jelly, but in either case you set a layer of jelly, arrange the fruit as prettily as possible, set in more jelly, and repeat. I found that even using very small layers, the raspberries tend to get loose and float (just from the motion of setting the mould back in the refrigerator). Fortunately, they still look pretty cool out of the neat layers I had originally set them in. To get the transparency, I used white grape juice, with red raspberries for contrast. For the actual process, I added 1 packet (1 oz) unflavored gelatin powder to 1 cup of juice; and since I needed small layers, I actually only made 1-2 cups at a time: heating 1/4-1/3 of the juice in the microwave for 30 seconds to a 1 min, while sprinkling the gelatin over the the cold juice, then stirring in the hot juice until the gelatin was fully dissolved, pouring it into the two molds, and letting the layer cool for an hour or two. 

Macedoine des Fruits

The striped jelly, aka panachee jelly (Francetelli) or jelly of two colors (Beeton) was prepared likewise. I used cran-raspberry juice and apple juice, again in the proportion of 1 cup of juice per packet gelatin, and simple alternated layers of the two. Unfortunately, the color contrast wasn't as great as I hoped, and only in bright sunlight could the orange and red be easily distinguished.

Note to self: higher color contrast next time.


Tuesday, September 26, 2023

HFF 6.16: Harvest Time


Detail from an 1850s painting with a woman's hands gesturing over a table of food.

The Challenge: Harvest Time. Try a recipe associated with the harvest. [I harvested the salsify from my garden today, so I think that counts.]

The Recipe: Fried (Celery or) Salsify from Miss Leslie's Lady's New Receipt Book:

FRIED CELERY--Take fine large celery, cut it into pieces three or four inches in length, and boil it tender, having seasoned the water with a very little salt. Then drain the pieces well, and lay them separately to cool on a large dish. Make a batter in the proportion of three well-beaten eggs stirred into a pint of rich milk, alternately with half a pint of grated bread crumbs or of sifted flour. Beat the batter very hard after it is all mixed. Put into a hot frying pan a sufficiency of fresh lard, melt it over the fire, and when it comes to a boil, dip each piece of celery twice into the batter, put them into the pan and fry them a light brown. When done, lay them to drain on an inverted sieve with a broad pan placed beneath it. Then dish the fried celery, and send it to table hot. 

Parsnips and salsify (or oyster plant) may be fried in butter according to the above directions. Also the tops of asparagus cut off from the stalk and the white part or blossom of cauliflower. Cold sweet potatoes are very nice peeled, cut into long slips, and fried in this way.

The Date/Year and Region: 1850, Philadelphia
 
How Did You Make It: Not without two notable errors, despite the simple instructions. I started by picking five salsify plants from my garden (mammoth sandwich island salsify, which is the/a white variety). I washed them, cut off the leaves, and peeled the roots, then cut them in half, aiming for 3" pieces, but getting between 2" and 4" pieces. These went directly into the boiling water, to which (first mistake), I forgot to salt. I let them boil while preparing the batter from 1 egg, 2/3 cup milk, and 1/3 cup plain bread crumbs. I melted a couple ounces of lard on the stove (second error: it's lard for the celery, but butter for the salsify), and when it started bubbling, I dipped the salsify twice in the batter, and set it to fry.
 
Fresh out of the garden.

Time to Complete: I wasn't paying attention to the clock, but safely under an hour.
 
Total Cost: Everything was on hand.
 
How Successful Was It?: Not spectacular, but not bad. It was definitely improved with a little salt and pepper (and would be more improved by salting the water, I expect), but mostly just tasted like the-status-of-being-deep-fried-in-lard. Even the largest pieces with the lowest batter to salsify ratio didn't taste much like anything.

I noted the two error above, and if making this again (which I might, simply because there's more salsify in the garden to use), I would salt the water and cook it in butter to see if there's more flavor to be had.
 
As much as I'd like to give this another try, I doubt it's going into my living history rotation. I'd need an autumn event (when the salsify is readily available in the garden) at which I'm serving food hot (this is not going to travel well after being made up in advance), and even then the main interpretive thrust is just that Victorians cooked with a plant called salsify or oyster plant. As far as I've read, the plant's main point of interest is that it's supposed to taste like oyster, though I haven't had the real thing to compare it with. It does remind me of the mock oysters of corn I've previously made, but only in that both taste like deep-fried-breaded-things.

How Accurate Is It? Heritage crop! Aside from the two errors, I'd put this as fairly accurate. No modern substitutions.

Fried salsify with a parsley garnish.


Saturday, September 16, 2023

Supper Dishes for a Large Company (1850)

Looking ahead to Candlelight, I decided to consult Miss Leslie's Lady's New Receipt Book (1850) for some inspiration. After laying out menus for plain family meals, very nice family meals, company meals, and large dinner parties for each of the four seasons, it gives the following list of dishes suited to standing suppers (functionally a buffet). This is precisely what our event logistics require.

SUPPER DISHES FOR A LARGE COMPANY 

  • boned turkey with jelly 
  • partridge pie 
  • game dressed in various ways 
  • cold ham glazed thickly all over with a mixture of bread crumbs cream and yolk of egg 
  • two smoked tongues one placed whole in the centre of the dish the other cut into circular slices and laid round it 
  • cold alamode beef 
  • French chicken salad 
  • Italian chicken salad 
  • marbled veal 
  • potted lobster 
  • pickled lobster 
  • terrapins 
  • cream oysters 
  • fried oysters 
  • pickled oysters 
  • oyster patties 
  • biscuit sandwiches 
  • charlotte polonaise 
  • charlotte russe 
  • French charlotte 
  • calves feet jelly 
  • trifle 
  • Spanish blanc mange 
  • chocolate blanc mange 
  • coffee blanc mange 
  • maccaroon blanc mange 
  • vanilla blanc mange 
  • pistachio cream 
  • cocoa nut cream 
  • chocolate cream 
  • vanilla cream 
  • lemon custards 
  • orange custards 
  • green custard 
  • red custard 
  • meringued apples 
  • whipt cream 
  • meringues 
  • iced grapes 
  • orange water ice 
  • damson water ice 
  • vanilla ice cream 
  • lemon ice cream 
  • almond ice cream 
  • chocolate ice cream 
  • biscuit ice cream 
  • maccaroon ice cream 
  • preserved pine apple 
  • preserved citron melon 
  • preserved limes 
  • preserved oranges
  • brandy peaches 
  • brandy greengages 
  • port wine jelly 
  • pink champagne jelly 
  • frozen punch &c 
  • plum cake 
  • lady cake 
  • almond sponge cake 
  • frothed chocolate with dry toast

From these may be selected supper dishes for a small assemblage, or for a company of moderate size. 

Based on the usual cast size, I'd rank the Tolmey's party as a "small assemblage." While Miss Leslie does not specify how many dishes to use for each size of group, my old standby extrapolated from other bills of fare is 1/2 dish per course per person; including dessert this tends to work out to 1.5-2x as many dishes as guests.

Saturday, September 9, 2023

Straw Crowns

I couldn't make it to Harvest Home this year, but did finish the new crowns for the harvest king and queen.

The pictures were a bit rushed, I'm afraid.

This time, I plaited both crowns in whole-straw (7-strand Dunstable to be precise) rather than split for a more substantial crown, and worked the decorative elements directly into the plait itself. I also tweaked the fit, and sewed the bands into the crown shape, with the ends plaited in, rather than trying to knot the ends. The effect is a stronger and more substantial than my first attempts, though still light.

The crown on the left has spreuer leaves, and a quilled rosette at the center front, covering a sewn join in the band. The crown on the right has spreuer wheat sheaves in both positions. 

While I haven't found any original straw crowns or depictions of harvest kings/queens, the materials are all appropriate to the mid-19th century, being wheat straw and a bit of cotton thread. The decorative motifs are from Swiss Straw Work: Techniques of a Fashion Industry by Veronica Main, and do show up in period hat-ornaments, though the manner they are used here if my own invention.

Friday, September 1, 2023

Original: Black Lace Bonnet Veil, c.1850-75

Bonnet veil, c.1850-1875. LACMA.
 

This bonnet veil is true silk lace and a lovely example of the fine accessories available in the third quarter of the 19th century. The "spots" over the face are a popular element c.1860, while the border is more heavily decorated with floral designs and intricately scalloped edges. The changing bonnet shapes of the era makes me suspect this half-oval-shaped veil is from closer to the middle of the century (1850-1865) rather than the last ten years of its range (1865-1875).

Thursday, July 20, 2023

Rag Rug, Part 2: Dyes

With references to dyeing both warp and weft, I decided to try some natural dyeing on my rug materials. 

I first applied an alum mordant to 7 of the 9 skeins of wool rug warp, using the recipe described in Wild Color by Jenny Dean.

Marigold Dye Bath
 

I then made 3 different dye vats. The first was with dried marigold flowers from my last two harvests (about 2 oz pure petals and 3 oz of full flower heads). For the second, I used about ~4oz of powdered madder root.. For both of these dye baths, I first dyed the prepared wool (letting it soak for about 3 hours), then put in mordanted linen thread and some test strips of white cotton (with and without mordants) for the whole afternoon/evening, and finally threw in my unmordanted rag weft to soak overnight.


Marigold and Madder Dye Results.
I tried to keep the madder below boiling, to get more of a red than an orange shade, but as the wool dried it shifted from a deep scarlet color to a tomato red, and finally a bright orange. The cotton, meanwhile, dried pale pink. The marigold wool came out dark goldenrod color (in person, it more resembles the image above than the one below), with the cotton coming out a pale Easter egg yellow
 
Marigold-dyed and undyed wool.
 
For the third, I used Dharma's pre-reduced indigo to make a 3-gallon dye vat. I over-dyed two of the marigold-dyed wool skeins, as well as the two un-mordanted skeins. This produced a very dark green (tending black) and a deep indigo blue--the former darkened as it dried, and the latter lightened from a navy blue. I tried overdyeing some pink and yellow rag weft, but instead of purple and green, I got the same deep blue as with white rags. Subsequent batches of rags came out slightly lighter, but still a fairly dark blue.

Green and blue wool dyed with indigo.

Wednesday, July 19, 2023

Rag Rug, Part 1: Research

Fiction

In Our Cousins in Ohio (1849), one November task is cutting wool clothing scraps for rugs. The pieces are sewn together and rolled into a large balls; when woven, the weft may be visible, created a mottled effect. It might also be woven in stripes/plaids or else dyed a solid color.  Here, the narrator claims that such rugs are common in America, used in the kitchens and dining rooms of the rich, and throughout humbler houses. 

"What Small Hands May Do" (1851) has a 14-year-old surprise her family with a new parlor carpet. She saves up scraps over the course of a year, cutting them into strips, and paying the local weaver $3 to make the carpet. The weaving takes four days, and the warp is included in the price. Red, blue, and white rags are specifically included to add decorative "figures." The woven carpet is pieced to fit the floor.

In the didactic story Home Comforts: Or, Economy Illustrated (1855), a rag carpet is made up in odd moments, using scraps of old clothes. The warp and weaving were paid for with additional rag-weft (both weaver and the family providing the rags got half of the final rug). 

The story "Making the Best of Everything" (Peterson's, 1861) has one cousin teach another to cut old clothes for a rag carpet: the colors are cut separately and dyed, then sent off to be woven (implying visible weft). This is considered a summertime task.


Piecing cotton and linen cabbage for the weft.

Non-Fiction

The Harbinger (1846) newspaper describes a whole industry in New York, in which rag-pickers sort, clean, and stitch rags into 1/2" strips which are sold to weavers to make rag rugs.

Miss Leslie (1850) disapproves of rag rugs being used in kitchens (on the ground that they get greasy and soiled), but recommends them for other service rooms or "where much economy is necessary." She mentions only wool fabrics (cloth from old garments, along with baize, flannel, or scraps of ingrain carpets).

Letters to Country Girls (1853) gives green dye instructions specifically for carpet warp (indigo over any shade of yellow), and recommends using  "ley and copperas" to make a colorfast yellow rug. Mrs. Swisshelm goes on claim that the hard-packed (warp-faced) rag rugs woven by professionals wear out quickly; she recommends requesting a more "thin" and "loose" weave.

Eliza Lea's Domestic Cookery, Useful Receipts, and Hints to Young Housekeepers (1859, 1st ed 1851) gives instructions for "How to Make a Rag Carpet." It recommends a warp of purple, green, yellow, and red (in stripes arranged according to your own fancy), and advises that the weft rags be made from 2/3 wool scraps and 1/3 cotton. It also observes that carpet warp is usually cotton, and (in name-dropping red flannel) indicates that the appearance of the rug is affected by the color of the weft. 

Agricultural prizes from Massachusetts (1853) mention a rag rug made with cotton weft submitted in the domestic manufacture division.  Rag rugs (braided and woven) are mentioned in a number of similar agricultural contest reports, one of which opines

"These [rag rugs] are articles in which the taste of the maker should combine beauty with utility to form, from unsightly and useless material, a serviceable parlor ornament. Arrangement of color should be carefully studied, and neat patterns selected or devised which are adapted to the colors at command."

The New York Institution for the Blind (1856) particularly recommends rag-carpet-weaving as an occupation for its graduates. The report mentions that every farmhouse in the area uses rag carpeting, and that one of its former pupils has already made a career of it. In his case, he both weaves commissioned carpets, and also sells carpeting he's already woven (pointing to a market for buying rugs, as well as preparing one's own rags and hiring a weaver). Some reform schools have the children cut the rags for carpet weft.

The Canadian Settler's Guide (1857) praises making rag rugs for use in the 'parlor, staircase and bed-room' of one's log house. It recommends saving cotton, linen, and woolen clothing too worn for reuse, cutting the fabrics into 1/4" strips (1/2" for fine muslins), and paying for it be woven on a 2-ply cotton warp. It mentions cutting turns in the fabric to save time on piecing, but claims that piecing perfectly straight strips gives a superior product. Cleaning the rags before use, and dying the white cotton, is also recommended. Recipes for dying the warp blue, yellow, and black are also provided. [Of course, clothing that is still wearable should be given to the needy, not cut for rag rugs.]

Both Peterson's and Arthur's Home Magazine (November 1865) discuss knitting rags into rugs. Where the woven rugs can be treated as carpeting (sewn together to fill a room or used in smaller pieces), the knitted rugs are suggested as mats or bedside rugs. The tone of the article indicates that this craft is not widely practiced in America as of 1865, though the author advocates for it.

In a letter dated December 1, 1855, Catherine Blaine mentions having a "very pretty" rag carpet in the parlor/sitting room of their Seattle home. In a June 9th, 1856 letter to his siblings, her husband David Blaine asks about a previous letter, in which his mother apparently visited the local weaver (in Seneca Falls, New York), asking "But what can you be going to do with a rag carpet? Is it to be used on Derinda's kitchen?"


Rag rug, c.1830-1870, from Historic New England.


Artifacts

I can't find many 19th century rag rugs in any of the usual online repositories, fewer still woven rag-rugs (hooked are more common, braided scarcer still).

The Met has a single rag rug, described as cotton and wool, c.1800-1850, and woven in stripes. Looking closely at the supplemental images, it appears to be warp-faced.

The Smithsonian has a piece of weft-faced rug from Maine (dated "late 19th century"), and a plaid cotton-rag rug from North Carolina (1832). 

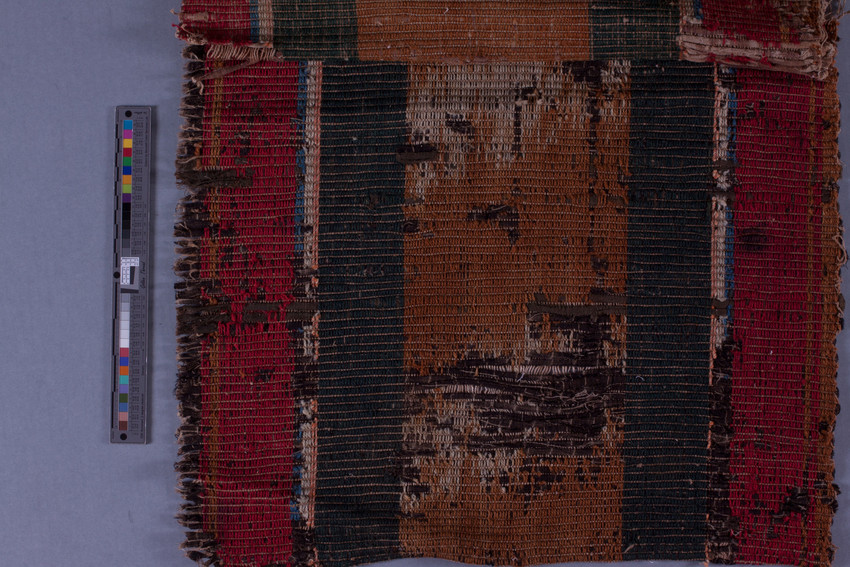
Historic New England has a fair few warp-faced striped woven rugs which came up in my initial search, though they have since been updated without reference to rags (and the close zoom appears to have a yarn fill rather than rags in most cases). And then, the holy grail (shown above): a warp-faced striped rag rug, with both warp and weft described as wool (though the overall item description reads "wool, cotton").


Conclusion

Although a humble article, rag rugs are associated with neatness and comfort. The most common structure for them (in the 1840-1865 period, in the literature I consulted) is woven, though weak evidence for braided, knit, and hooked rag rugs exists. Stripes appear to be the most common pattern in surviving rag carpets, and are also well-represented in contemporary literature. While many of the written sources treat the rags (weft) as being visible in the final product, the few surviving examples appear to favor warp-faced rugs where the rags are barely visible. 

A mixture of wool and cotton materials is recommended, and most mentions of warp fiber are cotton. Surviving rugs are biased towards wool, though the descriptions are not always clear which is warp and which weft.

The most universal depiction of rag-rug making in period literature is that of the thrifty girl or woman working at home, cutting otherwise unusable wool and cotton scraps into 1/2" (or occasionally 1/4") strips, sewing these into 3-yard pieces, and rolling them into large balls, which are then sent out to be professionally woven.

Wednesday, July 5, 2023

HFF: 6.11 Picnic


Detail from an 1850s painting with a woman's hands gesturing over a table of food.


The Challenge: Picnic. Make picnic food or a dish that's easy to eat outside.

The Recipe: Blackberry Pie from The Young Housekeeper's Friend
 
I took this to the July 4 reenacting event (held on July 2), so I'm counting it as a picnic food.
 
The Date/Year and Region: 1846, Boston

How Did You Make It: After reading all the contradictory instructions on pastry, I started with the "good common pie crust" of flour and butter, omitting the lard, salt, and saleratus discussed in the general paste instructions. The proportions given made no sense (1 heaping handful of flour per pie, 2 large spoons of butter for 3 pies), so I tweaked them to 2 heaping handfuls of flour for 1 double-crust pie, 4 tablespoons of butter, and 1/4 cup of water to help form the paste with the flour and half the butter. The rest of the butter was cut small and rolled into the crust in two layers.

Before starting on the paste, I buttered the pie tin, washed 2 pints of blackberries, and pre-heated the oven to 400F. Once I had the paste made, I cut out the top crust, set it aside, and re-rolled the scraps to make the bottom crust. I placed the bottom crust in position, added the pint of berries, sprinkled it all over with 5 large spoonfuls (soup-spoons) of granulated sugar, then swiped around the edges of the crust with water, and sprinkled both fruit and crust-edge with flour. Per the instructions, I tried to keep the berries level with the top of the tin. I laid the top crust in position, pinched it at the sides, and cut off the small bits of excess crust (while also patching one small hole). I pricked the initials "US" into the top crust with a fork, then baked it at 400F for 45 or 50 minutes.
 
Time to Complete: About 20 minutes to prepare and 45-50 minutes to bake.
 
Total Cost: $6 for blackberries, all else on hand

How Successful Was It?: Tasty enough. The crust wasn't oozing butter like my puff paste usually does, and I'm working on not overworking the pastry.

How Accurate Is It? I'm actually feeling pretty good about this one. The crust had a lot of guesswork, but for once this was the result of having lots of different options made explicit in the text (lard versus butter versus both, saleratus or not, etc.). I did try the trick explained in the text for using water and flour to seal the crust (which worked in the oven--no berry juice bubbled out--even if it ended up leaking juice in transit). Other advice I used from the general pastry instructions included using off-cuts of paste for a bottom crust (but not a top crust), and keeping the pastry itself much thinner than the fruit layer. I also had a replica tin to bake it in.

Blackberry Pie

Tuesday, July 4, 2023

Independence Day, Washington Territory

Reading through the earliest newspapers in Washington Territory offers a glimpse into how July 4 was celebrated in the territory during the 1850s.

1852: No newspaper existed in "North Oregon" on July 4, but the first issue of The Columbian in September reprinted an "Oration delivered by D. R. Bigelow at the celebration of the Fourth of July in this city [Olympia]."


1853: The July 9 issue of The Columbian included an article outlining the "Proceedings of the Fourth" in Olympia, which included a sunrise gun salute; a choir performing "America",  "The Star-Spangled Banner", and "Hail Columbia" at the Methodist church; prayers; a reading of the Declaration of Independence; a procession; and an outdoor meal in an arbor by the capitol.

1854: The Pioneer and Democrat described flags flying throughout Olympia, and gun salutes made at dawn, noon, and dusk. However, as the holiday fell on a Sunday, no major events were planned and the day was spent "quietly" and with "utmost propriety." The paper does report that a private group took a pleasure cruise on two ships, and held a ball and supper in the evening.

1855: Per the Pioneer and Democrat, a large party from Olympia gathered at Issac Wood's farm, where they were greeted by a flag flying overhead. A nearby clearing was equipped with seating for 150 people and a speakers' stand for the speeches. Starting at noon, there was a procession led by a band; the reading of the Declaration; an oration; and a large meal with "beef, mutton, roast pig, turkey, chicken, venison, and every vegetable in season," followed by toasts and more speeches.

1856: The July 11 issue of the Pioneer and Democrat reported that the Fourth was observed with a boat trip and picnic, an evening ball, and multiple gun salutes, as well as numerous flags.

1857: There was no coverage in the Pioneer and Democrat. Other museum volunteers claim that no public festivities were held on account of the political situation at the end of the Puget Sound Wars.

1858: Again, the Fourth fell on a Sunday, and was observed as a "quiet Sabbath," with the only public celebration being a sermon by Rev. Whitworth of the Presbyterian Church. However, this year, the Pioneer and Democrat reported more events happening around the day itself: Saturday July 3 apparently started the festivities with a minstrel show and midnight gun salute, which were followed by the burning of tar barrels (?) and a dance on the evening of Monday, July 5.

1859: This year saw a much larger assembly in Olympia, estimated at 1200-1500 attendees. There was again the dawn cannon salute, and in the late morning a procession with the Olympia Band and various fraternal orders in attendance. This ended in a  "shady grove adjacent to the capitol building" for an invocation, an oration, a reading of the declaration, and the band playing "The Star-Spangled Banner" and "Hail Columbia." Another gun salute was fired at noon, followed by a reading of Washington's Farewell Address (noted as a new addition to the festivities) and then a free supper including "roast beef, sheep, shoats, pigs, etc. and as for pies, cakes, etc. there was no end to them." The program concluded with a procession back into town. Later that afternoon, some groups sailed on the sound. More gun salutes followed in the evening, which ended with a firework display and a grand ball. 

Monday, July 3, 2023

Hff 6.10: First Fruits


Detail from an 1850s painting with a woman's hands gesturing over a table of food.

The Challenge: First Fruits Make a dish involving fruit in some capacity.

The Recipe: Salad of Mixed Summer Fruits from Eliza Acton's Modern Cookery for Private Families.
 
The Date/Year and Region: 1865, London

How Did You Make It: Washed about a pint each of golden raspberries, red raspberries, and blackberries. Picked mint leaves and arranged them around the plate. Following Francetelli's instructions (except for using a flat plate instead of a deep dish), I started by making a large circle with the golden raspberries, selected the most solid and uniform berries to start, and then filling in the circle. I then repeated this process with a layer of red raspberries making a slightly smaller, then a layer of blackberries, then golden raspberries again, ending with a single red raspberry at the top of the pile. 

The recipe then calls for pouring wine over the lot, or else using Devonshire cream. As my guests mostly don't drink, I opted for the later. Instructions in the same cookbook also call Devonshire cream 'clotted cream', and since I was worried about safe food handling during the 'heat cream for 12 hours' step, I opted to use a purchased clotted cream, which I daubed around the perimeter at intervals.
 
Time to Complete: About 20 minutes.
 
Total Cost: ~$12 fruit, don't recall for the clotted cream (and used very little wine)

How Successful Was It?: I'm fairly pleased with how the berried came together: the color contrast looked well, and they didn't roll all around like the cherries I tried before. The cream was in no condition to pour or spread, and the instructions were not clear on how to apply it, which it why I put it off to the sides. Also, my cooking mentor had compared it to butter, so I wanted to preserve the option to take the fruit with or without the clotted cream. 
 
Berries are berries, which I love. The clotted cream didn't go over well: one guest couldn't handle the texture, while another didn't like the flavor with the fruit (but happily spread it over the Sally Lunn). Personally, I thought that the cream didn't really taste like anything at all. I later poured a sweet moscato wine over the leftover berries (not the cream!) and really enjoyed how the berries and wine went together.

How Accurate Is It? The recipe calls for strawberries, white and red currants, and white or red raspberries. I intentionally substituted blackberries (available in my area) for the currants (not available in my area), but completely forgot the strawberries.As previously noted, I'm not clear on how the cream was to be applied, but in any case, I think I'll stick with the wine version in the future, and opt for 'a plate of fresh fruit' instead of 'fruit salad' when I need a non-alcoholic summer fruit dish.


Tuesday, May 30, 2023

Soft Crown Straw Bonnet, 1858

From Frank Leslie's New Family Magazine, October 1858:

WILDE'S HAT--This pretty hat is in a style which is just now very fashionable; the groundwork is of fine white Belgian straw surrounded with a border of plaid velvet with a cap crown also of plaid velvet separated into puffings by narrow bands of velvet edged with lace. Encircling the crown is a row of rich Chantilly lace, which nearly covers the straw front, the points just touching the velvet border. Very wide strings barred with velvet, side ruche and bandeaus of small mixed blossoms completes this handsome October bonnet. 


Plaid silk velvet not being an option, I decided to use a silk tafetta for the crown, binding, and ties. I also changed the color palette to be more spring-like, with white lace and white velvet ribbon. The front flowers are not visible, so I chose to use a mixture of blue cornflowers and violets for the "bandeau of small mixed blossoms." I omitted the lace from the edges of velvet ribbon because I couldn't get the scale to look right. The picture seems to suggest a sort of double-layer curtain, but as this is not confirmed in the description, I decided to keep it a simple single layer.


Back view.

The pattern is based off of one of the Timely Tresses round '50s bonnets (possibly the smaller cutting line on the Ada Gay). The brim is machine sewn from hemp braid. The rest of the bonnet is hand-sewn. The ties are narrow-hemmed strips of the same taffeta used for the crown, binding, facing, and bavolet, with both curtain and crown lined in cotton net for extra body; I believe this fabric came from Portland's Fabric Depot. The lace overlay and frill are both cotton levers lace from Fine French Laces.

From the front. The flowers aren't so dark as they appear.