Showing posts with label modern. Show all posts

Saturday, November 30, 2024

November Mending

 No new historic projects finished this month: there are a few in progress that I hope to complete in December, but otherwise most of my sewing time went into repairing modern clothing. Most recently, this involved patching my winter woolen tights, though I did get another round of mending my 16th century linen hose before putting them away for the season.

Less daunting than I feared to patch these tights, and they're wearing just fine.

Sunday, March 5, 2023

Bathrobe

This project is not of any historical import, but I always gets a little excited when I make something for daily wear. It's quite simple: I just traced my worn-out robe, and added to the seam allowances where it had gotten a little tight at the sleeve.

The finished garment is cozy and comfortable. It's fully made of purple terrycloth, with self-fabric facings are the neck, two pockets, and turn-back cuffs. The tricky part on this one finishing such thick fabric: I used French seams on the interior, and the four layers of terrycloth was about all my machine could take.

Friday, February 24, 2023

CSM Knit Rose

It's still winter, and the flowers aren' t growing. I suppose it's time to make some.


One knit rose.

I used Violante Fioravanti's CSM Rose pattern, using the option for 5 petals of 12 stitches each. To make life harder on myself, instead of installing the 60-cylinder, I knit the project flat on 60 needles on the 80-cylinder. The yarn is Knit Picks' palette, left-over from stockings. 

The green base ended up being larger than the petals (? both were knit on 60), so I decided to double it up and make some petals, which I think make a nice touch.

Tuesday, January 3, 2023

More Muffattees on CSM

It's the 9th day of Christmas, and time for more Christmas presents:

Two pairs of knitted muffatees, both knit in the round in a ribbed pattern. One is pale pink and relatively light weight, the other sage green and heavier.
A Study in Gauge

When I was looking for muffattee patterns to adapt, the simplest was to simply knit a 3-3 rib to the desired length (either in the round or knit flat and then seamed). For examples, see "Lambs' Wool Muffatees" in Woman...An Epitome of Social Duties (1843) and "Plain Ribbed Muffatees" in My Knitting Book (1845) among others. 

Since I'm still not up to using the ribber on my Autoknitter, I decided to follow instructions from the 1868 Bickford Family Knitter instruction manual, which treats the mock-rib technique (removing needles) as equivalent to ribbing. However, I've found that 3-3 really doesn't looking like ribbing when worked this way. Fortunately, Mlle Riego's The Winter Knitting Book (1859) gives a "Simple Muffatee for a Gentleman" worked in 2-2 ribbing in the round, which I took as permission to do a 2-2 mock rib. Her version is doubled to create a lining and has no thumb gap, but considering the intended recipients, I decided to make those changes. [These are for my coworkers, who spend a lot of time typing in a cold building.]

The pink muffatees were knitted with a very light lace-weight wool from my stash, on a tension of 5L3 (if I recall correctly). I failed to note the tension on the green, which made with a heavier sport-weight wool from the stash). The pink ones ended up very lacy in their effect, particularly when worn, while the heavier yarn make the green look more like true ribbing.

Friday, September 30, 2022

First Pair of Socks

I finally knit my first pair of real socks on the Autoknitter (also ever), using Roxy's "10 Minute Socks" pattern/recipe. It took me a bit longer than 10 minutes, but I found it a really useful live-trial of working increases/decreases for the toe and heel (not to mention kitchener-stitching the toe).


Et voila:

Socks! In 2-1 mock rib.

I used the 80-cylinder for these. The yarn is Aktiv's "Finnmark" self-striping sock yarn.

Wednesday, September 14, 2022

Early Harvest: Summer & Winter Squash

It's been a weird (unusually dry and warm) summer in the garden, which I assume is the reason that several of my winter squash reached their full color and size before most of the summer squash reached edible size. 
 
I expect my plants to be a little idiosyncratic and not always optimized for the climate I'm in: I focus on growing mid-19th century and earlier heritage varieties, because that's what I want to cook with. For instance, my only pumpkin to produce fruit last year (a Connecticut Field pumpkin) was still green when I had to clear my plot. It ripened off the vine, and I ended up saving seeds from it. This year, two of its four offspring had produced orange pumpkins by early September (one of the other two is larger, but dark green, and the fourth plant still only has a tiny fruit on it).

First haul of squash from the garden: two pumpkins, two Boston Marrow (winter) squash and a yellow crook-neck (summer) squash.


Tuesday, May 31, 2022

Knit Wristlets

 Not really a historic design (though I've seen other wristlets in 19th century knitting books), but I'm pretty excited about these wristlets. 


They're brown wool (the yarn was somewhere between a fingering weight and sportweight), but the part I'm excited about is what I made them with: a c. 1920s Autoknitter circular sock machine.


I've mostly just been knitting tubes of scrap yarn (and a few flat webs), but the wristlet project allowed me to practice several important sock elements, such as hanging the hem and not dropping stitches.

Thursday, May 27, 2021

Cosmetic Workshop

 I will be teaching a workshop on mid-19th century cosmetics at Fort Nisqually on Saturday, June 5. If you've ever wanted to make your own Victorian make-up, here's a chance to do so without needing to source all your own supplies. 

You can register here. Registration closes on Monday (June 1).

Wednesday, September 30, 2020

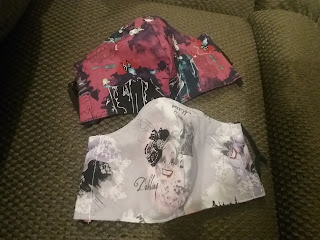
Yet More Masks

 It's the never-ending project, but the fabrics provide some novelty. I've started using longer wires along the upper end of these seamed masks (~8" instead of ~3"), as it gives a closer and more comfortable fit along the nose.

Two cloth facemasks printed with Disney villainesses.
Featuring Red's favorite villains.

Sunday, September 20, 2020

Virtual Sheep to Shawl

First time trying one of these; with distancing, it ended up being a sort of relay with the different participants. As the team weaver, I was measuring and dying the (purchased yarn) warp while the other three members were preparing the fleece and spinning it up. 

Measuring out 275 ends of 100" each. .

Need to remember to allow for shrinkage on dyeing.

The spinners dropped off four full bobbins of a yarn.
I used 3+.

The warp is Harrisville Shetland yarn; I dyed it with Dharma's "forest green" fiber reactive dye. The weft is grey/"natural-colored" Romney ewe fleece, spun in the grease. Most of it was done as a 2-ply "thick & thin", to maximize consistency among the 3 spinners' singles, with one bobbin of Navajo (3) ply that worked out to the same diameter.


Finnish Birdseye Twill is fun.

I used a Finnish Birdseye threading (4-3-2-1-4-3-4-1-2-3) on my 4-harness table loom, because it's a pattern I enjoy in two-colors. Within that, I opted for the zig-zag, since it's fun and the treadling is easy to remember when working at speed (treadle 12, 14, 43, 32--just a 2-2 twill). The warp had 275 ends; I used a 12 sett with 2 threads floating for selvedges on each side.

A (1) shawl, woven in a single 4-hour stretch.

To finish, I made a simple two-level fringe using square knots, then steam-pressed the whole shawl with an iron. The steam-pressing is fairly fast, and I like that it doesn't shrink the final piece as much as more vigorous fulling/finishing processes.

The handspun has some lovely subtle color gradations.

Zig-zags are fun.


The completed shawl is 20" wide and 72" long, with 2" of fringe along the short sides. It involved three spinners (who did all the fiber prep, spinning, and plying), and one weaver (warping, weaving, finishing). Prep (dying/warping) was not counted for the final time; my timed part was 4 hours of weaving plus 40 minutes of tying fringe, trimming threads, and steam-pressing the final product. 

Wednesday, September 9, 2020

New Ironing Board Cover

Finally down below 100 drafts on this blog. Huzzah!

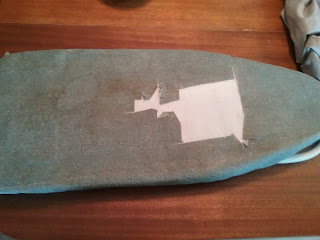
In celebration, I decided to finally fix my ironing board. It's had an adventurous life so far, but the already-stained-and-somewhat-worn cover suffered a major mishap with a rotary cutter when I was cutting out masks this summer.

Ironing board on a tabletop; the ironing board has several large squares of material missing from its cover.
I was taught better than this. Honestly. 


Fortunately, while I was ransacking my stash for mask material, I can across two packs of thermal-insulating padding and some heat-resistant yardage. I believe these were inherited from my aunt's stash. After long years of waiting, their moment has come.


The same ironing board as before, but the stained and cut blue cover has been replaced by a flawless grey cover.
I (very professionally) fitted this with
knotted shoelaces as drawstrings

Wednesday, April 8, 2020

Mask Update

My first batch(es), totaling 48 cloth masks, have been mailed to their various recipients. I still have a few dozen cut out, but am giving myself a day off before I get back to work, as these don't have a particular destination in mind. Undoubtedly, one will come up shortly. 

Fourteen cloth masks with self-fabric ties, mostly in yellow and purple prints, with a few bright red ones mixed in.
Masks #28-44.

The first twelve were two-piece shaped masks with elastic ear-loops, per the #2 design on this pattern. They went to an acquaintance's medical clinic, for covering the staff's N95 masks against soiling. The first 15 of the one-piece masks (from this pattern) went to the same place for use by patients. Having no elastic, I used the second pattern for rest of the masks, sent to various friends and family members who are caring for vulnerable relatives or required to work in 'essential' positions.

I used medical friend's specifications for all the masks: quilting calico for the exteriors, lining of cotton flannel or t-shirt material. Many old Girl Scout t-shirts volunteered for the cause. All the fabric was pre-washed on high against shrinkage, and laundered a second time before mailing.