Showing posts with label knit. Show all posts

Friday, February 14, 2025

Knit Undersleeves (1855), Take 2

Revisited the November 1855 Warm Undersleeve pattern from Godey's, once again on my circular knitting machine. Having learned from last time, the main change I made was reducing the frill to 4 whole motifs (with the extra 8 stitches divided between them and added into the plain sections; this was necessary because the repeat is 18 stitches and I was using my 80-slot machine cylinder). It was much faster and easier to work the pattern that way, and I think the symmetry it quite becoming. The one downside is a slightly less dramatic scallop effect. I also positioned the upper frill higher on the sleeve (~2" rather than 1" above the lower), which I think looks nicer.

New sleeves for Friend E.

For this pair, I used the Knit Picks pallette yarn which I like for socks on this machine. One skein did the first sleeve and both extra frills, with a bit left over. I knit the sleeves and frill headers at two tension-dial-rotations above the loosest setting, switching down to the loosest for the 'Old Shale' pattern, to make it lacier.

Tuesday, July 30, 2024

Tudor Garters

Knit garters, based on the Typical Tudor recipe for...knit garters. Appropriately worked in garter stitch, with two strands of undyed wool singles.

Garters as knit.

I made mine long enough for cross-gartering, only to find that my knees really aren't the right shape for it. Fortunately, the garters work just as well tied single. 

I tried to dye the garters blue (messed up my indigo vat this time, got a pale yellow that dried to absolutely nothing), then red/orange/pink/brown (madder vat, any color would be fine, except that I got a shade I call "world's palest oatmeal"), and finally yellow/green (pomegranate...but instead ended up with darkest brown-black instead). Functionally, this was the only color I was not going for at any point, but they still work fine and it's not like my garters are ever visible under a kirtle. 

And dyed brown.


Friday, February 24, 2023

CSM Knit Rose

It's still winter, and the flowers aren' t growing. I suppose it's time to make some.


One knit rose.

I used Violante Fioravanti's CSM Rose pattern, using the option for 5 petals of 12 stitches each. To make life harder on myself, instead of installing the 60-cylinder, I knit the project flat on 60 needles on the 80-cylinder. The yarn is Knit Picks' palette, left-over from stockings. 

The green base ended up being larger than the petals (? both were knit on 60), so I decided to double it up and make some petals, which I think make a nice touch.

Monday, January 23, 2023

Purple and green Stockings

Finished a second pair of over-the-knee stockings on my Autoknitter. Like the first, these have a hung hem and short-row heel. I used Knit Picks' palette fingering-weight wool, primarily majestic purple, with grass green for the toes and heels.


 Sized for friend Q, the recipe on these was 20 row hung hem at 4L1, 60 rows same, 30 rows 1L2, 30 rows 4L2, 30 rows 1L3, heel at the same, 59 rows same, toe. The heel shape is appropriate to the 1920s instructions with my machine, but is not a possible construction method for csms used in the late 1850s (though the machines did exist--they couldn't reverse direction, and instead used hand-sewing to finish the heel and toe).

Tuesday, January 3, 2023

More Muffattees on CSM

It's the 9th day of Christmas, and time for more Christmas presents:

Two pairs of knitted muffatees, both knit in the round in a ribbed pattern. One is pale pink and relatively light weight, the other sage green and heavier.
A Study in Gauge

When I was looking for muffattee patterns to adapt, the simplest was to simply knit a 3-3 rib to the desired length (either in the round or knit flat and then seamed). For examples, see "Lambs' Wool Muffatees" in Woman...An Epitome of Social Duties (1843) and "Plain Ribbed Muffatees" in My Knitting Book (1845) among others. 

Since I'm still not up to using the ribber on my Autoknitter, I decided to follow instructions from the 1868 Bickford Family Knitter instruction manual, which treats the mock-rib technique (removing needles) as equivalent to ribbing. However, I've found that 3-3 really doesn't looking like ribbing when worked this way. Fortunately, Mlle Riego's The Winter Knitting Book (1859) gives a "Simple Muffatee for a Gentleman" worked in 2-2 ribbing in the round, which I took as permission to do a 2-2 mock rib. Her version is doubled to create a lining and has no thumb gap, but considering the intended recipients, I decided to make those changes. [These are for my coworkers, who spend a lot of time typing in a cold building.]

The pink muffatees were knitted with a very light lace-weight wool from my stash, on a tension of 5L3 (if I recall correctly). I failed to note the tension on the green, which made with a heavier sport-weight wool from the stash). The pink ones ended up very lacy in their effect, particularly when worn, while the heavier yarn make the green look more like true ribbing.

Tuesday, December 27, 2022

1855 Warm Undersleeve, Circular Knitting Machine Edition

Revisiting these 1855 knit undersleeves, which I have previously made all the component for (sleeve, ruffles), but never finished due to frustration with the instructions.

Line drawing of a knit sleeve ending in a double layer ruffle of lacey openwork.
Warm Undersleeve.

A few changes to make this project circular knitting machine compatible:

First, brioche stitch isn't happening. I can do a double knit by running two threads, or I can just plain knit it. I decided to make a plain tube this time, since it's my first attempt at doing this pattern on a machine, and also the dress I'm going to wear this with is a nice warm wool in the first place.

The frills, as written, have a bit of a problem: they include decreases (knit 2 together) with no corresponding increases. I tried it as written, and again with yarn-overs to balance out the knit-2-togethers, but only got a closely-set eyelet motif. Helpful fellow volunteer Cynthia identified the original pattern as "Old Shale" and recommended the following variation as producing something more like the illustration (especially if the frill is worked on thicker needles than the sleeve itself):

Row 1: Knit

Row 2: Purl 

Row 3: Knit two together (3x), yarn over & knit 1 (6x), knit two together (3x). Repeat for the whole row

Row 4: Knit

[Per the original instructions, repeat the four rows 5 times (for 20 rows total) in white, then knit all four rows once in a colored yarn.]

If I make the fourth row a "purl", I can knit this in the round on the machine, though at the cost of the the ridged effect between repeats. For all the flaws of the illustrations, I think the stronger horizontal lines are meant to indicate this ridge.

The pattern is a 96 repeat, and the original calls for 90 stitches, but the largest cylinder I have is an 80, so I'll need to repeat the motif in row 3 four times, which will leave 8 stitches left over. I decided to solve this with a partial motif as follows:

1-2. Knit.

3. On the third, k2to 3x, then (yo k1) 6x, k2to 3x; repeat this 4 times, and for the last 8 needles k2to 3x, yo, k1, yo, k1, yo. [On the machine, this look like: starting at the 3 o'clock mark, move the stitch on the second needle to the first, then the stitches on needles 3 & 4 to needle 2, then the stitches on needle 5 & 6 to needle 3. Leaving needle 4 empty, move the stitch from needle 7 to needle 5, leave 6 empty and move the stitch from needle 8 to needle 7; needle 8 is also left empty and needle 9 keeps its stitch in place. Count to the end of the motif, and double up the stitches on needles 13-18 so that there are two stitches each on needles 16-18 (as at the beginning of the motif), while needles 13-15 are temporarily empty. Then move the stitch from needle 12 to needle 15; leave 14 empty; move the stitch from needle  11 to needle 13; leave 12 empty; move the stitch on 10 to 11, leaving 10 empty. Repeat for a total of 4 and half repeats around one circuit.]

4. Knit. 
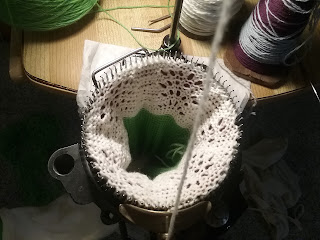

A circular sock knitting machine with a lacy piece of knitting in progress.
Frill on the machine (working the 5th fancy row)


As previously noted, after the 3 plain rows of the header, this four-row figure is repeated 5 times in white, and then once in color, then bound off. Of course, I was halfway through the fourth piece when I realized that the 8 extra stitches could be divided up between the motifs (2 extra plain stitches at the center of the sets of doubles, for instance), which would be a bit more symmetrical than having an extra half-motif.

I set my machine to the loosest possible tension for working this frill, after knitting the sleeve itself on the tension setting one rotation higher/tighter. [I denote it "1L1" in my notes, because the dial reads "1", and it's at the lowest dial position that can read "1"].

For the main sleeve, I set my knitter to "1L2", knit 20, hung the hem, then knit 130 rows, then adjusted the tension down to the its very loosest setting ("1L1") and started on the frill.


White knitted tube with a scalloped effect and eyelets. The piece terminates in a narrow blue border, above which it is attached to bright green waste-yarn worked in plain stockinette.
Frill with waste yarn. It scallops and has eyelets, at least.


After finishing the sleeve with it's frill, I ran some waste yarn, then did a single frills with its 3 rows of header (on 1l2, before adjusting back to 1L1 for the frill), then ran the other sleeve with its built-in frill and the second separate frill.

Blocking the completed frills and sleeves.

Off the machine, I bound the edges of each of the four frill edges, then whipped the separate frills onto the sleeves. I had intended to bind the edges before blocking each component flat, but holiday logistics meant I needed to complete the blocking before I had the chance to binding off more than one edge. I think this actually helped the scallops set better. 

Whipping the active stitches on the frills (the topmost of those 3 plain rows) onto the sleeves was actually the worst part. I could not keep a consistent horizontal line across the sleeve (counting was complicated by the frill covering that part of the sleeve, the lace motif itself made both frill and sleeve pucker into scallops, and attempting to eyeball the frill placement sent it rapidly veering onto diagonals). In the end, I ran a thread of waste yarn along a ruler in an approximately flat line, and stitched over it. For one frill, I removed the waste yarn as I bound the open edge, for the other I transferred the live stitches onto a circular hand-knitting needle to hold them; the waste yarn ended up being marginally easier to handle.

Et voila:
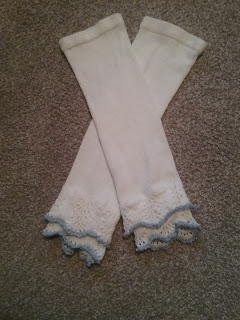
Two white knitted tubes with hung hems at the top edges, terminating in two layers of lacey scalloped frills, each edged with a narrow blue border.
At long last, the finished sleeves.
 
I'm glad these are done, and I like the scallops and the light touch of blue at the edges. If I were to make these again, I'd position the frill more than the indicated 1" up, so that the scallops overlap a little less. I'd also try knitting the sleeve on a smaller cylinder than the frills, so they can be gathered rather than put on straight. Knitting the sleeve on machine and then hand-knitting the scallops (so that the ridged rows happen) would also be an option to explore.

Sunday, December 18, 2022

Ribbed Muffatees c.1845, on CSM

Actually completed a few Christmas presents before the holiday this year, though most of my friends are still on track for New Year's presents. Or Groundhog's Day.

 
I knit these on my circular sock machine, based on these hand-knitting instructions:
Ribbed Muffatees 
No 12 PINS. Cast on each of three pins about twenty four loops, or any number according to the size you intend to make your muffatees, and with the fourth pin pearl four stitches and knit two alternately; every round is the same. They are generally made about five inches long." --The Practical Companion to the Work Table (1845)

The 1844 edition uses the same 4-2 pattern for "Lambs' Wool Muffattees", made to any desired length.

Tranlated to my Autoknitter, I set up a 4-2 mock rib on the 60-cylinder, with the tension set to 5L4. To knit, I made a narrow hem (knit 2 rows, pick up the first and knit the 3rd row together), then cranked 50 rows in the round. I then knit 14 rows flat to make the thumb-gap, and finished with 10 rows in the round. I used the double-pass off-machine bind-off on the top edge.

The material used for these muffatees was Knitpick's "palette" fingering-weight wool, in the currant colorway.

Tuesday, November 15, 2022

First Pair of Stockings

And my first pair of stockings on the Auto-knitter. I used the 80 cylinder, no ribber, and 4 oz of pale blue Jaegerspun fingering weight that I found in a thrift-store grab bag. The gauge was a bit off from my swatch, so I ended up cutting down the top of stocking #1, reducing the row-count on stocking #2, and subbing in a second yarn for the toe of the second stocking.


Historical accuracy on this piece is a bit...complicated. The use of a hem-top is recommended for wool stockings in the 1850s literature. However, the short-row heel is a 20th century standard for csm stockings. These stockings further differ from a handknit 1850s stocking in the heel shape, the lack of a back seam (ie, a purl stitch worked at the center back in opposite rows), and the manner of in which the leg is shaped (tension changes rather than reducing the number of stitches). However, circular knitting machines did exist in my target time of the late 1850s and early 1860s, used commercially and sometimes in the home. Like mine, these machines knit stocking without adding/reducing stitching and with no back seam. However, I haven't found pre-1868 instructions for a csm which use stitch tension to shape the leg, or knit the heel on the machine; instead, c.1860 machines produce only straight tubes, which need to be hand-finished at the band, and cut/sewn to shape the heel and foot. There is no leg shaping, and different sizes are achieved by removing needles to make mock ribs.

Which is a round-about way of saying that I have some lovely 1920s-to-present style basic stockings, which are slightly anachronistic for the 1850s/1860s in their heel/foot shaping techniques, and in the variable tension used to get a good fit through the leg (which is ok by ~1868). I'll be using them for earlier anyway, because this is my only option to get knit stockings that fit my legs comfortably, and the anachronistic elements are all well-covered by my shoes. I do have some ideas for making more accurate-to-the-1850s stockings on this machine, but it will involve mastering some more complicated heel variations. And manually making the seam.

Friday, September 30, 2022

First Pair of Socks

I finally knit my first pair of real socks on the Autoknitter (also ever), using Roxy's "10 Minute Socks" pattern/recipe. It took me a bit longer than 10 minutes, but I found it a really useful live-trial of working increases/decreases for the toe and heel (not to mention kitchener-stitching the toe).


Et voila:

Socks! In 2-1 mock rib.

I used the 80-cylinder for these. The yarn is Aktiv's "Finnmark" self-striping sock yarn.

Thursday, September 15, 2022

Onion Bags

Did some multi-tasking: I have onions that need to be stored after harvest, and an Autoknitter that I needed some practice on. The obvious solution was to knit small onion bags out of scraps of crochet cotton.

Onion socks! And two proper net bags.

I used the opportunity to mess around with the machine's tension, hang hems, learn mock ribs, and do a lot of kitchener stitch on the closed ends. My favorite onion sock is the one knit plain on the loosest machine tension (left of center), which produced the most open web.

Before jumping over to the machine, I did try to hand net bags for all the onions, but found that even with a generous mesh it simply took too long. I'll need to try this again when there's more time and the onions in question haven't already been harvested, cured, and in need of storage bags.

Tuesday, May 31, 2022

Knit Wristlets

 Not really a historic design (though I've seen other wristlets in 19th century knitting books), but I'm pretty excited about these wristlets. 


They're brown wool (the yarn was somewhere between a fingering weight and sportweight), but the part I'm excited about is what I made them with: a c. 1920s Autoknitter circular sock machine.


I've mostly just been knitting tubes of scrap yarn (and a few flat webs), but the wristlet project allowed me to practice several important sock elements, such as hanging the hem and not dropping stitches.

Monday, December 30, 2019

Knitting Apron, 1860

Finally finished the knitting apron from Peterson's May 1860--the one which has been haunting my to do pile at 70% compete for three and a half years.

The ground fabric is a sheer white cotton with a windowpane design woven into it; the ribbons are light weight silk 'tafetta'. All hand-sewn.

Knitting Apron in sheer white cotton with silk trim.
From Peterson's Magazine, 1860.

If re-commencing this project, I'd probably use a sheer with more body or even make it up in a moderate weight silk. I'd also do the self-trim in the (now, to me) straightforward way instead of installing it in the weird-backwards-mess-way that delayed this apron so long (I have some questions for past me).

Other than the fabric drape, my main concern is the pocket shape: they are extremely wide and shallow, which seems a recipe for spilled yarn. I already tacked the top center of each to keep the pockets from gaping, though I don't expect those stitches to hold (and rather hope they give rather than let the fabric tear).

Friday, January 11, 2019

Knit Cloths

Five knit washcloths, square and diamond shapes- varigated pink-white and white-red-green colors.

Warming up on knitting, with some cotton washcloths. Knit in stockinette, on size 8 needles.


Friday, November 16, 2018

Dressing for Winter

It's that time of year again.

Good winter event safety and warm clothing advice from millinery genius Anna Worden Bauersmith. See also her articles on clothing layers, and how Victorians kept warm in different situations.

Suggestions for children's and infants' warm clothing from Liz Clark. She also has relevant garment projects: a shawl, and a sunbonnet that can be made as a tufted hood.

Colleen Formby's sontag pattern also makes for a warm knitted garment. Virginia Mescher wrote a simple muffatee pattern, also knit. [I compiled a list of warm clothing projects at one point, but not all the links are currently active].

Need 1850s/1860s project inspiration? A quilted petticoata sontagfur cuffswinter hood and red riding hoodtufted hoods, and a girl's hood.

Wednesday, November 29, 2017

1855 Warm Undersleeves, part 2: Frills

To refresh, here are the frill instructions:
  Cast on 90 stitches with white wool, and knit 3 rows before commencing the pattern.
      1st row Slip1, knit 1, a pearl 1; knit 2 together three times; repeat from a, finishing with knit 2.
      2d. Slip1, knit 1, a pearl 1, knit 12; repeat from a.
      3d. Like 2d row.
      4th. Slip 1, pearl 1, a knit 1, pearl 12; repeat from a.
     Repeat rows 1-4 5 times (total of 3 rows plain and twenty rows pattern) in white, and then once (4 rows) in colored wool.
     These four rows form the pattern, which must be repeated five times with white, then once with blue, and cast off loosely. Two frills are required for each sleeve: the upper is placed about an inch and a half above the under, which is sewed by the edge of the sleeve.
These frills are a bit problematic, as there's an error in the instructions.  The many "knit two together" instructions in line 1 are not balanced by making new stitches anywhere; therefore, the total number of stitches drops by almost half every fourth line. Like this:  

Godey's 1855 knitted undersleeve frill, first attempt
The frill as written: after four repetitions,
there's only a dozen stitches left. 

I'm not the only one to notice this problem.  My solution to it, in attempting to keep as close to the written instructions as possible, was to simply add a yarn over before each 'knit 2 together'. This creates a series of small eyelets in each fourth row of the motifs.  It's not nearly as open as the illustration suggests, but it's a pretty effect, and should be plenty warm (and I'm not a sufficiently experienced knitter to get too creative here).  In the interest of making the motifs match-up, I decided to make the first and last 2 stitches into a stockinette stitch, and use sequences of 6 knits (or purls) between "ridges" on rows 2-4 instead of 12 (otherwise you get a 14-stitch repeat in the first row with a 13-stitch repeat subsequently).  The purl-heavy fourth row made me suspect that a stockinette effect was intended.  I initially tried carrying this through all four rows (first row largely as written, 4th row,  2nd/3rd row, 4th row), but thought that the eyelets tended to disappear; instead, I decided to go with "1st, 2nd, 4th, 2nd", so the three non-eyelet rows give a stockinette stitch with occasional ridges, while the eyelet row is opposite. 

So, my revised frills:
Cast on 96 stitches, and knit plain for three rows in white yarn. 
Motif:
1st row: Slip 1, knit 1, [purl 1, yarn over, knit 2 together] 13 times, purl, knit 2.
2nd row: Slip 1, knit 1 [purl 1, knit 6] 13 times, purl, knit 2
3rd row: Slip 1, purl 1 [knit 1, purl 6] 13 times, knit, purl 2
4th row: Slip 1, knit 1 [purl 1, knit 6] 13 times, purl, knit 2
As per the originals, this four row motif is repeated four times in white, and once in color (I used purple instead of blue):

Knit Frills, 1855 Undersleeve Pattern
Four knit frills.

The frills are considerably more substantial than the open petals depicted in the magazine, but I think they also look a bit warmer.  We'll see how they end up working.  If I do this pattern again, I'd like to find a way to make the ruffles look more like the illustration (which will probably involve cookies and bribing a more experienced knitter to help).

Wednesday, November 1, 2017

Warm Undersleeves, 1855: Part 1

It's now November, and a bit past due to pick up last winter's knitting project.

Warm Undersleeve illustration, from Godey's, November 1855
"Warm Undersleeve", Godey's, November 1855

From the November 1855 issue of Godey's (page 456):
WARM UNDERSLEEVE
       Materials  One ounce of white single Berlin wool; quarter of an ounce of blue wool; pins, No. 14.
      Cast on 60 stitches, and knit in brioche stitch till the length required, about half a yard, is completed; cast off; join up the sides with a rug needle and wool, and knit the frills as follows:
      Cast on 90 stitches with white wool, and knit 3 rows before commencing the pattern.
      1st row Slip1, knit 1, a pearl 1; knit 2 together three times; repeat from a, finishing with knit 2.
      2d. Slip1, knit 1, a pearl 1, knit 12; repeat from a.
      3d. Like 2d row.
      4th. Slip 1, pearl 1, a knit 1, pearl 12; repeat from a.
     Repeat rows 1-4 5 times (total of 3 rows plain and twenty rows pattern) in white, and then once (4 rows) in colored wool.
     These four rows form the pattern, which must be repeated five times with white, then once with blue, and cast off loosely. Two frills are required for each sleeve: the upper is placed about an inch and a half above the under, which is sewed by the edge of the sleeve.

So, the first step is a rectangle in brioche stitch, 60 sts (really 90) wide and about 18" long. Brioche stitch is "yarn-over, slip, knit two together." This Brioche tutorial on youtube helped me get it going.

Brioche stitch, 1855 knit undersleeve from Godey's.
Sleeve in progress.

I used size two needles and fingering weight white wool; there's an old SA thread where Colleen Formby sad that berlin wool is about a fingering weight, and her article on period knitting indicates that the "size fourteen" needles of the period compare to a modern size 2 or 3, depending on which period standard is being used. [I've since acquired a set of Virginia Mescher's knitting reference cards, which agree on the fingering weight wool, but suggests that size 14 needles are closer to a modern size 0.]  Nonetheless, I'm satisfied with how with the weight/feel of the piece so far.

Saturday, October 21, 2017

Knit-Along, Week "2"

Somewhat belatedly.
Nineteenth century pence jug knit along, two weeks in.
Two steps down, three to go!

The stringing took a couple months longer than it should have.

Friday, July 28, 2017

Pence Jug, Getting Started

I'm (rather belatedly) joining the pence jug knit-along.  Having never used size 00 needles before, this should be interesting.

Saturday, April 8, 2017

Sontag, 1860

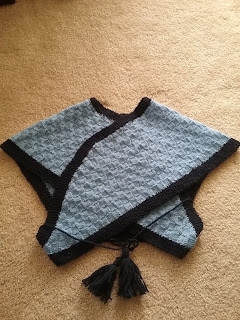
Whew. Some of my winter projects are finally starting to wind down. Here's the first: a knitted sontag from Godey's. 

Godey's 1860 sontag.
Finished sontag, front view.


I used Colleen Formby's suggestions for sizing it up (which worked perfectly for the back and shoulders). For better fit over a generous bust, I extended the front portion by 12 rows of blocks after the 'decrease every four rows' point. If making it again for myself, I would have decreased the width a bit more at that point, as I hadn't accounted for the trim and could have used a little more length.

The main body of the sontag is worked in a basket weave (alternating 5 knit, 5 purl). I knit it on size 2 needles, and used exactly 3 skeins of Cascade sport-weight wool (as in, there was literally no yarn left when this was done: even the tiny scraps went into the seams). The trim was done the same, but in plain knitting. I scaled it down to 6 stitches wide, from 12, as it was coming out disproportionately wider than the main piece---I had also tried to do 9 stitches, but ran out of yarn 3/4 of the way through. The neck area is 4 stitches wide. I tried knitting one continous piece of trim, but the front and neck corners were too curved for it to lie nicely; instead, I knit 6 separate pieces (outer and inner edges for each side, neck, and back waist) and sewed them in place.

Knit gauge for sontag trim, 1860.
Twelve stitches was way too wide for the trim.

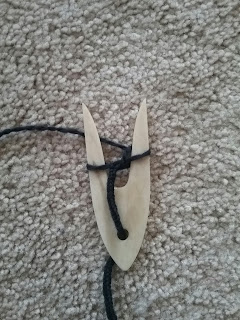
For the cord, I used a lucet.  It's my new favorite commute craft: emminently portable, easy to set down, and no one has mistaken it for knitting (yet).

Bone lucet with blue wool cord.
Lucet with cord.

The skein of dark blue wool made the trim, cords, and tassels (no leftovers--a side effect of making tassels, sure, but it was nerve-wracking while I tried to work out if there would be enough yarn!).

Handmade blue wool tassels for 1860 sontag.
Tassels!

The other change I made was to the buttons. Instead of putting one on a front corner and a loop on the other, I put a loop on each front corner and two shell buttons on the back corners (this gives a little more room through the front, since I couldn't make it longer).

Godey's 1860 sontag or bosom friend, back view.
I like this picture best,
and am now tempted to wear it backwards.

And here it is laid out:
Godey's 1860 sontag or bosom friend, dull view.
Yes, that was a lot of knitting.


Saturday, February 25, 2017

Original Projects

The Victorian Pattern Box is posting original magazine project instructions; most are from the later 1800s so far, but it's certainly worth keeping an eye on.