Showing posts with label pattern review. Show all posts

Friday, May 17, 2019

Early 1850s cottage bonnet

Cottage Bonnet, modelled by a helpful lamp.

From Timely Tresses' "Ada Gray" pattern, using style line 1.  Custom-dyed tissue tafetta and silk satin ribbon, all hand sewn.

Friday, September 21, 2018

Two Victorian Shirts (Past Patterns #011)

Revisiting Past Patterns #007, after a fashion, with two shirts made from its updated view B, aka pattern #011.

Shirt the first:
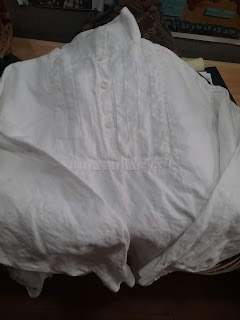
Linen shirt for 1850s 1860s reenacting, from Past Patterns #011.
Linen shirt

And shirt the second:


Cotton shirt for 1850s 1860s reenacting, from Past Patterns #011.
Cotton shirt.

The first shirt is made entirely from linen, the second from pimatex cotton.  At the request of the wearer, I made a few alterations to the basic pattern:

  • Reducing the length by ~8".  Last time I made this up, the recipient also requested it be shortened.
  • Using all one fabric (calls for linen bosom and cuffs, with the rest of the shirt in cotton)
  • Adding a third button at the top of the pleated bosom. The cravat, in theory, holds the collar in place, but after trying the first shirt out, the wearer requested an extra button at the top to stabilize things.
  • For the cotton shirt, the collar was lengthened.
Thoughts on this pattern:

Generally, I like this pattern. The shirt has a good shape, and there's some customization options presented (alternatives to the center front pleats), with citations.  It's also copied from an original shirt, with all the instructions for hand-sewing it. That being said, the pattern is not without it's quirks--such as the tiny triangles pieced into the sleeve, which serve no discernible purpose* except for making the seam hard to fell.  The instructions are mostly clear about each step, but there are times when additional information would be useful. For instance, it's never specified where the front bosom pieces should lap left over right or right over left; the pleats themselves are to be basted, but no future step mentions permanently stitching the pleats or removing the basting thread.

Twice I've made it up, and struggled to get everything cut from the allowed material; the third time, I had a lot left over.  For future use, instead of following the pattern envelop guides, I would establish the wearer's preferred length in advance, and then lay out all the pattern pieces to determine the amount of material needed.


*These are not gores for increasing mobility at the shoulder: they attach flat the sleeve, to make it more of a trapezoid shape. The same result can be achieved by overlapping the pattern pieces and cutting out the sleeve as one piece (less seam allowances). My only guess is that the original garment was pieced due to fabric limitations.

Monday, August 6, 2018

SA Cloth Girl Doll

Meet Nelly's new little sister: Harriet. She is made from Liz Clark's 13" cloth girl doll pattern.

Sewing Academy 1850s/1860s Reproduction Cloth Girl Doll
Harriet in new dress and pinafore.
Not visible: chemise, drawers, petticoat.
I don't have a lot to review here, as the pattern instructions and format closely resembles its predecessor, the cloth lady doll (15").  If you liked that, you'll like this.* The differences are in the doll size and garment types: the girl doll is two inches shorter, and her wardrobe includes children's style variations, as well as few different outerwear pieces, such as a sunbonnet and pinafore.  The girl doll pattern also has instructions for making dress and bonnet forms to display additional garments. 

The garments in common between the two dolls are nicely differentiated: the girl doll has a slightly different style of chemise, while other garments (drawers, stays) are cut in children's styles. The main reason for adding Harriet to my kit is to show the differences between womens' and girls' wardrobes.

The other notable difference is that the girl doll pattern is a pdf rather than a paper pattern.  While this felt a little weird to me, I appreciate the ability cut out pattern pieces without having to trace them.

What You Get With This Pattern: 

  • 1 pdf, containing 20 pages of instructions and 8 pages of doll/clothing pattern pieces
  • Patterns include the doll, a dress form, a bonnet form and the following garments: chemise, drawers, stays, petticoats, dress variations (yoked, gathered or pleated bodices cut high or low; 5 sleeves), jacket, basque, pinafore, and bonnet. 

Rating: 5 stars
Difficulty: Varies from easy to intermediate
Accuracy: High. Some background is included about cloth dolls; the clothing rings very true for girls' dresses of the 1850s/1860s.
General Impression: A nice doll, from a pattern than is easy to use and encourages customization.  In quality and user-friendliness, this pattern is the equal of its predecessor.

*I really love using Liz's patterns, finding them straightforward and intuitive to use. Occasionally, someone disagrees with me on this; check out the free compendium articles if you want to get a feel for the writing style.

Thursday, October 29, 2015

More Infant Gowns and Pattern Review of HMP-105

Cute garments first:
Natural waist, long sleeve dress from SA/HMP-105

Adjustable "infant" style dress from Sewing Academy- #105 infant gowns pattern


With five loaner dresses made, I'm finally ready to review Historic Moments Patterns/The Sewing Academy 105: Infant Gowns.

This is an easy and versatile pattern, and if you need to make 1850s/60s baby clothes, you should buy it.  As with the girls' dresses pattern, there's many different customization options: three bodices (five,counting the high/low options), 4-5 base sleeves, waist treatment options, etc.  In fact, it's basically the same pattern, only sized for infants instead of girls & pre-teens.  The main difference is that the infant pattern includes a straight long sleeve instead of a coat sleeve option  In theory, you could get one pattern or the other and simply size up or down as needed--but then, in theory, you could also drape instead of using a pattern at all.  Also included in the pattern booklet is specific discussion of long versus short infant skirts (for mobile versus stationary babies); fabric choice, yardage calculations, and trim options are also explored.

Undergarments and outwear are available in separate patterns.  All HMP/SA infant patterns are unisex.

Since I'm making clothes to fill gaps in a lending wardrobe, I made up the dress pattern as-is, in the three larger sizes--they'll be getting altered for every wearer anyway, so tucks and waistbands were used.  As noted before, it would be nice if suggested skirt width/lengths pairings were included for those without a good grasp on how wide a skirt should be for a wearer of a given stature.  I imagine this is easier if one has a model on-hand and can experiment a little.  Nonetheless, the instructions are very thorough for making skirts to measure and the smaller range of infant sizes made it easier to guess where on the width range a given garment should fall.

There is an error in the pattern copy I was working from, in that coat sleeve instructions are included, but the long, straight sleeve is not (however, it makes up fine following the short straight sleeve instructions).  This may have been fixed in newer copies.  On the size B jewel-neck bodice, I'm concerned that the neck line is disproportionately small, and will be looking into it (if sewing for a specific child, a toile/mock-up would have solved this problem at the beginning--make a toile!).

What You Get: Pattern Book, 1 page of bodice and sleeve pattern pieces on printer-weight paper (skirts/cuffs/bindings, being rectangles, have cutting instructions rather than printed pattern pieces).

What You Need: Fabric; thread; hooks and eyes or buttons; cording and twill tape (for some styles); sewing tools

Score: Five Stars

Difficulty: Beginner and up.  As in other SA patterns, there's an illustrated explanation of period sewing techniques included, putting this pattern within the reach of even the most novice of sewers. I'm told that those less mathematically-inclined still find them a little challenging, but the designer's accompanying on-line advice forum can help. The small pieces in this pattern make some parts easier to sew by hand than on machine.

Accuracy: Very High.

Strongest Impression: A versatile and accurate pattern that goes together quickly.

Friday, July 24, 2015

Pattern Review: 1859-1862 Low Spoon Straw Bonnet by The Dressmaker's Shop

1859-1862 Low Spoon Straw Bonnet by Kimberly Lynch of The Dressmaker's Shop

I made this up in 1/2" hemp straw braid, purchased from the same shop.  Between making the largest size and overlapping some of the brim rows more than was probably necessary, I ended up 7" short on the straw braid--fortunately, at that point, it was just covering raw edges in the interior, so I supplemented it with some cotton bias tape.  In purchasing the pattern, be sure to select the appropriate brim size; instructions are provided for adapting the bonnet to your own back-neck measurement during construction.

Green hemp plait straw bonnet form, from "1859-1862 Low Spoon Straw Bonnet" pattern by The Dressmaker's Shop
The form: sewn and wired, prior to stiffening.

The pattern really covers how to make the straw form, and decoration is left to the maker's initiative; the reader is advised to consult original images and bonnets in doing so, which makes this pattern less-susceptible to “cookie cutter” issues. Each step of the process is illustrated with color photographs.  The brim rows may be sewn by hand or by machine, but the crown portion needs to be worked by hand.

What you get: 12-page instruction packet
brim pattern sheet (printer-weight paper)

What you need: 1 roll straw braid (18 yd of 1/2” or 36 yd of 1/4”), bonnet wire, thread, parchment paper, wire cutter, pressing ham, fabric stiffener (optional); ribbons, lace, trim, etc., as desired

Score: 4.5 stars

Difficulty: Intermediate and up. The instructions are clear, and the only specific techniques one needs be acquainted with are a back-stitch and a modified whip stitch (method shown). However, the shaping was tricky, and I wouldn't recommend it for a beginner. New milliners may find a buckram form slightly easier.

Accuracy: The shape closely follows surviving bonnets (such as this, this, and this), though pictures of originals are not included with the pattern. It does, however, include period images of and magazine excerpts on straw bonnet production.

Strongest Impression: The pattern instructions could be more polished in their presentation/formatting, but the steps are clearly explained; the shape and methods appear well-researched.

Low-spoon straw bonnet, front trimmings.

Low-spoon straw bonnet, back.

Low-spoon straw bonnet, side trimmings.

Thursday, June 4, 2015

Recent Project/Pattern Review SA-250

Girl's yoked dress from Sewing Academy (Historic Moments) pattern.

Yoked bodice 1850s/1860s girl's dress from HMP/SA-250 pattern.

Recently completed project: a girl's dress for the Fort Nisqually wardrobe.  It's a black/white windowpane cotton, fully lined.

I used the Historic Moments Patterns/ Sewing Academy - 250 "Girls' Dresses 1850-1865" pattern for this garment.  Specifically, I used the yoked bodice pattern, with the boat/batteau neckline and waistband options, and the short puffed sleeves. The skirt has three tucks, which may be let out for future re-sizing.

Thoughts on the pattern:

It's very comprehensive pattern, with a 40-odd page booklet covering period sewing techniques and offering different finishing details for your dresses.  This is a great pattern for site costumers or large families, as the many different variations prevent "cookie-cutter" issues.

The available design elements include a yoked or a smooth bodice, with high ("jewel") or low ("boat") necklines and piped edges or waistbands, and four sleeve variations (short smooth or puffed sleeves, long bishop or coat sleeves).  Some of the variations include further customization options: for instance, the bishop sleeves may be made with closed cuffs or with plackets.  These elements, including the four "set in" sleeve patterns, are all interchangeable.  There's also a third "infant-style" bodice which comes with yet another sleeve; in this case, the sleeves/shoulder are cut as one piece (like on an old-fashioned baseball shirt), so it can't interchanged with the other pieces.  However, the infant bodice still has options to customize: varied fullness, fixed or adjustable necklines, waistbands or piping, and the sleeve may be made up smooth, loose, or puffed. Skirt instructions include plain and tucked options.  The author also has advice for making a dress with hidden "growth room", which can be let out as needed.

To see if you like the author's style, I'd recommend reading some of her free patterns (such as this pinafore).  If you can follow it easily, you shouldn't have trouble with HMP/SA-250 (and if you do, there's a support forum available).

The main drawback to this pattern is it's scope: it's very easy to become intimidated by the many different options included in it; with so much ground to cover, there's lots of "continue on page 17 for option X or page 20 for option Y".  For the rectangular pieces (skirt panels, waistbands, cuffs), the instructions call for measuring the child and cutting custom pieces, which may also be strange for one used to modern commercial patterns.  There were one or two typos which caused temporary confusion, but I was working from an older version of this pattern, so these may have been corrected already.

One thing I would change about this pattern is suggesting skirt widths to go with each of the four bodice sizes; period lengths are discussed, and overall width ranges, but as someone without experience sewing for children, I was sort of flying blind on decided how wide to make the skirts. Another potential issue with this pattern is the way the pieces are laid together, particularly the set-in sleeve.  All four sleeve styles and sizes are overlaid, which I enjoyed (it shows how the different styles relate to each other, as well as saving paper), but it does make for a lot of crossing lines which require some concentration to follow.

What You Get:
  • Pattern booklet
  • 3 pages of full-sized bodice and sleeve pieces, on printer-weight paper
Pattern Score: 4.5-5 Stars

Difficulty: Beginner and up.  There's a tutorial of period sewing techniques in the pattern booklet which should be useful to new sewers, or those unfamiliar with period techniques.

Accuracy: High.  No original images are included with the pattern instructions, but many examples are available at the designer's website.

General Impression: This is a very versatile pattern, and provides the shapes needed to make many permutations of girl's dress in the 1850-65.

Wednesday, March 25, 2015

Pattern (Kit) Review: Kayfig Cage

Finally finished my new 108" cage crinoline, from the Originals by Kay kit which I received for Christmas.

108" Cage crinoline made from the Originals by Kay kit.


Back view of cage crinoline from Kayfig kit.


The cage went together rather easily.  The instruction packet lays out the measurements clearly, and walks you through the appropriate marking and assembly steps.The only sewing that is required is making up the waistband and attaching the tapes to it, but you're on your own for that, so sewing experience is assumed. The buckle caused me a some confusion at first, but that was primarily the result of over-thinking it.  

I much prefer using rivets to attempting to sew through the buckram, as I had previously done; that being said, I didn't like the way these rivets went in.  They had a tendency to deform when hammered; I tried varying my setting method to ameliorate this, but without luck.  I don't have enough experience to say whether these rivets in particular are the problem, whether my technique was incorrect, or whether rivets always bend that way.  They seem secure so far.

What You Get: Instruction packet (3 pages front & back, with placement diagrams)
1.5 rolls of hoop steel (about 45 yds)
16 end caps
c. 10 yards cotton tape
77 2-piece rivets
buckle

Items needed: waistband; pliers (to attach end caps), hammer (to set rivets), bolt cutters (to cut hoop steel), punch and/or awl (to make rivet-holes in the hoop steel and tapes, respectively) 

Pattern Score: 4 stars

Difficulty: Advanced Beginner--little sewing is required, but that is unguided; for the rest, spacial reasoning and ability to follow instructions are more relevant than sewing experience

Accuracy: Citations not included, but the materials are period.  Most of the images* I've seen for uncovered cages used smaller gauge wire in large quantity, like the needle & thread kit, but I'm satisfied with the shape.  

General Impression: The main things I like about this kit is that the math and proportions are all pre-done, and the hoop steel and tapes are of good quality.  I didn't like the grommets, personally. Still, it went together fairly easily, and makes a nice shape.  The instructions were very compact, and could use a little more detail at times.  This kit is the cheapest option I've found for making a good quality '60's cage, and my only lingering concern is those annoying rivets.


*Edited to add: three of the period illustrations in Nora Wraugh's Corsets and Crinolines show cages c. 1856-58 with the wider steels like this.

Tuesday, September 2, 2014

Pattern Review: HMP-400, Historic Moments Cloth Doll Pattern

As I can only wear one historic outfit at a time, I decided to make a clothing demonstration assistant.

Meet Nelly:
1850s/60s style cloth doll from HMP-400 pattern.


She's made from Mrs. Clark's "Great Aunt Maude's Cloth Lady Doll" pattern.  Her first outfit, above, consists of the chemise, corset, drawers, apron and high-necked dress (all from the pattern), with an additional apron of my own design, and a sunbonnet based on Mrs. Clark's free sunbonnet pattern (as drawn from memory, scaled down to fit a 15" doll).

Undergarments:
HMP-400 cloth doll with undergarments.

Accessories:
HMP-400 cloth doll with undergarments.


I've been enjoying making doll clothing so far.  The small pieces let me use up scraps from my other projects (this will be great with the wools and silks that aren't appropriate for my quilting activities), and they items go together really quickly.  All of Nelly's clothing has been handsewn--so far--and working on them has been a great opportunity to practice my hand-sewing in a low-stress way; doll clothing also makes for a very portable period project, and gives a great sense of accomplishment as it gets finished very quickly.  The downside to the small garments, in my opinion, is making the tiny eyelets.  Miniature piping is the other tricky bit.  For easier sewing, many of the instructions call for decorative buttons with functional hook-and-eye closures, instead of functional buttons with tiny button-holes.

The doll herself and the undergarments are made exactly as given in the instructions (save that I added a functional button and loop on the petticoat).  I think I made my seam-allowances too small on the corset, as it turned out a little loose.  It would also have benefited from some ironing during production (which it would have had, were I not sewing it in the car on my way to an event...). For the dress, I made some changes to the basic high-neckline bodice pattern.  It's gathered, rather than darted, but I didn't get the bulk down quite enough, making for a front that 'poofs' a bit above the waist.  The bishop and cap sleeve options were both among the given variants (there's also a pagoda sleeve, a puff sleeve, a bias sleeve, and with the wrapper, a coat sleeve).

What You Get With This Pattern: 

  • 39-page instruction booklet
  • 2 sheets of pattern pieces--done on writing-weight paper, not tissue--with pieces to create one doll and twenty garments/accessories, plus variations.  The dress pattern includes 3 bodice options and 5-6 sleeves to play with.

Rating: 5 stars
Difficulty: Varies from easy to intermediate
Accuracy: The shapes and methods are all good for the mid-19th century, based on my knowledge of women's clothing.  No pictures of original dolls are included, though the author provides some background information.
General Impression: A very complete pattern for a doll and her wardrobe: there are dress variations, underclothes, nightwear, and accessories included (no bonnets, per se, though there are two caps and a hood).  The clothes are all (almost entirely) pre-fit to the doll, making this pattern the easiest introduction to mid-century clothing that I've seen.

Saturday, July 26, 2014

Book Review: The Dressmaker's Guide by Elizabeth Stewart Clark


A good seven/eight years after I started reading at her website, I finally got a copy of Mrs. Clark's "The Dressmaker's Guide".  I hadn't done so at first, as I was 1) at college, with little spending money, and thus 2) on hiatus from the hobby.  By time I got back into the swing of things, I felt confident on the basics, and didn't think I'd have much to learn from this particular source.

This turned out to be--very much--not true.

The book is divided into twelve chapters, detailing how to drape or draft and then make up each of the layers* which goes into women's wardrobes c. 1840-65.  The first three chapters cover preparation for sewing and context for one's living history: a year-by-year timeline of events, approaches to progressive reenactment and documentation of research, a timeline of dress styles, and a 50-page tutorial of stitches and fabric terms.  Chapters 4-11 go through each garment or element, discussing how to fit it, what materials to use, and how to make it.  Chapter 12 is a quick-reference appendix, with three "croquis" in different body types (instructions are given in chapter 2 for using these paper dolls to plan your outfits and play with styles).

For a preview of style and content, the free women's patterns found at the Compendium are mostly taken from the book (except for the sunbonnet, shawl, and apron).  The chemise chapter, for instance, includes the personally-drafted banded chemise found at the Compendium, as well as instructions for a gored chemise, and a discussions of the different fabric choices.  Similarly, the basic drawers and petticoat are given free on-line, but the book offers additional design choices, including decorative tucks and whitework insertions, and instructions for corded and quilted/wadded petticoats.  If you can follow the directions given on-line, you'll have no trouble with the book's instructions.  Additional book content includes a whole chapter on draping a personal corset pattern, cage crinoline instructions, a self-drafted sleeve pattern with 8 different variations, and a chapter on personal accessories.

What I found most valuable were the bodice and sleeve drafting instructions.  Several variants were included for each, with the time period when each is popular, and instructions for personalized fitting. To get an idea of the breadth of the bodice chapter, take the "Having a Fit" article, then add sketches of each step for the draping, advice for fitting commercial patterns, and instructions for creating 6 different bodice variations from the basic pattern (high or low, gathered or darted, V-necks or rounded, and some beautiful pleated/shirred "fan fronts").  The sleeve portion follows, and I'm excited to experiment with some of the variations shown.

I expect this book will prove valuable to sewing enthusiasts of all skill levels.  Despite extensive reading on the subject, I was surprised by new elements like the diagonal tucks.  At the same time, all the basics are present.  A person with no experience in mid-19th century women's clothing could go through every step from selecting an impression to finishing a completed ensemble with the instructions given here.  It may take a while, by the information is all given in a clear manner which should be accessible for beginners.  Additional help is available through the author's website, or at the attached forum.

Looking for downsides, the main things which come to mind are the overall size: there are 100 pages of information before any garment instructions show up.  This is possibly overwhelming, but also provides interesting background information and useful techniques.  The instructions can at times 'run-on' in my opinion (separate tables for calculating yardage for each type of petticoat, for instance, instead of just adding or subtracting from the basic plan), but this may be useful to those not mathematically-inclined or who need to take some things in 'baby-steps'.  Erring on the side of more information and simpler explanations isn't a bad thing.  For those that need visual instructions, there are nice sketches included with most of the techniques, but no photographic images of garments or steps.  I liked the drawings as given; your mileage may vary. The table of contents gives page numbers for the chapters, but the one thing I would change about this book is adding a topical index,*** so you can look up "coat sleeve" or "petticoat: whitework" and go directly to the page.

Score: 5 Stars
Difficulty: Absolute beginner & up.  Basic sewing skills are useful, but not strictly necessary.
Accuracy: No original garments are presented, but the variations and techniques are all very accurate as far as I can tell.  Read Janet Arnold if you want details of original garments, this is more a summary of the the period and its aesthetics.
Strongest Impressions: This is a book to reference.  It's not meant to be the end of your research, but the beginning.  Find an original for inspiration, then use the sketches and instructions in here to reproduce the elements you like.  The introductions and instructions in chapters 1-3 are a good basis for making one's first forays into historic clothing--and will put you miles ahead of the non-fitted, ready-mades found at most reenactments.  Should I even become an eccentric millionaire (half-way there!), I would be giving these out like Bibles.

*On further reflection, stockings & garters, shoes, gloves, and millinery are not included as topics.  All trunk garments from the chemise outward are covered, however.**
**Ok, not aprons.  But you should be able to figure one out from the all the techniques given.
***Edited to add (11/28/14) that a printable index is now available here. Rumor has it that future editions will include an index.

Tuesday, June 10, 2014

Pattern Review: Kayfig Wrapper (KF611)

I just made up this pattern, and thought I'd toss out a few thoughts on it.

KF611 is a wrapper/morning dress pattern c. 1855-65.  Wrappers are (relatively) loose garments for 'undress'--the sort of thing you'd wear to breakfast, or around the house.

First, pictures:


Kayfig wrapper, with contrast lining visible.


Wrapper front (KF611).


Open coat sleeve from Past Pattern #702.


This is made up in a reproduction cotton print, with a solid lining in two colors; in the first picture, the lining has deliberately been turned out to show off the colors.  The sleeves above are not from the wrapper pattern, but instead are the "modified pagoda" sleeves (open coat sleeves) from Past Patterns #702.  The wrapper pattern includes bishop sleeves, but I made this up for a friend who preferred the open sleeves.   

What you get in the pattern:
Book of Instructions
2 pages of pattern pieces 

The pattern is printed on printer-weight paper, not tissue-paper.  The pieces are multi-sized, and the sizing is apparently based on custom slopers rather than being larger or smaller versions of a single garment (according to the information given).  All I can say is that in making it up, surprisingly little alteration was needed to be made for a good fit in the back and front lining.  The wrapper is fitted in back just like a normal c. 1855-65 dress, as is the front lining of the bodice (darted to fit).  The front fashion fabric, obviously, is very loose, being pleated only at the shoulder, and then contained with ties at the waist.  Do not panic about the lack of skirt pattern pieces--being large rectangles, instructions are given for cutting a custom size rather than printing large sheets of rectangular paper.

The booklet can be intimidating--it's 38 pages long.  It's also full of helpful information, including 6 pages of period references & pictures of antique garments, 14 pages of technical information (including pattern terminology, fitting advice, and period sewing techniques), and 15 pages of detailed cutting and construction instructions, often with a choice of techniques.  For example, three different methods of finishing the hem are presented; it also has two different styles of sleeve cuff, and so on.  The remaining pages have attributions and a bibliography for the research.  Illustrations accompany each step of the instructions.

I'm of a mixed mind on recommending this pattern for beginners.  On the one hand, I've heard of others being stymied by the instructions--either overwhelmed by the length, or confused by the construction of the front panel.  On the other, I found it a really comprehensive walk-through of period dressmaking techniques.  The technique pages, in my opinion, would be very valuable to someone who's starting out on mid-Victorian dress-making, even if the sheer amount of information is intimidating.  If you already know how to gauge a skirt, make piping, and so on, you won't need this information as much.  For what it's worth, I made my first dress 9 years ago, and I still found a new piping technique in the instructions (which I am so using on my next dress).  

There were one or two tricky moments in making up this pattern: I couldn't tell at first how the front piece would fit in over the bodice lining, but the second I laid it out according to the instructions, it all 'fell into place'.  If I were making it up again, I think I'd play with where exactly the front panel is attached to the front bodice, in order to change the fall of the pleats.  Attaching the piping/binding around the neckline also had some difficult moments around the shoulder seam, as that's where the two different front pieces met the back and one of those pieces needed to be separate, the other bound.  I ended up whipping the edge down by hand, and was still sort of winging it.

On area where I found the instructions very valuable was in giving the order in which things needed to be done.  Since I've usually worked with "big 3" patterns, I'm used to taking the pieces, tossing the instructions, and then making things up to fit based on my own reasoning and what I've read about period dressmaking techniques. Here, it's very important that the bodice, back skirt, front panels, etc. get attached in a very specific order, so that you're hemming it all the way around at one time, and getting the pleats in the shoulders set properly.  With that in mind, it's very easy to see how and why the instructions are arranged, even if, at first, you're wondering about setting aside a half-sewn bodice to start gauging a skirt.   

Most of the wrapper is machine-amenable.  While hand-sewing is suggested for easing the armhole sewing (piping and sleeves), it's only really required on the skirt gauging.  Additionally, I did it along the hem facing, and to whip-stitch the raw edge of the waist and neck piping.  The rest is easily sewn on machine, though an ambitious person could sew it by hand.  Sewing machines were available to the public by this time-period, so both methods can be authentic.

Mention is made of different trimming options for wrappers, but no specific methods/styles are given in the instructions themselves.  The research pages, however, show many variants including contrasting front panels, decorative bows, and self-fabric ruffle accents.  I think this is an interesting compromise for avoiding the dreaded 'cookie cutter' look, while making it easy for those-so-inclined to add their own authentic touches.

Pattern Score: 4.5-5 stars
Difficulty: Intermediate or ambitious beginner (there's lots of good information for beginners, but it's not an easy garment exactly)
Accuracy: Very high.  Based on original garments, and fully documented with information on making and wearing.
Strongest Impressions:  It went together well, and I appreciated all the research that was presented.  The many little variants make it easy to customize, though most of them aren't dramatic enough to change the look of the dress/wrapper.  The couple of tricky spots and the large size of the instruction book may intimidate newer sewers, but neither of those is insurmountable.  Beginning sewers should be ready for a challenge and not working on a tight deadline; those with experience constructing dresses of the period should find it very familiar. 


Thursday, June 5, 2014

On-Line Patterns for Clothing (American Civil War/ Mid-Victorian)

Getting into this hobby as a broke high school student, and again as a broke grad student (and now continuing as a broke un/underemployed former student), I've spent a fair amount of time hunting for free patterns and resources on-line.  What follows is a mixture of modern instructions from very generous, reputable persons and original patterns from the 19th century (these are not always easy to work with, especially for a beginner).  Since I mostly do 1855-1865 women's clothing...most of the links are for women's clothing of the 1850s and 1860s.

Useful for New Reenactors

The VERY FIRST Thing to Read Before Making/Buying Women's Clothing:
Your Best Bet Wardrobe by Elizabeth Stewart Clark

General Advice on All Things (but especially non-military clothing for men, women and children)
The Compendium The Sewing Academy Forums
Atlantic Guard Soldiers' Aid Society Links (Go for the first person worksheets, stay for the widespread advice)


Patterns & Instructions (& Some Advice) 

Hats and Bonnets
Cost-effective Headwear for All Seasons (advice thread)
Original Soft Bonnet/Hood Patterns On-Line (with my commentary)
Romantic History Hood Pattern (printable, modern instructions)
1861 Knit Hood (Original pattern with modern commentary)

Hair-styling
My Hair Tutorials
Video: Basic Hair (with some alterations to the side-styling, this will get you through much of the 1850s and early 1860s)
Hair Advice (Thread)
Later Victorian Hairdressing (Beautiful step-by-step pictures, but about 15 years post-ACW)
Video: Rag Curls

Chemise Patterns
Mrs. Clark's Chemise Pattern
1860 Chemise Pattern

Drawers Patterns
Draft Your Own Drawers
1863 Drawers Diagram

Corset Patterns
Stays in The Workwoman's Guide (1838/40) [page 80-81, diagram page 327]
"Practical Instructions in Say-Making" in Godey's (1857) [diagram and instructions pages 165-6]
1868 Corset Diagram (Patent)
1869 Corset Pattern

Skirt Support Instructions
A Covered Cage
Cage Crinoline
Another Cage Crinoline (Thread)
Corded Petticoat (Thread)

Petticoat Instructions (Do not wear a hoop without a petticoat--it will look bad)
A Petticoat

Note on skirt supports: Hoops appear in European high society in 1856, and spread quickly--by 1857-8 they're already on the westward trails & America's Pacific coast.  By the early '60's hoops are ubiquitous.  If you're doing pre-'56 events (or are doing 1856, but aren't the Empress Eugenie), use a corded petticoat.  If you're in the 1860s, use a hoop, or select a non-hoop impression (nurse, servant, cook).  Keep hoops away from open fires.

Dress (Bodice) Patterns
Original 1859 Bodice Patterns
Bodice with 3-Piece Back and Coat Sleeves ('60's)
Mrs. Clark's Fitting Instructions
1857 Bodice

Dress (Skirt) Instructions
Gauging a Skirt (No Pattern Needed)

Undersleeves
Undersleeve Instructions

Collars & Cuffs
Draft a Simple Collar (Thread)

Outerwear & Warm Layers
Easy Shawl Instructions
Original Mantle & Cloak Patterns
Original Jacket & Mantle Patterns
1855 Mantle
A Knitted Sontag (and more knitted items for keeping warm)
1859 Winter Cloak

Accessories
Swiss Waist (patterned from an original)
A Basic Apron
1850 Crochet Reticule
Analysis & Dscriptions of Period Hair-Nets

Shoes
Yes.  There are period sources for home-made shoes (ie Every Lady Her Own Shoemaker 1856), but you'll want to buy this item.  See Robert Land Historic Shoes and Fugawee to train your eye, then either save up for the good stuff, or search e-bay & second-hand shops for something passable.  I've heard paddock boots are a possible alternative, depending on your situation.  Things to look for in 'period-passable' shoes: leather upper, low/no heel, fastens with side or front laces or side elastic panel ("congress gaitor"), and square or rounded toe (not pointy).  Speed laces should be removed if possible.
1850 Lady's Slipper (All the fancy work slipper patterns I've seen either have a two-piece upper like this one--a trapezoidal toe-piece with a straight band around the heal, or else a single-piece upper shaped like a bottom-heavy V).

Nightclothes
1859 Nightcap
1859 Nightgown Drawings

Baggage
Pouche Pompadour (elegant travelling bag)
Travelling Bag
Re: Period Baskets (read this before buying a basket; Mrs. Mescher's other articles are as interesting as they are diverse
Toilette Sachets


Looking for something to work on at events?  Antique Pattern Library

New period seamstresses looking for an easier start should buy The Dressmaker's Guide.  I've heard good things about the Truly Victorian patterns, and Past Patterns.  Kayfig patterns are meticulously researched; I've made up their wrapper pattern and found it charming (also, the instructions are a comb-bound book, the first half of which is an illustrated tutorial of period construction techniques). If you pick up Simplicity patterns during the $2 sales, look for the Martha McCain or Kay Gnagley ones--the shapes are good, but the scaling is weird and the instructions aren't always period-appropriate.  I've used several simplicity patterns, but I wouldn't recommend them for a first dress unless you have good spacial sense & really can't afford a more straightforward pattern.

Good luck, and always make a test muslin!

Thursday, April 17, 2014

1855 Summer Bonnet and Pattern Review: Juliana Rose

Finally trimmed and finished the white crape bonnet I started last summer:


White crape bonnet with lilacs, lace, and vintage ribbon.


The pattern is the Timely Tresses Juliana Rose, which I've made twice before.  This time I followed the mid-'50s cutting line for the brim (instead of the early '60s version, which rises higher over the head).  The base fabric is an ivory-colored silk chiffon--meant here to look like period crape; vintage lace makes the 'cap' inside the bonnet, and also overlays the outer brim and edges the bavolet; vintage silk ribbon and lilacs from Nancy's complete the trim.  The functional ties are a narrow silk ribbon (not pictured).  Modeled by the iron, and some scrap fabric:

Back view of "Juliana Rose" 1850s bonnet from Timely Tresses.
Bonnet made from the "Juliana Rose" pattern by Timely Tresses.
It feels weird to write a review of a pattern I've had for years and used previously; the exercise is also largely academic as the pattern itself has apparently been retired.  Nonetheless, a few remarks:
This is a good pattern.  I wouldn't have made it up three times and acquired two more patterns from the same company if it weren't.  All the previously noted high points of a Timely Tresses pattern--including illustrated step-by-step instructions, references to original bonnets, trimming suggestions, and sewing advice--are present. 

That being said, this pattern doesn't have the same level of 'polish' as the Julia pattern did.  Perhaps that's why it's not currently available.  The illustrations are mostly drawn rather than photographed, for instance; only one period picture is included where the Julia pattern had four; there were fewer color illustrations showing different trimming options, etc. The essentials, however, are all present.

The Juliana Rose is a two-piece bonnet (crown plus a one-piece brim) for the mid '50s into the early '60s. It has three cutting lines: a low one just over the head for the mid 1850s (shown above), and two progressively higher brims for the late '50s and early '60s which anticipate the high spoon bonnet.  I should mention that the bavolet in my new bonnet is longer than that given in the pattern; I cut it out intending to overlay it with lace, only to realize in the middle of construction that putting the lace along the bottom gives a more '55 look.  At some point, I should probably shorten the curtain to compensate.  I also used net instead of blocked buckram for the crown, making a flatter back than the bonnet really should have.  My black and pink bonnets both have blocked crowns (one purchased, one molded at home over a cereal bowl), which give a more rounded and less abrupt look to the back of the bonnet.  

Beginning seamstresses take note: this pattern requires a fair amount of hand-sewing.  I sewed the whole thing by hand save the bavolet edge; that and wiring the brim were the only steps that could really really employ a machine.  Stitching the wired crown and brim pieces together is always an adventure, but gets easier.

Pattern Score: 4-4.5 Stars
Difficulty: Intermediate+
Accuracy: High
Strongest Impressions: Can be frustrating to assemble the wired buckram pieces, but comes together well and makes a cute bonnet.

Original bonnets to admire:
Tone-one-tone decorations and lace effects. An apparent one-piece brim.  I originally meant to trim the bonnet after this original, but changed my mind after finding the lilacs.
Sketch from Peterson's Magazine (July 1855), showing the lace-edge bavolet:
Two fashionable bonnets from Peterson's Magazine, July 1855.


Thursday, January 30, 2014

A Regency Bonnet: Pattern Review ("Julia")

While waiting on my corset reference books (which delays both it and the gown), I decided to get to work on some headgear.

I bought the Julia pattern from Timely Tresses a couple years back in order to surprise my dear sister Red, with an appropriately red regency bonnet.  It went together very readily then, and if anything has gotten easier with practice (on a few low spoon bonnets).  Last time I used brim option #1; this time I made #4.

I used some white silk from the stash (the same that got dyed here), and lined it with white linen.  I have just enough buckram left over from my last Victorian bonnet for the brim.  Due to the extremely soft body of the silk, I decided to interline it.  I omitted this layer when previously making the pattern up with taffeta, but this light-weight silk needs some help.  I bought new satin ribbons for the project, as none of the appropriate width were on hand.

The instructions are very clear: as with all three* Timely Tresses patterns I have, the instructions are a proper booklet full of clarifying diagrams and pictures showing each step of the process--from cutting out the fabric to attaching the ties.**  The research and background information are what I've come to expect from them: accurate and edifying, yet concise. The Julia instructions include color pictures of the bonnet made up 4 different ways, as well as color images from period fashion plates.  Appropriate materials and period techniques are discussed, and different finishing and trimming options are included.  The instructions even include explanations of the recommended hand-sewing techniques (much of the sewing can be done on machine or by hand, but the trims and finishing should be hand-sewn).  The pattern pieces are of "printer paper" weight, much sturdier than tissue paper pattern.

And here's my new bonnet (expertly modeled by my iron and a piece of purple linen):


White satin bonnet with blue ribbon trim, made from the Julia pattern by Timely Tresses.
 Top view of bonnet made from the "Julia" Regency bonnet pattern by Timely Tresses.

I'm trying to think of any drawbacks to this pattern, and the closest I'm getting is that the brim variations are overlapped: 1 & 2 share space on two "half brim" pieces, as do 3 & 4.  Since both halves are needed to lay out on the buckram, it's a good idea to trace the line you want, and not cut the original pattern (or you can cut each half-piece along a different brim line, and get good at switching them around).  I followed the pattern advice about interlining, and used a white cotton broadcloth to line the brim, and cotton crinoline for the crown.  Both worked admirably at preventing "show through", but if I were re-doing it, I would flat-line the brim interlining to the fashion fabric (since I was interlining for better structure on the silk as well as to hide the inner layers).  This is how the crown layers were treated, and it worked well.

Very new amateur milliners may have difficulty with wiring the buckram pieces around the edges.  I find hand-sewing it much easier than the machine option (half-inch spaced button hole/blanket stitches will do it, or a wide zigzag machine stitch), as I can bend the wire around the buckram as I go.  However the wire gets attached, by time the crinoline bias is over the edges, it all looks much neater and more professional than you really expect it to look.

Compared to the "big four" patterns I've tried to make, Timely Tresses millinery patterns are far superior: not only is the design documentation included in the instruction booklet, but the techniques are researched and feasible, the instruction are clear, and the pictures make a lot of sense.  It's almost like having a teacher walking you through it.  It'll also tell you which steps can be done on a machine and which need to be hand-sewn (instead of telling you to glue anything that can't be put on a machine, *cough* Simplicity*cough*). Compared to the other Timely Tresses patterns I've made, the Julia was by far the easiest, having the fewest pieces and a soft crown.

I would definitely recommend this pattern to someone looking for an authentic early 19th century, puffy-crown bonnet pattern; it would also make a good first foray into millinery, particularly for someone who prefers machine sewing (most other bonnets I've made require more hand-sewing; this pattern can go either way).  A complete sewing novice would likely struggle with this pattern, but that would be true of any attempt at stitching on a structured 3D object of this sort.  The pattern specifies the years 1800-1810, and should be made-up in silk to get the appropriate period look.

There are some very specific notions needed for a project of this sort.  I've had good luck with the buckram, crinoline, and wire included in the kits at Timely Tresses (they also have good prices on fat quarters/halves of silk tafetta and on ribbons and trims).  Do not use the "buckram" found at JoAnn or similar stores. It doesn't have the same structure and won't hold the bonnet shape (the crinoline works alright for linings).  Linen and smooth silks can be found at your fabric store of choice (if yours doesn't carry these things, see the links for on-line options).  Ribbons and flowers can be found on-line (Ebay, Etsy), at antique shops (vintage trims!) or at specialty fabric shops--the two times I've made this bonnet, I used silk satin ribbon from Nancy's Sewing Basket in Seattle and from Treadle Yard Goods in St. Paul.

Pattern Score: 5 Stars!
Difficulty: Intermediate/ Advanced Beginner
Accuracy: High
Strongest Impressions: A quality bonnet that goes together easily; no pattern modification required

*I have made up two, but have read through the third and will be making it once I find the right silk.
**This is a pattern review rather than a tutorial, because a pictorial tutorial is already included in the instructions.