Showing posts with label Godey's. Show all posts

Monday, January 7, 2019

HFF 3.1: Twelfth Night Cake

A woman's hands, gesturing with a spoon over a laden table. Detail from Lily Martin Spencer's "Kiss Me And You'll Kiss the Lassies"


The Challenge: New Year's A new year, a new era, a new receipt, or a food intended for New Year's.

For the "new year" challenge, I tried a new receipt that seasonal in early January: Twelfth (Night) Cake.  For added fun, I baked in my new 8" tin cake ring (from Goosebay Workshops).

My usual receipt for Twelfth Cake is from 1888, and I tend to decorate it with marzipan and my modern almond-buttercream icing (since I encountered references to such cakes being iced and decorated in sugarplums or sweetmeats, but without explicit recipes).  While preparing for this task, however, I discovered some very helpful receipts in the The Complete Cook (1850): a specific icing for wedding or twelfth cakes, as well as an apple paste for decoration, and a couple versions of the cake itself.  However, I couldn't resist trying the 1857 cake receipt in Godey's--it's in rhyme!

The Receipt:  Twelfth Cake
TWELFTH CAKE
To two pounds of flour well sifted unite
 Of loaf sugar ounces sixteen.
Two pounds of fresh butter with eighteen fine eggs
And four pounds of currants washed clean
Eight ounces of almonds well blanched and cut small
The same weight of citron sliced
Of orange and lemon peel candied one pound
And a gill of pale brandy uniced
A large nutmeg grated exact half an ounce
Of allspice but only a quarter
Of mace coriander and ginger well ground
Or pounded to dust in a mortar
An important addition is cinnamon which
Is better increased than diminished
The fourth of an ounce is sufficient
Now this
May be baked four good hours till finished.
The Date/Year and Region: 1857, American (Philadelphia)

How Did You Make it: I made this receipt on a quarter-scale. First, there was candied lemon and orange peel to make (in the usual method of boiling in sugar syrup). I then beat 4.5 eggs (four eggs and the white of a fifth) very hard, and mixed into it 1/2 lb of softened butter, 1/4 lb sugar, and 1/2 lb all-purpose flour.  I then stirred in 10 oz of currants (should have been 16 oz), 2 oz of silvered, blanched almonds, 4 oz of candied peel (minced), 1 fl oz brandy, about a quarter of a nutmeg (freshly grated), 1.5 tsp ground allspice, 3/4 tsp each of mace, coriander, ginger, and cinnamon.  I omitted the 2 oz citron, as I did not have any.

Having learned from previous recipes that these cakes need to bake very slowly, I put a double layer of parchment paper around the inside of the cake ring, and on the cookie sheet under it, and over the batter. It was much easier that trying to line a pan in paper.  This cake baked in 2 hours at 325F. I added a white bean near the end of the bake, per tradition.

For the icing, I beat egg white and powered sugar for about ~20 minutes, until the icing thickened and would hang on  the side of a spoon without dripping.  I actually managed to forget the lemon juice; this didn't affect the consistency of the cake when first cut, but on the day after, the icing broke/scaled when cut, just as the book warned.

Running out of time to make the apple paste (which I simply have to try next year), I used commercial marzipan and modern food coloring to decorate the cake. I'm still not good at shaping marzipan, so after the usual attempt at a crown, I just made medallions with a cookie stamp.

[I used the approximation of 4 Tbsp= 1 oz on the spices, since I didn't have a scale that could handle weighing out 1/8 and 1/16 oz quantities.  For the brandy, 1 gill = half a cup or 4 fl oz.]

Time to Complete: About half an hour to prepare the cake (after the peel was candied) and two hours to bake it. Decorating it was another 20-30 minutes of playing with the marzipan while letting the mixer beat the icing.

Total Cost: Most everything I already had on hand.

How Successful Was It? Fairly successful. This cake baked nicer than my previous ones, which tend to get overdone on the edges by time the center bakes (even with a few layers of paper). I think the proportions of raisins/currants/almonds/peel in my usual receipt is slightly richer, but the texture was really pleasant on this one. The new icing went on easily and looked well, but I like using my modern icing, because I think the extra almond flavor goes well with the cake.  I may try experimenting with some period almond icings next year, and hopefully that apple paste, too.

How Accurate Is It? As noted, I scaled down to a quarter-sized cake; I'm tempted to try a half-size in my current cake hoop, but I'll need a much larger party and pan to attempt a full-sized cake. Even with a dozen people, we only ate 3/4 of the cake that night (resulting in a second year with no monarch being crowned--no one found the bean). I omitted the citron, simply because I didn't have any, and used 'zante currants' for the currants, because that is what I can buy locally. We do have a native currant in this region, so one of these years I'd like to dry some of its fruit for my winter baking.

A saucepan on a stove top, containing a boiling liquid with orange and yellow strips of citrus peel.
Boiling lemon and orange peel in sugar syrup.

A tin cylinder, 8" in diameter and 4" high, open on both ends. It is riveted along one seam.
New cake round! It was easy to paper, easy to remove the cake,
and only a tiny bit of the batter seeped under.


A 2 inch tall cake, 8 inches in diameter, baked to a light brown, and with currants and almonds visible in it.
The baked cake.
A single layer cake, on a silver pedestal stand; the icing is white, with a yellow crown at the center, and 2" medallions in green, blue and red set around the circumference of the cake.
Iced cake, decorated with a  yellow marzipan crown in the center,
and red, blue and green medallions around the sides.
The crown stood straighter before I cut the back half of the cake.


Wednesday, December 5, 2018

"Red" (Brown) Riding Hood

And finally: the Red Riding Hood. I've made it up twice before in red wool flannel, per the instructions (the first, alas, fell prey to moths). This time, I tried it in a brown wool that I had. The ties, and decorative back bow are made of narrow striped floral chintz, finished with a narrow rolled hem. I omitted the top bow, as I have since my first attempt at the hood, because it looks really awkward when worn, tending to flop forward. 


"Red" Riding Hood from Godey's, Jan 1862
Brown Wool Flannel Hood, With Chintz Ties and Bow

Two things I really like about how this one turned out are the fine stitches on the casings, and how neatly the narrow-hemmed chintz strips work as ribbons. I'm almost tempted to make more of them, if I can find a project in need of chintz 'ribbon.'

Godey's January 1862, Red Riding Hood Illustration
Red Riding Hood, Finished Illustration

The magazine illustration also takes an interesting liberty, presenting the bavolet much shorter than it is--per the second illustration, the distance between the two bows should be shorter than the distance from the lower bow to the back point.

Godey's January 1862, Red Riding Hood Cutting Diagram and Instructions
Red Riding Hood, Cutting Diagram and Instructions


Friday, June 22, 2018

Godey's July '63

My other project for last weekend's reenactment was the latest issue of Godey's, July 1863.*

The cover could have printed darker.

But I'm 87% pleased with how the fashion plate turned out.
I printed the pages in 16-page sets as two-sided "pamphlets", then sewed each together. The pamphlets and folded fashion plate were then glued into the spine of the cover.  I used 8.5" x 11" letter paper due to its availability, with the result that the final magazine is slightly smaller than the originals, which would requires 10" x 13" sheets.  Whether or not I can find large paper to print on, next time I'll try sewing the pamphlets differently, for a flatter product and tighter spine.  On the upsides, this one was legible, and provided appropriate conversational fodder for the weekend. It also is closer to the originals than any re-print I've so-far found offered (at least in terms of being sewn rather than stapled, and having the colored plate at the beginning).  I did end up omitting the title page for the half-yearly volume due to how the page numbers were working out.  I think it would have been neat to include it--showing how the individual issues could be collected and bound into a volume--but wasn't able to make it work this time around.  Next time!


*Which was probably showing up in most US homes sometime in mid-late June, based on the research in this Sewing Academy thread.

Wednesday, November 29, 2017

1855 Warm Undersleeves, part 2: Frills

To refresh, here are the frill instructions:
  Cast on 90 stitches with white wool, and knit 3 rows before commencing the pattern.
      1st row Slip1, knit 1, a pearl 1; knit 2 together three times; repeat from a, finishing with knit 2.
      2d. Slip1, knit 1, a pearl 1, knit 12; repeat from a.
      3d. Like 2d row.
      4th. Slip 1, pearl 1, a knit 1, pearl 12; repeat from a.
     Repeat rows 1-4 5 times (total of 3 rows plain and twenty rows pattern) in white, and then once (4 rows) in colored wool.
     These four rows form the pattern, which must be repeated five times with white, then once with blue, and cast off loosely. Two frills are required for each sleeve: the upper is placed about an inch and a half above the under, which is sewed by the edge of the sleeve.
These frills are a bit problematic, as there's an error in the instructions.  The many "knit two together" instructions in line 1 are not balanced by making new stitches anywhere; therefore, the total number of stitches drops by almost half every fourth line. Like this:  

Godey's 1855 knitted undersleeve frill, first attempt
The frill as written: after four repetitions,
there's only a dozen stitches left. 

I'm not the only one to notice this problem.  My solution to it, in attempting to keep as close to the written instructions as possible, was to simply add a yarn over before each 'knit 2 together'. This creates a series of small eyelets in each fourth row of the motifs.  It's not nearly as open as the illustration suggests, but it's a pretty effect, and should be plenty warm (and I'm not a sufficiently experienced knitter to get too creative here).  In the interest of making the motifs match-up, I decided to make the first and last 2 stitches into a stockinette stitch, and use sequences of 6 knits (or purls) between "ridges" on rows 2-4 instead of 12 (otherwise you get a 14-stitch repeat in the first row with a 13-stitch repeat subsequently).  The purl-heavy fourth row made me suspect that a stockinette effect was intended.  I initially tried carrying this through all four rows (first row largely as written, 4th row,  2nd/3rd row, 4th row), but thought that the eyelets tended to disappear; instead, I decided to go with "1st, 2nd, 4th, 2nd", so the three non-eyelet rows give a stockinette stitch with occasional ridges, while the eyelet row is opposite. 

So, my revised frills:
Cast on 96 stitches, and knit plain for three rows in white yarn. 
Motif:
1st row: Slip 1, knit 1, [purl 1, yarn over, knit 2 together] 13 times, purl, knit 2.
2nd row: Slip 1, knit 1 [purl 1, knit 6] 13 times, purl, knit 2
3rd row: Slip 1, purl 1 [knit 1, purl 6] 13 times, knit, purl 2
4th row: Slip 1, knit 1 [purl 1, knit 6] 13 times, purl, knit 2
As per the originals, this four row motif is repeated four times in white, and once in color (I used purple instead of blue):

Knit Frills, 1855 Undersleeve Pattern
Four knit frills.

The frills are considerably more substantial than the open petals depicted in the magazine, but I think they also look a bit warmer.  We'll see how they end up working.  If I do this pattern again, I'd like to find a way to make the ruffles look more like the illustration (which will probably involve cookies and bribing a more experienced knitter to help).

Wednesday, November 1, 2017

Warm Undersleeves, 1855: Part 1

It's now November, and a bit past due to pick up last winter's knitting project.

Warm Undersleeve illustration, from Godey's, November 1855
"Warm Undersleeve", Godey's, November 1855

From the November 1855 issue of Godey's (page 456):
WARM UNDERSLEEVE
       Materials  One ounce of white single Berlin wool; quarter of an ounce of blue wool; pins, No. 14.
      Cast on 60 stitches, and knit in brioche stitch till the length required, about half a yard, is completed; cast off; join up the sides with a rug needle and wool, and knit the frills as follows:
      Cast on 90 stitches with white wool, and knit 3 rows before commencing the pattern.
      1st row Slip1, knit 1, a pearl 1; knit 2 together three times; repeat from a, finishing with knit 2.
      2d. Slip1, knit 1, a pearl 1, knit 12; repeat from a.
      3d. Like 2d row.
      4th. Slip 1, pearl 1, a knit 1, pearl 12; repeat from a.
     Repeat rows 1-4 5 times (total of 3 rows plain and twenty rows pattern) in white, and then once (4 rows) in colored wool.
     These four rows form the pattern, which must be repeated five times with white, then once with blue, and cast off loosely. Two frills are required for each sleeve: the upper is placed about an inch and a half above the under, which is sewed by the edge of the sleeve.

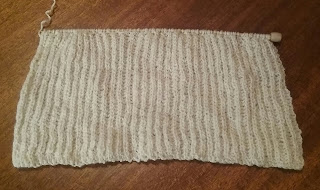
So, the first step is a rectangle in brioche stitch, 60 sts (really 90) wide and about 18" long. Brioche stitch is "yarn-over, slip, knit two together." This Brioche tutorial on youtube helped me get it going.

Brioche stitch, 1855 knit undersleeve from Godey's.
Sleeve in progress.

I used size two needles and fingering weight white wool; there's an old SA thread where Colleen Formby sad that berlin wool is about a fingering weight, and her article on period knitting indicates that the "size fourteen" needles of the period compare to a modern size 2 or 3, depending on which period standard is being used. [I've since acquired a set of Virginia Mescher's knitting reference cards, which agree on the fingering weight wool, but suggests that size 14 needles are closer to a modern size 0.]  Nonetheless, I'm satisfied with how with the weight/feel of the piece so far.