Showing posts with label 17th century. Show all posts

Thursday, March 20, 2025

Book Review: The Domestic Revolution

The Domestic Revolution by Ruth Goodman
 

I have a new favorite Ruth Goodman book. Embarrassingly enough, I ordered The Domestic Revolution: How the Introduction of Coal into Our Homes Changed Everything when it first came out in 2020, read it three times, but somehow never actually finished this post. The book is a bit of a departure from the author's previous titles, spanning the 16th to 19th centuries instead of focusing on a single century/reign, and it really delves the changes over that period rather than giving a snapshot of a particular time. As the subtitle suggests, this book explores the causes and effects of adopting coal as the primary domestic fuel in England. 

The book is 302 pages (excluding the bibliography), divided into nine chapters. The first of these discusses the various fuels that were used before the widespread adoption of coal; later chapters explore the factors which led to coal replacing wood as Britain's main fuel coal, the evidence for how/where coal use spread through the island, and the resulting the changes in land-use patterns, cooking methods, house fixtures, and cleaning practices that arose from domestic coal use. The primary sources are eclectic, including wills/inventories, charitable bequests, household manuals, cookbooks, surviving buildings, advertisements, patents; I find their use persuasive and the conclusions drawn from them plausible. The author also describes her own historical experiments where relevant (particularly concerning cooking and the idiosyncrasies of using different fuels) which I think adds a unique practical dimension to the discussion.

This is a fairly text-heavy book. The images, averaging just over six per chapter, are often copied from period sources. There are no color illustrations, and the modern images are mostly simple illustrations or diagrams (including grates, coppices, peat cooking fires, the reconstructed Mary Rose galley.) There were times when I wished I was standing next to a reconstructed oven with the author pointing out the relevant features, but overall the text carries the message and the book doesn't really suffer from having few illustrations. As always, the writing is approachable, and reads like a friend telling you all about their latest historic research project. The text does not use numbered citations, but the bibliography is divided by chapter.

Overall, I found the book enjoyable, and thought-provoking. I particularly like how the author ties the different subtopic to eachother: how land-use affects the availability of different fuels, how those fuels affect cooking styles and oven design; tracing the changes to English cuisine as coal replaced slower fuels; and even the different cleaning methods needed in a coal-burning versus wood-burning households.

*In addition to wood, the first chapter explores the practical aspects of other domestic fuels used in Britain prior to and aside from coal, including peat/turves, heather, gorse/ling, furze, and animal dung.

Score: Five Stars.

Accuracy: High.

Strongest Impression: An interesting synthesis of Ruth's many areas of expertise, this book caused me to seriously rethink the interconnected-ness of housework, energy, land-use, and foodways, as well as offering insight into how fuel choice shapes cooking (and many other things.)

Tuesday, December 26, 2023

Early Modern Cookery Books

On the second day of Christmas: a compilation of medieval and early modern cooking references I've found online. This is more of a gift to myself, in that the eclectic spelling makes it difficult to search for some of these by name, even when I know which book I'd like to use.

The Forme of Cury (c.1390) 

Two Fifteenth Century Cookbooks: Harleian MS 279 & 4016 (c. 1430-40 & c.1450)

Wynkyn de Worde's The Book of Kervynge/ The Book of Carving (1508) 

Le Grant Cuysinier de Toute Cuysine (1550, French)

The Good Husvvifes Jevvell/ The Good Huswifes Jewell (1582)

A Book of Cookrye (1584/1591)

Edward Allde's The Good Hous-wiues Treasurie/ The Good Housewife's Treasury (1588)

A Good Huswifes Handmaide for the Kitchin (1593)

A Boke of Cookerie and the Order of Meates to Bee Serued to the Table (1629)

Gervaise Markham's English Housewife (1631)

Hannah Wooley's The Cooks Guide (1664)

The Closet of the Eminently Learned Sir Kenelme Digbie Kt. Opened (1669) Transcription.

The Accomplish'd Lady's Delight (1677)


W. Carew Hazlitt's Old Cookery Books and Ancient Cuisine (1902) lists additional early cookbook titles, some of which I have not yet found available online.


Friday, December 1, 2023

Original: Katarina of Sweden's Doll

Ok, one more early modern original. Dolls are very seasonal for Christmas, and this one even has a lovely muff to keep her hands warm in the winter cold.

.
Fashion Doll, c. 1600, Staten Historika Museer.

I'm relying on translation software, but I believe the museum's website describes this doll as wearing a purple silk gown with gold lace; red silk sleeves (now faded) with gold mesh and pearls, and embroidered in red, silver, and gold; silk petticoat with silver; rose-color taffeta petticoat with gold; and a yellow taffeta bodice (bodiced petticoat?). The doll's face is silk embroidery on taffeta, with real hair; headdress of gold lace and pearls. [Additional views, including the doll's braided hairstyle, are available at Isis' Wardrobe.]

This doll is attributed to either Princess Katarina of Sweden (daughter of King Charles IX and by marriage the Countess Palantine of Kleeburg; she was also Gustavus Adolphus's older half-sister and guardian to young Queen Kristina) or her mother Maria of the Palatinate-Simmern. An alternative date range of roughly the 1590s is also given in the object description; Katarina was born in 1584, and was the only surviving child at the time of her mother's death in 1589.

Wednesday, May 24, 2023

Medieval Drawstring Pouch

Continuing the catch-up posts, last spring I made some fingerloop braids at the Two Rivers Faire, with the intention of making a round purse based on some of the archeological examples from Amsterdam:

  • Leather purse (c.1300-1700), 11" diameter, 64 punched holes (~1/2" for a hole plus its adjoining space, punch size probably ~1/8 inch with 3/8 gap judging by how large the punched holes appear relative to the space between)
  • Another, 5.6" diameter, ~48 holes (~3/8" for hole plus space, holes probably ~1/8")
  • And a third, 12.5" diameter, ~72-74 holes (~just over 1/2" per hole, hole size nearing 1/4")

Of course, since embarking on this endeavor, the database has been updated to indicate that the ties were likely leather. Despite the simple design, my leather-punching skills proved inadequate, and I ended up letting this simple item linger in the To Do pile all winter. It's just a 9.5" leather circle, with 40 holes punched around the perimeter, and the striped fingerloop braid threaded through.

The pouch, open almost flat.

Closed pouch. Holds my replica coins and dice very well.


Sunday, May 7, 2023

Chirography Resources, 16th-18th Century

I need a good hand for 16th century writing, and thus started gathering this list of letter forms and copybooks available online:

Excerpts from A booke containing divers hands (1550-1602) including Italic and Secretary letter forms. [Columbia University Library has also digitized the title page.]

Incomplete alphabets derived from 16th-18th century sources (Italic, Secretary, and Chancery hands)

The Pens Excellency (1618) includes the forms for Secretary hand (pgs 13-14); Bastard-Secretary or Text (p.18); Roman (p.21); Italian (p.24); Court (p.28); Chancery (p.29); as well as the Greek (p.30) and Hebrew (p.31) alphabets.

The Pen-mans Recreation (1673)

The Paul's Scholar's Copy Book (1709)

Round Text. A new copy-book (1712)


Tuesday, May 2, 2023

Ink, 17th-18th century

I went looking for a home-made ink for 16th century use, and ended up finding a number of recipes from the 17th/18th centuries:

The Mysteryes of Nature, and Art (1654) has a page of recipes for different colors of printing ink, as well as a "good writing ink".

Naturall Experiments, or Physick for the Poor (1657) has instructions for red, green, blue ,and gold-colored ink. 

Eighteen Books of the Secrets of Art and Nature (1661) page 272 has a simple receipt with copperas, oak galls, gum arabic, and white wine

Polygraphice (1685) Another oak gall/copperas/wine/gum arabic receipt

Modern Curiosities of Art&Nature (1685) has recipes for India ink, powdered ink, "an excellent ink for writing", ink for parchment or grease-paper, silver and gold ink, etc.

New Curiosities in Art and Nature (1711): India ink recipe with horsebeans 

Three Essays in Artificial Philosophy (1731)

Dictionarium Polygraphicum (1735) the "Another good black ink" receipt with copperas, oak galls and stale beer looks promising. 

The Laboratory (1740):Same as others, uses alum, sal ammonia.

The Instructor; Or Young Man's Best Companion (1742) Like the others, with rock alum added

I decided to try the common combination of oak galls and copperas (aka ferrous sulfate aka iron (II) sulfate), which are both conveniently available at my favorite dye supplier. The main difference between the first and last of these seems to be the inclusion of alum in the later 18th century versions. There's also some variety in whether the solvent is water, beer, or wine.

 I went with the stale beer/copperas/oak gall/gum arabic version from Mysteryes of Nature, at a 1/2 scale (1/2 pint beer, 1 handful galls), though the vitriol quantity is not given (the gum is to be 1/3 that amount). So, I filled in from the Dictionarium Polygraphicum which calls for 2-3oz vitriol/3 pints solvent, which I ended up approximating as 1 tsp vitriol and 1/2 tsp gum arabic.

Ingredients assembled.


Coarsely cut oak galls, in a not-for-food-use glass jar.


The galls soaked in beer overnight.

I let the galls soak almost 24 hours, having intended to leave them overnight, then running into scheduling issues. The liquid stayed a dark, gross brown the whole time. [It also smelled of off-beer, as a warning.] I filtered through muslin to remove the galls and some of the scum, then added the vitriol and gum at which point the ink started turning black. I stirred it in a hot water bath as it darkened, letting it go about 2 hours total. This is more than was called for, but as some of the other recipes want you to heat it for days at a time, this seemed reasonable. I decanted the ink into a storage container (and my clay inkwell) and gave it a try.

Finished ink. It writes well with a steel nib, now to try some quills.


Friday, October 28, 2022

To Preserve Roses or Any Other Flowers (1656)


From A Book of Fruits & Flowers:

To Preserve Roses or any other Flowers 

Take one pound of Roses, three pound of Sugar, one pint of Rose water, or more, make your Syrup first, and let it stand till it be cold, then take your Rose leaves, having first clipt of all the white, put them into the cold Syrupe, then cover them and set them on a soft fire, that they may but simper for two or three hours, then while they are hot put them into pots or glasses for your use.

In choosing this receipt for my excess marigolds, I accidentally conflated it with the preceding "A Conserve of Roses", which indicates that the method works for any flower conserve, such as violets, cowslips, marigolds, sage, and something I've never heard of which looks like "seavoise." However, this one claims to be good for "any other flowers" so I figure it's a fair play.

At any rate, the main difference between the two recipes is that the "preserve" receipt involves making a syrup, while the "conserve" has the liquid added first to the flowers, followed by dry sugar.


Ingredients

To make on a 1/8 scale, I started with 2 oz of marigold flowers, 6 oz granulated sugar, and 1 fl oz of plain water (having run out of rosewater momentarily). The differentiation between roses/rose leaves [petals?] in the instructions led to me weighing the whole flowers, but then removing and using only the petals. I think it can be read either way (use 2oz of petals, or use the petals off of 2 oz of flowers), and thus is open to experiment. 


Probably my most successful attempt at boiling sugar...

I combined the water and sugar in a saucepan on "medium" (on a burner that runs hot), and boiled a syrup for some 15 minutes. Meanwhile, I removed the petals from the flowers. After letting the syrup cool about 20 minutes, I stirred in the petals, and set it all to simmer on med-low for about 3 hours. This produced a reddish, viscous syrup that I poured into a pipkin for storage.

Thick texture, weird taste, did not immediately balance my humors.

The preserves taste... not great and honestly less sweet than I'd expect for something well over 75% sugar by weight. So far as I can tell, marigold's use in the 17th-18th centuries is largely medicinal, so perhaps taste isn't a high consideration. I think next time, I'll just keep the flowers for dye, or maybe distill some marigold water and see if it really does cure headaches.

Wednesday, August 10, 2022

Plain Coif and Forehead Cloth


Plain coif and forehead cloth.


More faire-related wardrobe additions. Having decked one coif and forehead cloth in lace and (begun) embroidering the other, I found myself without any fitted headgear appropriate to my lowly social station. That is, it's too hot to wear a respectable late Elizabethan ensemble, so I need a plain coif  to go with my kirtle/smock/apron combo. I could just tie a rail over my hair...but coifs are more fun.

I used a light-weight white linen for both, with bleached 1/4" linen ties on the forehead cloth and a linen cord for the coif.

Friday, August 5, 2022

Boemio Cloak, c.1580-1640

With most of my early modern events at the hottest time of the year, I've so far avoided making any garment heavier than a wool waistcoat or two. But, after several rainy musters and a chilly faire in early May, I've concluded that some warmer garments are advisable.

I decided to try the Modern Maker's drafting methods this time. For a versatile, wearable garment, I chose the Bohemio: a short, full cloak with standing collar and contrasting lining. It was also one of the few cloak patterns in the book explicitly described as being worn by women.
 
One very full cloak.
 
The personal measuring tapes were a bit time-consuming to make, but fun in their own way. They definitely made the drafting process go smoothly, as each point was simple a matter of measuring to the designated symbol (and sometimes adding/subtracting like Roman numerals). At least on this loose garment, I didn't have to do any alterations after drafting--the cloak is a comfortable length and perfectly fitted at the shoulders and neck.
 
Custom measuring tapes...in abbreviated Spanish.


I wanted a proper piece of outerwear, so I chose a heavily fulled wool broadcloth for the exterior. My regular suppliers were out of the really interesting shades and I had my heart set on Lincoln green, so I opted for an emerald green melton wool from the Dorr Mill Store. For the lining, I selected a bright "weld" yellow mid-weight linen from Fabric-store.com.
 
 
A full circle & then some.

I consulted Patterns of Fashion IV for information about extent short cloaks, and while it mentions green wool among the known cloak materials, and both dyed linen and yellow linings, I do not have any specific evidence for the combination of a green wool exterior with a yellow linen lining (much less one of this particular style). That being said, the material and colors are at least plausible and I like the them together, especially with the contrasting front panel.

I got it into my head that I wanted to sew the whole cloak by hand, which wasn't as bad as it might seem. The main body was four parts (two backs, two fronts), with a two-piece collar. All of those pieces were also lined. I used a double row of running stitches to join the seams, based on an original 18th century cloak that I may have started copying just before this project. Neither book had detailed instructions for lining the garment, so I ended up using the Tudor Tailor's method of sewing the lining separately, turning the raw edges and then slip-stitching the two layers together along the top and sides. The collar (two wool layers) was made up separately and attached to the wool cloak, with its raw edges hidden under the linen lining. The fulled wool was heavy enough that I had to miter the corners to get them laying neatly. Following Quin's advice, I hemmed the two layers separately-- or rather, I hemmed the linen, and left the wool with a raw cut edge, which is a perk of broadcloth. This saved me approximately 3 lifetimes worth of pressing heavy wool, and was definitely the right decision.
 
I get the tiniest stitches working on linen.

Double row of running stitches in black silk.

The Modern Maker instructions do not mention or show any fastener on this cloak. I thought to add one, but have been pleasantly surprised by how much it is not needed. The fabric is well-balanced front and back, so that the cloak stays on whether I'm walking or standing still (with the revers turned back or not). I haven't tried running or anything, but it doesn't have the tendency of my more modern cloaks to slither off at the slightest movement. It also weighs a ton, so I'm glad it's hanging from the shoulders and not a clasp at the throat.

Monday, August 1, 2022

Original: Doublet and Breeches, 16/17th-19th Century

 In an early modern mood, and selected this month's original garment for that reason. LACMA has this marked as "late 19th century construction, 16th-17th century textile" without further elaboration--I suspect they mean that it was made or altered for fancy dress or theatrical use in the late 19th century from extant 16th/17th century garment.


Red velvet doublet and breeches, courtesy LACMA.

Whatever it's particular origins, I do like the points. And the paned trunkhose. And the wings. And the buttons. It's a fun garment.

Sunday, July 31, 2022

Fingerloop Braid Color Variations

Two fingerloop braids, with bonus whetstone and shears.


Getting ready for Faire, and realized I never posted these fingerloop braids from my last 16th century event. They're braids #4 & #6 ("A Lace Baston", "An Endented Lace") from Tak V Bowes Departed. Both have the same braiding patterns as #2 "A Round Lace of Five Loops", which I previously used as purse strings. I've technically made #6 before (the endented braid for a drawstring on the sweetbag project), but revisiting it in conjunction with the others really helped me internalize how the color patterns work.

Close up on the patterns: stripes and chevrons.

All three of these are the same braiding pattern. Number #2 (the black purse string) just uses 5 loops of the same material, giving a plain round cord. Number #6 (above, tied on the whetstone) uses two loops of one color and three of the other, each starting on separate hands, so the colors alternate and change place as you work; this produces the chevron design. Number #4 also uses five identical bicolor 'loops' made by tying a thread of one color to a thread of the other: this produces the vertical lines down the cord IF you keep the loops aligned.

It's probably obvious to everyone else, but I found this this experiment very helpful for improving my understanding of how the braiding really works. The patterns were also nice training tools for keeping tracking of your loops (chevron) and picking up the right side of the loop (stripe). The solid color looks more forgiving, but makes it harder to tell where errors occurred. I'd honestly recommend that anyone starting on fingerloop braiding try all three of these variant braids together as an exercise.


Wednesday, May 25, 2022

HFF 5.23: Dessert


The Challenge: Dessert. 

I went a little off-task on this challenge: hypocras or ipocras is certainly sweet, and I like drinking it after dinner, it's but not exactly a dessert in its time period. As far as I can tell, hypocras is simply a drink (if you're rich enough for the ingredients), and/or may have medicinal purposes. It can certainly be used as a vehicle for consuming herbal medicines, per the different recipe books I was looking through.

The Recipe: To make Ipocras From The English House-wife (1631)

To make Ipocras, take a pottle of wine, two ounces of good cinamon, halfe an ounce of ginger, nine cloues & sixe pepper cornes and a nutmeg & bruise them and put them into the wine with some rosemary flowers and to let them stoepe all night and then put in sugar a pound at least & when it is well setled let it run through a woollen bag made for that purpose, thus if your wine be claret the Ipocras wil be red, if white, then of that color also.

The Date/Year and Region: 1631, English 

How Did You Make It: A pottle being a half-gallon, I decided to make a half-batch of the receipt, which is 1 quart. Conveniently, this is the exact volume of my Renaissance pitcher (from Reannag Teine). Scaled down, this calls for:

  • 1 quart wine
  • 1 oz cinnamon (sticks)
  • 1/4 oz fresh ginger
  • 5 whole cloves
  • 3 whole peppercorns
  • half of a nutmeg [I ended up skimping on this because I only had ~1/4 of a nutmeg available]
  • rosemary flowers
  • 1/2 lb sugar (1 generous cup of granulated sugar)

I measured out the wine, for which I used Barefoot's "buttery chardonnay", then cut the ginger into coarse pieces, and gave the cinnamon/cloves/peppercorns/nutmeg a few hits with the mortar and pestle to bruise/break them a little. I then added all the spices to the wine, and let it sit in the refrigerator for two days. I then added the sugar and a small handful of dried rosemary leaves (having no flowers). As the sugar did not readily dissolve, I let it sit overnight in the fridge before straining out the solids. Even after the extra time the sugar hadn't fully dissolved, so I ended up discarding some after decanting the wine.

Total Time: 10 minutes, over 2 days (intended) or 4 days (what I did here)

Total Cost: Depends on the wine.

How Successful Was It?: Too much cinnamon, but in the sense that it over-powered the other flavors a bit; it didn't burn or anything, it just tasted like cinnamon wine rather than having many different complex flavors combined. I found the receipt bit too sweet, but that's probably because I used a fairly sweet white wine and then added a lot of sugar. There was so much sugar sludge in the wine, even after lots of stirring, that I think the solution just got saturated. In the future, I would like to play with using a more dry or tart wine, reducing the amount of cinnamon (or increasing the other items), and using a bit less sugar. I'd also be tempted to try heating the wine before adding the sugar, to aid in dissolving it.

How Accurate Is It? I put the wine in the refrigerator mostly to keep it from attracting flies--which always seem to be a problem this time of year--though it should have been fine at room temperature. This may have make the sugar less soluble, so it's worth investigating further. I then proceeded to forget that I was only supposed to let it steep one day, so everything went a bit longer than it should have--except the rosemary, which I only remembered when I meant to go strain everything out after two days. I added the rosemary leaves with the sugar, and let it all sit overnight in hopes to make up for the missing time steeping the rosemary

I ended up skimping on the nutmeg, just because I had closer to 1/4 than 1/2 of a nutmeg left (and haven't been able to source whole nutmegs since before the pandemic started). I also wasn't able to source any rosemary flowers just now, but I did throw a few dried leaves in, albeit late. In total, the spices sat in the wine for 3 days instead of one, with the sugar and rosemary added the day before.. Some residual sugar and flecks of clove/pepper escaped repeated straining,which is my own fault for using a metal strainer instead of cloth.


Ingredients assembled.


Tuesday, May 24, 2022

HFF 5.22: Stars


The Challenge: Stars. Make a "star" dish to catch the eye. Or something star-shaped, inspired by the heavens, etc

The Recipe: French Bisket from The Cook's Guide (1664) or Bisket-Bread from The Accomplish'd Lady's Delight (1677) [with further reference to "To Make Bisket" The Closet of the Eminently Learned Sir Kenelme Digbie Kt. Opened (1669).]

I chose these (very similar) recipes, in order to use some star anise.

The Date/Year and Region: 1664, England

How Did You Make It: I made one-third of the recipe from The Cook's Guide. In full, it called for:

  •  1/2 peck [1 gallon or 16 cups] flour
  • 2 oz anise seed [~4 Tbsp]
  • 2 oz coriander seed [~4 Tbsp]
  •  6 egg whites
  • 1 pint ale-yeast [substitute 1 oz/28 g/4 tsp yeast in 1 pint water]
  • enough water to make a paste
I took 5 1/3 cups all-purpose flour, and mixed in 2 1/4 tsp ground coriander and ~2/3 oz of star anise (hand-ground in a wooden mortar); to this I added 2/3 cup of water (with 2 tsp dry yeast proofed therein) and 2 egg whites, and mixed it all up, with an additional 1/2 cup of water to make a workable paste. I rolled this out by hand into long rolls, and divided in two to fit my largest pan. I baked the rolls at 325F for 30 minutes, then let them sit in the cooling oven overnight. The next evening, I cut them  into pieces about ~1/2" thick. For the icing, I beat 1 egg white into peaks, and stirred in 1/2 cup powdered sugar and 1 tsp rose-water. I iced the slices, and put them in an oven pre-heated to 325F and promptly turned off.

Total Time: 2 days. About 1 hour worth of work, separated by baking and cooling times.

Total Cost: I used ingredients on hand, no idea as to price.

How Successful Was It?: These are not great. To say the least. I expected something like hard-tack from the double-baking/drying instructions (not to mention the note that they "keep all year"), but was hoping for something closer to biscotti. It ended up like licorice-flavored hardtack. The only sugar's in the icing, so the overall effect if more like a hard bread than a cookie, but the anise flavor is very strong, and completely overwhelms the coriander and rosewater flavors. The icing was thinner than I would have liked (more like a glaze), which I'm blaming on the eggs not being beaten enough.

I did bring these to a reenactment, described as "anise abominations", and a weirdly large number of people were actually willing to try them. Exactly one person actually liked the texture (but agreed there was a bit much anise), while most others were morbidly curious and/or eager to experiment with what beverages the cakes could be soaked it to soften them.

How Accurate Is It? I hope that the texture/flavor issues are a result of user error. My scale really isn't meant for measuring less than 1/2 oz quantities, so I suspect that I ended up using more anise than was really called for. Regarding the baking, I thought from the instructions in The Closet that it really shouldn't be given much rising time, but on further reflection, note that that recipe only uses water (more like hardtack) while the eggs and barm/yeast in the other two could point towards a more bread-like treatment of the first baking (allowing time to rise, baking it somewhat faster, and then using a slower oven to dry it later). The Cook's Guide and Lady's Delight recipes differed only in the number of egg whites (4 versus 6) and days between bakes (1 or 2). I ended up mostly using the former, since it specified icing with egg white, sugar and rosewater, where the latter recipe just said to "sugar" the bisket.


Ingredients


Preparing for the second bake


Sunday, October 10, 2021

HFF 5.6: Luncheon

Still writing up the backlog....


The Challenge: Luncheon. Make a mid-day meal from your preferred era.

[I sorta cheated on the spirit here, since the mid-day meal of the 16th century is still dinner, aka the main meal of the day.]

The Recipe: "To boyle a Capon" from A Book of Cookrye

Take your Capon and boyle it tender, and take out a little of the broth and put it in a little pipkin with whole mace and a good deale of ginger, and quartered Dates, and boyle your corance and prunes in very faire water by themselves, for making of your broth black and thicken your broth with yolks of egges and wine strained togither or a little Vergious, and let your broth boile no more when you have thickened it, for it will quail.  Then cut sippits in a platter, and lay in your Capon, and laye your fruite upon it, so dooing serve it out.

The Date/Year and Region: British, 1591 (First edition 1583)

How Did You Make It: Over an actual fire!

I started by bringing a cauldron of water to boil over the fire, then adding a whole (pre-cleaned) chicken, and letting it continue boiling ~90 minutes. At that point, I cut the dates and prunes, and put 1/2 cup of each into a sauce pan with ~1 cup of the chicken water, and set it to boil on a trivet (which happened almost instantly--it was a very fast fire). Having misread the recipe, at this point I also the added 1/2 cup zante currants, 1/4 tsp each of powdered ginger and mace [the prunes and dates should have boiled separate first, then been combined with the broth and everything else]. Once the sauce had started boiling, I pulled it off the fire, added 1/2 cup white white and 1 egg (beaten well together), and stirred the sauce near-but-not-on the fire until it thickened, which took about a minute. Once the sauce was done, I confirmed the chicken had reached 165F, then removed it from the cauldron. 

To plate, I cut sippets of bread, arranged the chicken on top, and poured the sauce over all.

Time to Complete: About 2 hours. It would have gone ~30 minutes faster if I'd started the sauce earlier, since the fixed minimum time is "how long the chicken needs to cook through". 

Total Cost: About $25. 

How Successful Was It?: Needed a bit of salt. but otherwise good. The sippets got soggy fast, so using toasted bread would have been better there. When I made this again (with 4 birds, for an event) the next week, I added some salt to the boiling water, which improved the flavor to both bird and sauce. That second time, I used only 3 eggs instead of 4 in the sauce, and whether due to insufficient egg or less heat, the sauce never really thickened nicely. In both cases, I ended up boiling the chicken longer than needed, such that the bird started falling apart when I dished it up. I'm still getting used to the fruit+meat flavor combinations of the medieval and renaissance periods, but this one does work in my opinion.

How Accurate Is It?: One of my more accurate attempts, what with actually cooking it on a fire both times. I even used a ceramic pipkin for heating some of the second-attempt sauce next to the fire--and the first time, ate it with period-appropriate utensils, ie, the hand. The usual zante-currant-for-currant substitution was used, and the proportions in the sauces were all a fortunate guesses from my first attempt. I don't have an accurate 16th century cauldron or cooking pot, so 20th century cast iron was used. Also, I used a general grocery store chicken, not a real capon (though I'm given to understand that modern meat birds are closer in size to capons, ie neutered roosters, than to other historic birds). 

Sauce and boiling chicken (with bonus 20th century
dessert in the dutch oven).

Boyl'd Capon.

Sunday, January 10, 2021

Plaited Straw Hat

Handsewn straw hat
Hat of indeterminate vintage

It's a completely hand-plaited, hand-sewn hat. Shaped free-hand. The plait is 7-strand "Dunstable" (except not really, because it's quarter-split rye instead of whole straws, but I used the "over 1, under 2" plait). There's about 12 yards of plait in in, and on the order of 40-50 hours work. 

The year is a bit open-ended. I had intended it to have a very shallow crown, similar to one I saw in a Bruegel painting (almost flat, but very slightly convex--suffice to say, that attempt got rapidly out of hand). And while most of my sources do point to 16th century for early examples of plaited straw hats in Europe, they seem to have picked up more in England in the 17th century. However, the splits are a more recent innovation, supposedly dating to the early 18th century, but rapidly multiplying in form and use from the early 19th.  I could use it for working-class, rural 19th century summer-wear, though what little documentation I've found for such humble items suggests a flatter shape would be more likely.

I'll be talking about this project (and a ton of research done along the way), this Saturday at the Fort Nisqually virtual program.

Friday, December 18, 2020

Sweets Bag, 15th/16th/17th century

Sweet bag, after a fashion. It's more a sampler for techniques than a proper sweet bag: the few surviving examples of which I can find tend to be much more fully embroidered, and ornamented with tassels and cords.

The bag is white linen, embroidered with red silk after the style of this smock. I started it a few years back as practice for the embroidered coif project, but never finished making it up. The squirrel is copied from the above smock, the other motifs (rose, bee, bleeding pelican, oak leaves, mutant-raspberry thing) are all out of A Schole-House for the Needle. The rose side is work in two strands (starting split stitch, switching to back); the squirrel side in single-strand backstitch.


Squirrel, acorn, and raspberry(?).

The string is "An Endented Braid" (5-loop round braid in bichromatic chevrons) from Tak V Bowes Departed, looped in blue and gold size FF silk.


Rose, bee, and a pelican stabbing itself.

I don't actually like how the ultra-narrow casing works, and wish the motifs were all a bit lower down. I'm already tempted to take out the casing for some added height and re-thread the the strings through the material itself to see if the closure works better. And because that appears to be the more customary method. Maybe add some extra tassels... 


Tuesday, December 15, 2020

HFF 4.25: Yuletide Headstart

Detail from an 1850s painting with a woman's hands gesturing over a table of food.


The Challenge: Yuletide Headstart--Make a seasonal dish for the holiday of your choice, or a food that needs to be prepared in advance of serving. 


The Date/Year and Region: 1655, England

How Did You Make It:  I went for 3/4 scale. I blanched 6 oz of almonds (brought to boil on the stove, then put into cold water). The outer shells worked off easily. Once dry, I crushed the almonds in a mortar, making a paste. I added a few splashes of rosewater as I went along (about 1-2 Tbsp), working the almonds into a paste. This was really slow, so I did try duplicating the effort with a blender (and added 6 oz of pre-blanched, pre-sliced almonds to make 12 oz total). To the rosewater-almond paste, I added 6 oz of pounded granulated sugar of sugar. I tried coloring some of it with a little saffron in rosewater (that being the only coloring-compound in the book I had on hand), but found it made little difference to the already-yellow-hued almond paste. I finally used modern food coloring before shaping the paste, and putting it into a cooling oven overnight (turned off the oven after baking cookies and put the almond paste in).

Time to Complete: About an hour of beating almonds, ~15 minutes to blanch and peel them.

Total Cost: Don't recall.

How Successful Was It?: Not really. The almonds made a paste. The taste isn't bad. But neither the mortar nor the blender really got the last few chunks of almond worked in, and I eventually gave up on the 'fine paste' because I just couldn't get it to incorporate smoothly. The freshly-blanched almonds were much easier to work with than the fully-dried-out pre-blanched ones.

The sweetness is good, and the rosewater is mostly an aftertaste (though very prominent). I think this isn't worth the effort when I can just buy a perfectly smooth box of almond paste for about the same price as the almonds. However, it was interesting to try, and more theoretically straight-forward than expected. I probably won't make this again, but the temptation to try with the food-mill (or a larger mortar and pestle...) exists.

How Accurate Is It?: I did cheat with the mixer and modern food coloring. I think my next step to improved accuracy would be to try some of the historic coloring techniques (though probably not the gilding).


It begins: whole almonds, blanched/slivered almonds,
rose water, and a marble mortar & pestle.

Freshly blanched almonds being worked into a paste.

The world's most awkward almond paste holly.

Sunday, October 18, 2020

Book Review: The Pocket


Book cover showing a linen detached pocket embroidered in a red blue and green floral pattern.

The Pocket: A Hidden History of Women's Lives by Barbara Burman and Ariane Fennetaux is a well-sourced yet highly readable survey of the 240+ year history of detached pockets.

This book is lavishly illustrated with color photographs of original pockets, supplemented by contemporary depictions of pockets in use, primarily paintings and engravings, to a total of 161 images. The book's 214 pages are divided thematically into seven chapters (plus introduction and conclusion), investigating not only the construction and use of pockets, but also the social, economic, and sentimental implications of pockets throughout the period. There are a further 40 pages of notes and indexes, including a list by decade of all the court cases at the Old Bailey in which pockets are mentioned; original pockets included in the work are also listed by museum for easier research. The examples and sources are largely British. 

There are no diagrams or instructions for replicating period pockets, but the many photographs offer ready inspiration for material, style and decoration; a fair number of close-ups are included, highlighting old repairs and interesting construction details.

I found this book very interesting. The thematic arrangement and lively writing style made for an enjoyable read. The non-chronological narrative makes feel less like a reference book, though the extensive endnotes and works cited offer a good start for further research. Judicious use of sticky-notes might also be in order for someone interested in a particular subset of the book's timespan. It seems like the late 18th into the early 19th century has the most material featured, but considering the paucity of early sources in general and the waning popularity of the garment on the other end of the period, I think the authors make a good attempt at including the whole timespan c.1660-1900.

Stars: 5

Accuracy: High

Strongest Impression: Informative and highly enjoyable. It's already added nuance to my understanding of pockets during my main time period (1855-1865)


Tuesday, August 25, 2020

Embroidered Coif, Design Test

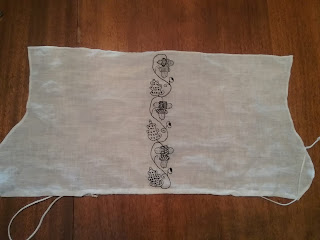
Rectangular piece of flat linen that has been cut and hemmed with curves along the two short sides. Three repeated motifs make an embroidered  stripe down the center. Each motif is an S-shaped vine connecting an oak leave to a cluster of three acorns. The leaves and acorns are sparsely filled in with spaced stitches in lattices, lines, and alternating X and O shapes.
One column down, "2(/2) and 6" to go.

And the coif embroidery commences. The garment itself is based on original coifs dated c.1590-1620 in Patterns of Fashion 4 (it's specifically this coif, though the hair-dressing was less wrong in the version with lace).

The design I selected is an oak-leaf and acorn motif from A Schole-House For the Needle (1624, some designs as early as 1540s). The book only gives the figures themselves, leaving it to the embroiderer to determine stitches and fill effects. I therefore consulted  Elizabethan Stitches by Jacqui Carey for insight into the stitches and how to apply them. While full of lovely examples, and very detailed analysis, all of the original coifs in the book were covered in polychrome embroidery, many with metallic accents. This has given me a lot of ideas about the next coif I hope to attempt--using the wider braided stitches for the vine-like pattern elements and dense infilling of the motifs--but it isn't the single-color, more delicate blackwork effect I want for this project.

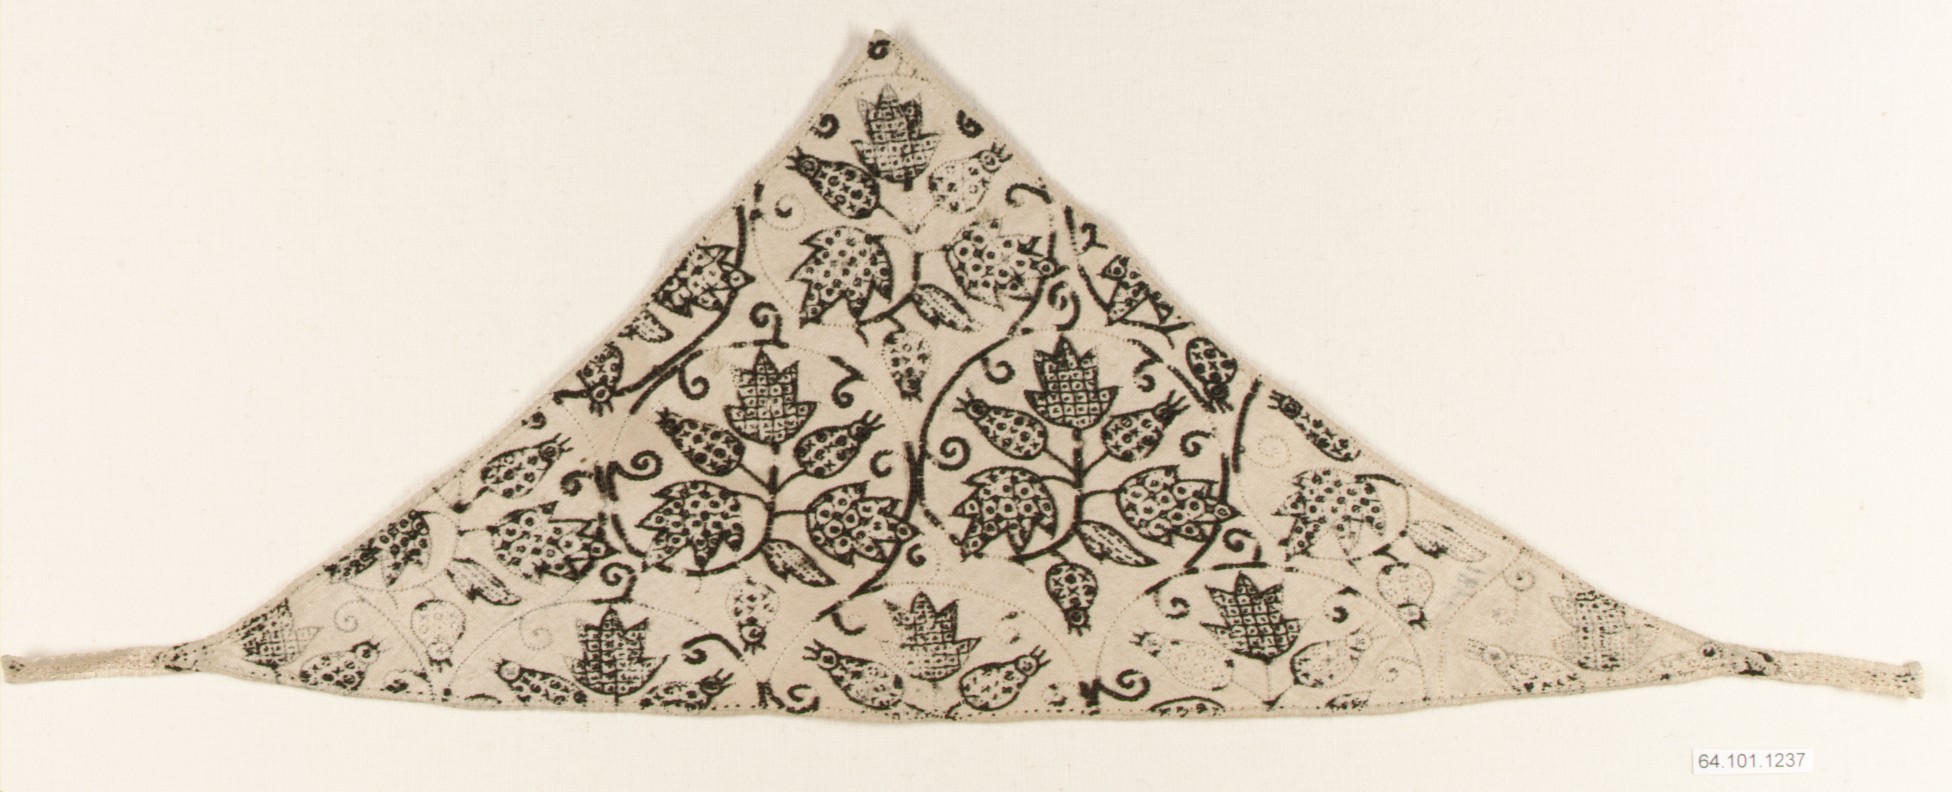
The aesthetic I'm looking at is more like this coif and matching forehead cloth in the Met, where the lines are fairly narrow, and the infilling is pretty open (quite suitable for differentiating space in monochromatic floss):
A linen coif displayed on a head form. Coif fits closely around the top, back, and sides of the head; it is decorated all over in an embroidered botanical design.
Late 16th century blackwork coif in The Met.
Looking closely at the coif, the lines seem to be done in a stitch with some width to it, making almost a row of connected dots rather than a long line (possibly a chain or coral stitch, as opposed to a stem, Holbein or backstitch); on the close view of the forehead cloth, it rather looks like a chain stitch. The coifs and forehead cloths on Elizabethancostume.net mention stemstitch, backstitch, and chainstitch among the techniques, though the images are too small to determine which stitches are used where. The amazing squirrel smock, however, does have close up images showing its embroidered motifs are outlined in a stem stitch, with no infill. In contrast, the polychrome coifs in Elizabethan Stitches use wider plaited stitches for most vine-like elements, with chain stitch among the many filling options.

A matching forehead cloth, with good close-up images of the stitching.

In addition to the possibly-chain-stitched outline, the Met coif uses a variety of open filling patterns. The largest leaf motifs have square or diamond grids of a narrow stitch, with dots in the voids (and on the nodes of the diamonds); the fruit/flower element has alternating Xs and Os; and the smallest leaves have rows of parallel dotted lines (suggesting a running or half backstitch).

I decided to copy the squirrel smock and use a stem stitch for the vines and outlines. I borrowed the Met coif's alternating 'noughts & crosses' on the oak leaves, with its broken line pattern on the acorns to suggest the lines on a real one. For the acorns caps, I initially tried infilling the whole cap with a detached buttonhole stitch (from Elizabeth Stitches), but even on such a small area, the effect was too dark. I decided against using a herringbone or other dense space-filling stitch for the same reason. The second method I tried was using spaced Xs in reference to the crosshatched texture of an acorn cap. This worked a bit better, but didn't quite capture the true look of an acorn, while also not affording as much contrast as I would like between the caps and the other parts of the design. At that point, I decided to attempt a diamond grid, like the Met coif (but set closer and thus without the dots). I expected a backstitch to get too messy (it's not my best), and so made each diagonal a whole stitch (tacked at the intersections so the floats won't catch as easily). As far as I know, this is my own invention, but it gives neat, reasonably strong straight lines with minimal waste of silk on the verso, so I think it's in the spirit of the 16th-17th century at least. The buds or immature acorns have chainstitch infilling.

Blackwork embroidery of two vine motives with acorns and oak leaves, and two real acorns for comparison.
Another thing I learned: changing stitches until you get one
you like is apparently a-ok in this sort of work.

The fabric is IL020 (3.5 oz handkerchief weight linen) from Fabric-store.com; the thread is Soie d'Alger seven-strand silk floss from Needle In A Haystack. Even the single strand I'm using looks too heavy up close on the linen, so I'm tempted to try my next overly ambitious embroidery project on the IC64 'luxury' mid-weight. It's fine, but a bit denser, and should make up very nicely perhaps in colored floss with that gold lace...

Tuesday, August 11, 2020

A Very Good Idea

  1. One linen coif.
  2. Five skeins of embroidery silk.
  3. A Schole-House for the Needle filled with early 17th century designs.
  4. A lot of free time.
A plain linen coif next to an open book of embroidery patterns, with several skeins of silk. An iron and a large pincushion in the background.
Not sure how this is going to turn out, to be honest.