Showing posts with label bags & luggage. Show all posts

Friday, August 25, 2017

Two More Sewing Cases

Several deserving young ladies of my acquaintance being lately married, I decided period presents were in order--and that it was time to try some more designs out of Fanciful Utility. This time, I made up the other structured sewing kit design: it has a rectangular pocket instead of a scissors case, and no pincushion in the thread box.

Two Victorian-style cotton print sewing cases from "Fanciful Utility" by Anna Worden Bauersmith
Sewing cases with thread box, needle pages, and
pocket. Fitted with bone thread winders, brass thimbles,
cakes of beeswax, emery strawberries, and pins.

Sewing the box to the base/cover was a little trickier in the center (compared to the box being at one edge), but the lack of a pincushion with its extra wall made the box construction easier.  I do like the extra stability that that wall provides (the long edges of the box tend to bend in slightly without it), but it was a bit of a pain to sew.  I also appreciate the convenience of having a pincushion right in the box, but I suspect this design will have other trade-offs: the large pocket and longer box compartment have space for various larger tools (button hole scissors, seam rippers, awls, a spool of thread, etc.).

I may add a loop and button closure to the left one; the ribbon
on the right works well, but obscures the fun striped material.

Per the book, the original this design was taken from had no closure, just the two fold-over flaps. I added the ribbon to the pink-and-green case (tacked to the center bottom) for more security while transporting the case. I think a button-and-thread-loop or two small ties might make a nice closure for the other.

Sunday, September 11, 2016

Another Rolled Sewing Kit

One of these days I will make some of the other items in Fanciful Utility (there's just too many to pick from!), but for now, here's another rolled sewing kit.  It's a gift for my other awesome mentor at The Fort.

Mid-nineteenth century sewing kit, open, from Anna Bauersmith's "Fanciful Utility".
Sewing kit open.
Victorian rolled sewing kit, closed, from Anna Bauersmith's "Fanciful Utility".
Rolled shut for transport or storage.
The blue stripe print is leftover from my wrapper (Windham 30586-2, from Eileen Trestain's "Sally Rose" line), the red is a Sturbridge Village print, and I don't recall the name of the purple coral. The needle pages are red wool, and the pin cushion is stuffed with wool roving.

Sunday, April 24, 2016

Fancy Fair

Yesterday was Fort Nisqually's annual Sewing to Sowing event.  Here are a few of this items I made for our "fancy fair":

1) Finished two more beaded bracelets to display.


2) Rolled and strawberry pincushions for the donation table, and some pen-wipers (designs from The American Girl's Book The Girl's Own Book).
Rolled and strawberry pincushions, pen-wipers.

3) More brick pincushions, ditto.
Brick pincushions.


4) A small housewife/sewing roll, ditto:
Sewing roll or housewife.

Sewing roll or housewife, open.


5) For outgoing Event Coordinator Chris, a sewing bag.
Sewing Bag, 1840s design.
The print is from Barbara Brackman's "Alice's Scrapbag" line;
fabric and cotton satin ribbon from Fabric Depot.

Monday, April 4, 2016

Early 1840s Sewing Bag

Late to the party, but Anna Worden Bauersmith did a lovely sew along earlier this year, providing templates and instructions to make a cute work bag based on this c. 1840-1845 original.  She's since started another one for purses (and even though my crochet is abysmal, it's so cute that I'm tempted to join in).

Here's mine:
1840s style Sewing Bag from Anna Worden's Sew Along

Needle pages on sewing bag, from Anna Worden's Sew Along.

Interior of sewing bag, from Anna Worden's Sew Along.

The brown and pink repro print probably came from Hancock's of Paducah; the pink cotton satin ribbon is from Fabric Depot in Portland, and the wool flannel "pages" are scraps from my stash (originally from Mill End in Minneapolis).  I opted to put a small pocket in each side of the lining, against the pasteboard, the better to keep track of thimbles and other little items.  I switched the ribbon trim from box pleats to ruching ("rose leaf wave trimming" in Miss Leslie's terms), as I can't seem to manage neat pleats in satin.


Sunday, August 30, 2015

Sewing Kit

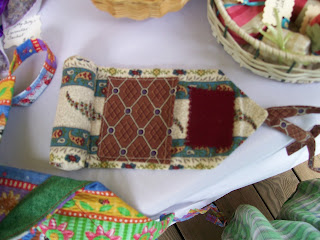
As a more portable alternative to my work basket, I made up a little rolled sewing kit from Anna Worden Bauersmith's Fanciful Utility. The materials are all reproduction prints out of my quilting stash, plus a few scraps of wool flannel and a little roving to stuff the pincushion.  The box walls and lid are pasteboard, which was left-over from making a hat box. Except for the linings, it's all hand-sewn, which took far less time than expected.

Rolled box sewing case from Fanciful Utility, open

Rolled box sewing case from Fanciful Utility, tied closed

So far, it's very convenient little case: small enough for easy packing and transport, but still equipped with the requisite pins, needles, scissors, thread, thimble, and wax that are so useful to have on hand.  In it's first 18 hours at a reenactment, this case has aided in the alteration of three dresses and two coats.

Thursday, June 26, 2014

A Carpet Bag

 I've been meaning to make a carpet bag for sometime--it's an accurate (even iconic) piece of luggage for the mid-century, and can hold a scary amount of items.

Materials:
1 yard of reproduction period carpet
1+ yard of lining material, depending on width (I used linen scraps; I've also heard of canvas and silk linings, and seen some reproductions lined in cotton prints)
1 frame (I used a 16" tubular purse frame, some people use dowels)
5 purse feet
Leather scraps, for bottom, welts, buckle straps, and handles
2 small buckles
A bottom board (I used a double thickness of pasteboard, a thin wood may be preferable).

Materials Sources: 
I got the 16" frame from Bits and Purses on etsy.  The fabric was from a friend who has sources.  I found the feet at Weaving Works (75% off clearance during the moving sale!); the leather and linen were in my stash (previously from S.R. Harris Our Fabric Stash, IIRC), and the pasteboard was from Blick.

The closest thing I could find to an original pattern on-line were these instructions from Scientific American (apparently from 1881).  Also useful were the original carpetbag pictures at The Graceful Lady (scroll to the bottom of the page), and these Sewing Academy threads: carpetbag part suggestions, carpetbag bottom.

The process:
Extrapolating from the size chart in the Sci. Am. instructions (which gave piece sizes for a 15" or 18" frame), I cut out the bag sides and gussets in scrap fabric.  I sewed these together, and pinned the edges over the (open) frame to check the fit.  I tried opening and closing the frame, and--being satisfied with the fit--used the scrap fabric as a pattern for cutting the lining and carpet pieces (two side pieces and two gusset pieces in each material).  If I'd thought ahead, I would have cut the lining sides and bottom together as one long rectangle for easier assembly (this was the recommended procedure from the 19th century instructions).

I wanted a pocket inside the bag, to help keep track of small items, so I put one on one of the side lining pieces before going further.

Next, I sewed the carpet pieces together in a square: side to gusset to side to gusset (to the first side); for reinforcement, a leather 'welt' was stitched over each of the side/gusset seams.  While the weight/structure they provide is nice, the process was tricky, and the extra seam bulk complicated later steps--I'd be tempted to skip this leather next time.  The lining was prepared in the same way, sans welts.  Measuring the opening gave me the bottom dimensions; I cut one piece of leather to this bottom measurement, and one piece of linen to make up the bottom inside lining.  The leather was sewn to the carpet (right to right, on machine), and turned right-side-out.  At this point, the bag was starting to take shape.  The bottom lining was attached to the side/gusset lining in the same manner.

I cut a piece of pasteboard for the bottom foundation, using the dimensions of the leather bottom (shorter by 1/4" on each side). It ended up too big, anyway, so I trimmed it until it fit snugly, and then marked on it the positions for the 5 feet--one in the center, and one in each corner.  I punched small holes on those points, and then glued the pasteboard onto the leather bottom.  When dry, I used an awl to make small holes in the leather at the foot-points, and attached a foot through each (the feet have two prong on them, like brads, which are spread apart to secure the foot).  I tapped each with a mallet, per the instructions, and that seemed to secure it nicely.

Being unsatisfied with the rigidity of the bottom portion, I cut a second piece of pasteboard and glued it over the first.  The double-layer is more satisfactory, but next time I'd like to try a thin piece of wood.

Next, I pinned the bag upper to the open frame, lining up the corners and centering each piece.  I folded the top of each side/gusset over the frame (measuring from the bottom to top along each side, so that the bag is uniform length), and stitched it down by hand.  By using white thread and taking small outside stitches (through the white portion of the weave), the seam is nearly invisible on the outside.

To make the handles, I cut 2 strips of leather 11 1/8" x 1", rounded the edges, then folded in half (lengthwise, right sides out) and stitched along the edge, leaving 1.5" at either end.  I dampened these with water, bent them into half-circle shapes, and let them dry.

To attach each handle, I placed is at the desired location near the top of the bag, and--using a leather needle with black silk thread--topstitched along the rounded end of the handle, through the carpetbag beneath.  I should have done the buckles at this time as well, so that the wrong side of the sewing is hidden by the lining.

The lining was placed inside the bag (right side out), and the top excess folded down between the carpet and the lining material.  This was pined in place, and handsewn close to the frame.


Tubular frame and carpet bag pieces.
Frame and pieces
Leather bottom of carpet bag, with five feet.
Leather bottom with feet
Leather handles for carpet bag.
Shaping the handles
Carpetbag interior, without lining.
Bag interior, with frame, sans lining
Carpetbag exterior.
Bag exterior, before adding handles
Carpetbag interior with bottom board.
Interior, showing bottom board

Completed carpetbag exterior.
Finished carpetbag, exterior
Completed carpetbag interior.
Finished carpetbag, interior


Sunday, May 11, 2014

For Mothers' Day: A Medieval Belt Pouch

Because my mom is awesome, and likes to dress up as a viking.

The pattern is actually taken from a 14th century design I found in "The Medieval Tailor's Assistant" by Sarah Thursfield.  A little late for vikings, but it should fit in well with the rest of the costume, nonetheless.

The pouch is made in two pieces, a back and front, with the back folding over to close it.  I guessed on the dimensions (relating them to the belt size), and then adjusted the paper pattern until I was happy with the size.  The front piece is cut from the same pattern as the back; it stops at the fold-line, and the center opening is widened for ease of use.

Bag template positioned on leather.

Pieces cut out: bag back/lid, front, and ties.


I opted to top stitch the two pieces together, raw edges to the outside, as leather doesn't fray and I didn't want the bulk of turned seams.  The sewing was done in black silk thread, with leather needles, on the machine--after the slipper experience, I actively avoid sewing leather by hand.  Ow.

The top is joined to the back along three sides (down one side from below the 'dip', along the bottom and back up the other side), and along the fold line.  The belt goes through the gap in the side seams between the fold line and the front 'dip'.  The finished effect is modeled by my tape measure:

Belt pouch body stitched together.


Now, all that remains is the fastener.  Buckles and ties were presented as period options; having no period buckles to hand, I opted to make self-ties of leather.  A doubled leather thong at the center front passes through a loop of the same on the lid, which can then be tied shut.  The one thing I would have done differently on this project was to attach the ties to the front piece before sewing it to the back; it was possible to do afterward, but very tricky to arrange.

Finished medieval belt pouch, open.

Finished medieval belt pouch, closed.


I'm really happy with the overall look.  Hopefully Mom will be, too. We'll see how it performs at the syttende mai parade next week.