Showing posts with label circular sock machine. Show all posts

Thursday, August 14, 2025

Cotton Stockings

Finally tried something other than wool on the Autoknitter. For the hot August weather, I made a pair of cotton stockings using Knit Picks' Simply Cotton fingering-weight yarn. The thickness of the stockings is comparable to wool ones that I've knit, but I didn't find them uncomfortable to wear in the 90+ degree heat (though I certainly wouldn't have minded even lighter stockings).


Finished (and washed) stockings, of un-dyed cotton.

I was worried about how the yarn would handle in the machine, specifically whether it would have enough stretch to knit without breaking or jamming. It was a pleasant surprise to find that this cotton handled just like most of the wool yarns I've tried. The hardest part was actually winding the large skeins into cones for use--before the next pair, I really should get my swift repaired. One skein made for one complete stocking, plus the hem and first 57 rows of a second.

I read that 10% shrinkage is to be expected with this yarn, and adjusted my usual 'recipe' (based on Knit Picks' wool palette yarn) by adding 20 rows to the first section past the hem. I figured that as this was the widest part of the calf, it was the safest place for any extra length, if my calculations were wrong; I also added 5 rows to the foot length. Since I didn't finish grafting the toe closed until the morning I needed to wear the stockings, I didn't have the chance to wash them before use. The stockings were definitely a bit long in the foot on that first wear, resulting in some wrinkling around the heel, but were still use-able. After the first wash, the fit was much better through the foot and the texture of the stockings also improved--it generally fluffed up a bit and made for a softer hand. The foot itself is still just a little bit longer than I'd like, so I might try only adding 4 rows instead of 5 next time.

I'll probably knit myself a second set of these, so I'll have two pair cotton and three pair wool stockings, which should do me for most events throughout the year. For really hot weather, I should also probably make a new pair of sewn hose, as the cotton knit fabric is thinner and lighter than these stockings. However, between the annoyance of fitting sewn hose and the frequency of broken seams, I am very eager to add more knit stockings into my wardrobe. I also prefer how the knit ones fit. These cotton knit stockings will fill a nice niche for warm and 'in-between' weather, allowing me to save the more fragile stockings for the most extreme heat. 


Tuesday, December 27, 2022

1855 Warm Undersleeve, Circular Knitting Machine Edition

Revisiting these 1855 knit undersleeves, which I have previously made all the component for (sleeve, ruffles), but never finished due to frustration with the instructions.

Line drawing of a knit sleeve ending in a double layer ruffle of lacey openwork.
Warm Undersleeve.

A few changes to make this project circular knitting machine compatible:

First, brioche stitch isn't happening. I can do a double knit by running two threads, or I can just plain knit it. I decided to make a plain tube this time, since it's my first attempt at doing this pattern on a machine, and also the dress I'm going to wear this with is a nice warm wool in the first place.

The frills, as written, have a bit of a problem: they include decreases (knit 2 together) with no corresponding increases. I tried it as written, and again with yarn-overs to balance out the knit-2-togethers, but only got a closely-set eyelet motif. Helpful fellow volunteer Cynthia identified the original pattern as "Old Shale" and recommended the following variation as producing something more like the illustration (especially if the frill is worked on thicker needles than the sleeve itself):

Row 1: Knit

Row 2: Purl 

Row 3: Knit two together (3x), yarn over & knit 1 (6x), knit two together (3x). Repeat for the whole row

Row 4: Knit

[Per the original instructions, repeat the four rows 5 times (for 20 rows total) in white, then knit all four rows once in a colored yarn.]

If I make the fourth row a "purl", I can knit this in the round on the machine, though at the cost of the the ridged effect between repeats. For all the flaws of the illustrations, I think the stronger horizontal lines are meant to indicate this ridge.

The pattern is a 96 repeat, and the original calls for 90 stitches, but the largest cylinder I have is an 80, so I'll need to repeat the motif in row 3 four times, which will leave 8 stitches left over. I decided to solve this with a partial motif as follows:

1-2. Knit.

3. On the third, k2to 3x, then (yo k1) 6x, k2to 3x; repeat this 4 times, and for the last 8 needles k2to 3x, yo, k1, yo, k1, yo. [On the machine, this look like: starting at the 3 o'clock mark, move the stitch on the second needle to the first, then the stitches on needles 3 & 4 to needle 2, then the stitches on needle 5 & 6 to needle 3. Leaving needle 4 empty, move the stitch from needle 7 to needle 5, leave 6 empty and move the stitch from needle 8 to needle 7; needle 8 is also left empty and needle 9 keeps its stitch in place. Count to the end of the motif, and double up the stitches on needles 13-18 so that there are two stitches each on needles 16-18 (as at the beginning of the motif), while needles 13-15 are temporarily empty. Then move the stitch from needle 12 to needle 15; leave 14 empty; move the stitch from needle  11 to needle 13; leave 12 empty; move the stitch on 10 to 11, leaving 10 empty. Repeat for a total of 4 and half repeats around one circuit.]

4. Knit. 
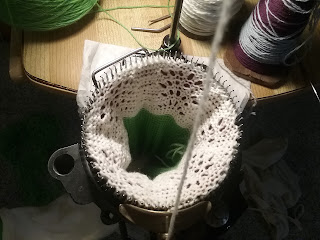

A circular sock knitting machine with a lacy piece of knitting in progress.
Frill on the machine (working the 5th fancy row)


As previously noted, after the 3 plain rows of the header, this four-row figure is repeated 5 times in white, and then once in color, then bound off. Of course, I was halfway through the fourth piece when I realized that the 8 extra stitches could be divided up between the motifs (2 extra plain stitches at the center of the sets of doubles, for instance), which would be a bit more symmetrical than having an extra half-motif.

I set my machine to the loosest possible tension for working this frill, after knitting the sleeve itself on the tension setting one rotation higher/tighter. [I denote it "1L1" in my notes, because the dial reads "1", and it's at the lowest dial position that can read "1"].

For the main sleeve, I set my knitter to "1L2", knit 20, hung the hem, then knit 130 rows, then adjusted the tension down to the its very loosest setting ("1L1") and started on the frill.


White knitted tube with a scalloped effect and eyelets. The piece terminates in a narrow blue border, above which it is attached to bright green waste-yarn worked in plain stockinette.
Frill with waste yarn. It scallops and has eyelets, at least.


After finishing the sleeve with it's frill, I ran some waste yarn, then did a single frills with its 3 rows of header (on 1l2, before adjusting back to 1L1 for the frill), then ran the other sleeve with its built-in frill and the second separate frill.

Blocking the completed frills and sleeves.

Off the machine, I bound the edges of each of the four frill edges, then whipped the separate frills onto the sleeves. I had intended to bind the edges before blocking each component flat, but holiday logistics meant I needed to complete the blocking before I had the chance to binding off more than one edge. I think this actually helped the scallops set better. 

Whipping the active stitches on the frills (the topmost of those 3 plain rows) onto the sleeves was actually the worst part. I could not keep a consistent horizontal line across the sleeve (counting was complicated by the frill covering that part of the sleeve, the lace motif itself made both frill and sleeve pucker into scallops, and attempting to eyeball the frill placement sent it rapidly veering onto diagonals). In the end, I ran a thread of waste yarn along a ruler in an approximately flat line, and stitched over it. For one frill, I removed the waste yarn as I bound the open edge, for the other I transferred the live stitches onto a circular hand-knitting needle to hold them; the waste yarn ended up being marginally easier to handle.

Et voila:
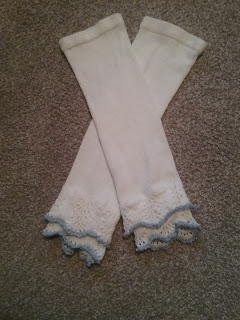
Two white knitted tubes with hung hems at the top edges, terminating in two layers of lacey scalloped frills, each edged with a narrow blue border.
At long last, the finished sleeves.
 
I'm glad these are done, and I like the scallops and the light touch of blue at the edges. If I were to make these again, I'd position the frill more than the indicated 1" up, so that the scallops overlap a little less. I'd also try knitting the sleeve on a smaller cylinder than the frills, so they can be gathered rather than put on straight. Knitting the sleeve on machine and then hand-knitting the scallops (so that the ridged rows happen) would also be an option to explore.

Tuesday, November 15, 2022

First Pair of Stockings

And my first pair of stockings on the Auto-knitter. I used the 80 cylinder, no ribber, and 4 oz of pale blue Jaegerspun fingering weight that I found in a thrift-store grab bag. The gauge was a bit off from my swatch, so I ended up cutting down the top of stocking #1, reducing the row-count on stocking #2, and subbing in a second yarn for the toe of the second stocking.


Historical accuracy on this piece is a bit...complicated. The use of a hem-top is recommended for wool stockings in the 1850s literature. However, the short-row heel is a 20th century standard for csm stockings. These stockings further differ from a handknit 1850s stocking in the heel shape, the lack of a back seam (ie, a purl stitch worked at the center back in opposite rows), and the manner of in which the leg is shaped (tension changes rather than reducing the number of stitches). However, circular knitting machines did exist in my target time of the late 1850s and early 1860s, used commercially and sometimes in the home. Like mine, these machines knit stocking without adding/reducing stitching and with no back seam. However, I haven't found pre-1868 instructions for a csm which use stitch tension to shape the leg, or knit the heel on the machine; instead, c.1860 machines produce only straight tubes, which need to be hand-finished at the band, and cut/sewn to shape the heel and foot. There is no leg shaping, and different sizes are achieved by removing needles to make mock ribs.

Which is a round-about way of saying that I have some lovely 1920s-to-present style basic stockings, which are slightly anachronistic for the 1850s/1860s in their heel/foot shaping techniques, and in the variable tension used to get a good fit through the leg (which is ok by ~1868). I'll be using them for earlier anyway, because this is my only option to get knit stockings that fit my legs comfortably, and the anachronistic elements are all well-covered by my shoes. I do have some ideas for making more accurate-to-the-1850s stockings on this machine, but it will involve mastering some more complicated heel variations. And manually making the seam.

Friday, September 30, 2022

First Pair of Socks

I finally knit my first pair of real socks on the Autoknitter (also ever), using Roxy's "10 Minute Socks" pattern/recipe. It took me a bit longer than 10 minutes, but I found it a really useful live-trial of working increases/decreases for the toe and heel (not to mention kitchener-stitching the toe).


Et voila:

Socks! In 2-1 mock rib.

I used the 80-cylinder for these. The yarn is Aktiv's "Finnmark" self-striping sock yarn.

Thursday, September 15, 2022

Onion Bags

Did some multi-tasking: I have onions that need to be stored after harvest, and an Autoknitter that I needed some practice on. The obvious solution was to knit small onion bags out of scraps of crochet cotton.

Onion socks! And two proper net bags.

I used the opportunity to mess around with the machine's tension, hang hems, learn mock ribs, and do a lot of kitchener stitch on the closed ends. My favorite onion sock is the one knit plain on the loosest machine tension (left of center), which produced the most open web.

Before jumping over to the machine, I did try to hand net bags for all the onions, but found that even with a generous mesh it simply took too long. I'll need to try this again when there's more time and the onions in question haven't already been harvested, cured, and in need of storage bags.