While waiting on my corset reference books (which delays both it and the gown), I decided to get to work on some headgear.
I bought the
Julia pattern from
Timely Tresses a couple years back in order to surprise my dear sister Red, with an appropriately red regency bonnet. It went together very readily then, and if anything has gotten easier with practice (on a few low spoon bonnets). Last time I used brim option #1; this time I made #4.
I used some white silk from the stash (the same that got dyed
here), and lined it with white linen. I have just enough buckram left over from my last Victorian bonnet for the brim. Due to the extremely soft body of the silk, I decided to interline it. I omitted this layer when previously making the pattern up with taffeta, but this light-weight silk needs some help. I bought new satin ribbons for the project, as none of the appropriate width were on hand.
The instructions are very clear: as with all three* Timely Tresses patterns I have, the instructions are a proper booklet full of clarifying diagrams and pictures showing each step of the process--from cutting out the fabric to attaching the ties.** The research and background information are what I've come to expect from them: accurate and edifying, yet concise. The
Julia instructions include color pictures of the bonnet made up 4 different ways, as well as color images from period fashion plates. Appropriate materials and period techniques are discussed, and different finishing and trimming options are included. The instructions even include explanations of the recommended hand-sewing techniques (much of the sewing can be done on machine or by hand, but the trims and finishing should be hand-sewn). The pattern pieces are of "printer paper" weight, much sturdier than tissue paper pattern.
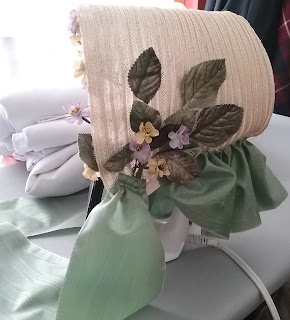
And here's my new bonnet (expertly modeled by my iron and a piece of purple linen):

I'm trying to think of any drawbacks to this pattern, and the closest I'm getting is that the brim variations are overlapped: 1 & 2 share space on two "half brim" pieces, as do 3 & 4. Since both halves are needed to lay out on the buckram, it's a good idea to trace the line you want, and not cut the original pattern (or you can cut each half-piece along a different brim line, and get good at switching them around). I followed the pattern advice about interlining, and used a white cotton broadcloth to line the brim, and cotton crinoline for the crown. Both worked admirably at preventing "show through", but if I were re-doing it, I would flat-line the brim interlining to the fashion fabric (since I was interlining for better structure on the silk as well as to hide the inner layers). This is how the crown layers were treated, and it worked well.
Very new amateur milliners may have difficulty with wiring the buckram pieces around the edges. I find hand-sewing it much easier than the machine option (half-inch spaced button hole/blanket stitches will do it, or a wide zigzag machine stitch), as I can bend the wire around the buckram as I go. However the wire gets attached, by time the crinoline bias is over the edges, it all looks much neater and more professional than you really expect it to look.
Compared to the "big four" patterns I've tried to make, Timely Tresses millinery patterns are far superior: not only is the design documentation included
in the instruction booklet, but the techniques are researched and feasible, the instruction are clear, and the pictures make a lot of sense. It's almost like having a teacher walking you through it. It'll also tell you which steps can be done on a machine and which need to be hand-sewn (instead of telling you to glue anything that can't be put on a machine, *cough* Simplicity*cough*). Compared to the other Timely Tresses patterns I've made, the Julia was by far the easiest, having the fewest pieces and a soft crown.
I would definitely recommend this pattern to someone looking for an authentic early 19th century, puffy-crown bonnet pattern; it would also make a good first foray into millinery, particularly for someone who prefers machine sewing (most other bonnets I've made require more hand-sewing; this pattern can go either way). A complete sewing novice would likely struggle with this pattern, but that would be true of any attempt at stitching on a structured 3D object of this sort. The pattern specifies the years 1800-1810, and should be made-up in silk to get the appropriate period look.
There are some very specific notions needed for a project of this sort. I've had good luck with the buckram, crinoline, and wire included in the kits at Timely Tresses (they also have good prices on fat quarters/halves of silk tafetta and on ribbons and trims). Do not use the "buckram" found at JoAnn or similar stores. It doesn't have the same structure and won't hold the bonnet shape (the crinoline works alright for linings). Linen and smooth silks can be found at your fabric store of choice (if yours doesn't carry these things, see the links for on-line options). Ribbons and flowers can be found on-line (Ebay, Etsy), at antique shops (vintage trims!) or at specialty fabric shops--the two times I've made this bonnet, I used silk satin ribbon from
Nancy's Sewing Basket in Seattle and from
Treadle Yard Goods in St. Paul.
Pattern Score: 5 Stars!
Difficulty: Intermediate/ Advanced Beginner
Accuracy: High
Strongest Impressions: A quality bonnet that goes together easily; no pattern modification required
*I have made up two, but have read through the third and will be making it once I find the right silk.
**This is a pattern review rather than a tutorial, because a pictorial tutorial is already included in the instructions.


