Showing posts with label Undergarments. Show all posts

Wednesday, February 26, 2025

Another Typical Tudor Smock, mid-16th century

So I apparently never posted one project from last summer: a second Typical Tudor smock, this one all hand-sewn to use the 'hem each piece then whip-stitch the seams together' method. And because my older smocks were suffering catastrophic seam failure all through the first weekend of Faire.

The place where this method shines.

Compared to run-and-fell seaming, this method takes about 50% more sewing per seam (since both sides of each seam is getting finished individually before they're even joined). However, it makes the square gussets fit beautifully with no weird lumps or bulk where the felled finishes of the gusset overlaps with the sleeve and body seams. Other benefits include most of the project being very portable (the sleeves and gusset pieces fit very easily in my to-go work bag, so that most of the hemming could be done in odd minutes), and very easy repairs (since the seams under stress can be replaced without compromising the edge finish).

Managed to photograph this smock before wearing it on the last day of the event.

Friday, December 29, 2023

Corset, 1870s

Another from the summer railroad events: the corset for my 1873 ensemble. I used the same material and hardware as on the corset for an 1890s ensemble. The pattern is one that was custom-made for me by Marie of The Fitting Room, right before everything shut down back in 2020. It's based on the corset design on page of Corsets and Crinolines.

Shaped-seam corset.

The material is a double layer of cotton coutil, with self-fabric binding, and 1/4" spring steels throughout. Busk and steels from Wawak; I forget whether this piece of coutil was from Renaissance Fabrics, Lacis, or somewhere else, which is unfortunate, as I'd prefer not to order it again.  It's a decently stout twill, but heavier and not quite as stiff as my favorite coutil.

On this garment I really tried to improve my ironing technique. Each seam was pressed closed and open,on both sides, with the clapper to help set them. For the more pronounced curves, I steamed and ironed the fabric over a dressmaker's ham to help set the shape. So far it seems to have paid off with a smooth finish and a garment that can't lie flat 

Thursday, November 9, 2023

Typical Tudor Smock

At long last, the seam finishes are done on my new 16th century smock. It's based on the smock variations in The Typical Tudor; this time I opted for a low square neckline and sleeves gathered into cuffs. The whole smock is made of the same mid-weight linen with (bleached) linen tape to fasten the wrists.

Smock.

The garment is mostly hand-sewn, though I did cheat with some machine sewing on the long gusset seam because I was rushing to have another wearable smock for Faire. It did debut on the final day, but with only half a hem and many raw seam allowances; most of the delay in photographing the smock centered on removing the Faire stains so I could finish all the felling. Two soaks with borax and wash soda got most of the dirt out, while spot-cleaning with bleach was needed for the sunscreen/sweat discoloration.

Sunday, October 29, 2023

Drawers

 Not much to look at, but still a very overdue project. And much needed.

Yep, just some drawers.

I cut two pairs of these out ages ago (at least 5 years...). The legs are a custom draft from Liz's drawers pattern, while the slightly-pointed waistband/yoke is traced off an old pair, which originated from the simplicity undergarments pattern by Kay Gnagey.

Tuesday, April 18, 2023

Gored Petticoat, c.1873

Over the horsehair bustle pad goes a gored petticoat. Per a note in Demorest's (1875), the order for skirt supports is a short underskirt, then the tournure, then the upper petticoat, and finally the dress. This upper petticoat is meant to be cut along the same lines as the skirt which will be worn over it. Various sources explain the necessity for gored skirts to be worn over gored petticoats (examples from 1865 and 1873, and even some doll dress instructions from 1872).


For this dress and petticoat, I used the gored skirt instructions in The Complete Dressmaker (1875), using only 1 gore to each side on account of the fabric width. I ended up making the petticoat 4" longer at the back than at the front, allowing for the bustle. The skirt is attached flat to its waistband along the front panel and the start of the side gores; the rest is knife-pleated, meeting in a double box pleat at the center back. If I had more time, I meant to gauge this back section, but I'm satisfied with how the pleats have held shape, and don't plan to change them.

Monday, April 17, 2023

Horsehair Bustle Pad, c.1875

And we're back to the never-ending railroad event costumes. I already posted my bustle research, and opted to try copying a c.1875 horsehair bustle pad from LACMA's collection for wearing in my c.1873 outfit. 

Working only from images of the antique garments, I had to invent my own sewing process. 

I started by using the given center back length of the LACMA bustle (15.75"), and scaling the pieces of my bustle to that. For material, I went with a 20 3/4" hair canvas, which has a cotton warp and horsehair weft, making it the closest fabric I could find to a true 'crinoline'. To use this efficiently, I cut whole widths of fabric for the three ruffles. with the hair running horizontally along each. The base piece is 14.75" x 10"; I estimated the tape waistband at 1" wide, and assumed that counted into the total figure. The ruffles I took at about 3.5" each, with the 'puff' at the top 4" (7.5" for the whole piece).

I started by binding the lower edge of each of the 3 ruffles (using a 1" cotton twill tape), and doing the same for three sides of the base layer (the top edge being left raw for now).

All the pieces bound.

At this point, I also ran a hand running stitch across the largest ruffle, dividing it into the upper puff and lower ruffle.

The edge of the ruffles if not visible in that example piece, but after looking through all the originals I could find, it appeared that there were two main options: binding the ruffles and base together, or folding the raw edges of the ruffles in. I opted for the later. Starting from the bottom, I applied the right-hand side of the lowest ruffle, putting it right-side-to-right on the base, on sewing through both layers on the wrong side. The second ruffle got the same treatment, under-lapping the bottom ruffle slightly, and then the top ruffle as well. To get some height in the puff, I put three small tucks in the puff as I sewed the side seams.

Starting from the bottom. The raw edge if just turned over.
i
Up to the pleats on the puff.

I was able to repeat this on the left side (there's a fair amount of give in the ruffles). I then put the bone casings on the back. In retrospect, I should have done this first, back when I binding the edges, but I didn't realize the import of the named-but-unseen boning until I started trying to gather the ruffle.

It was possible to fold the ruffles out of the way since they only stitched at the sides.


Without inserting the bones (leaving one short side open on each casing), I pleated the bottom ruffle and machine-stitched it down to the base. I hand tried to gather the ruffles, but found the material much too stiff. Even with the small pleats, it was hard to get the fabric laying neatly. I repeated with the middle ruffle, with the gathering stitch between the puff and ruffle, and with the top of the puff. On this last, I didn't fold over the raw edge, but basted the base and puff raw edge on top of eachother.

Stitching down ruffle #2. Working bottom to top allows more maneuvering room.

To finish, I took a piece of 1" twill tape, lined up the center to the raw upper edge, and used it to bind off the top of the base and the puff. The long tails become the ties on the garment. Finally, I inserted the three 9.5" bones into the casings, and stitched them closed.


What happens without boning.


Completed bustle pad. Only slightly flattened from sitting on it.


All told, I'm quite satisfied with how this bustle performs. It's quite light, mostly keeps it shape, and gives my dress the distinct bustle shape I was looking for. If I were making it again, I'd add the bone casings in the initial step, go right to pleating the ruffles, and make the top puff about 1" long (also giving the ruffles a little more overlap in the process) to it looks more like the proportions in the original.

Saturday, April 8, 2023

Corset, c.1895

Another for the railroad living history event. I needed to outfit our telegrapher for the 1890s. Unfortunately, my own corset for this approximate time was 1) barely started, and 2) going to be just a bit small for the lady in question. Instead, I ended up scaling up my custom pattern, and then fitting it to the volunteer. She found it comfortable, and I found it easy to drape a toile over, so I'm calling this a win-win situation.


The corset is from a double-layer of coutil, which I sourced from Renaissance Fabrics. The busk and 1/4" steel boning (and pair of spiral bones for the front curve) were purchased at Wawak. The grommets are from the two gross I purchased at my favorite neighborhood hardware store many years ago (RIP Hardwicks). Self-fabric binding.

Saturday, April 1, 2023

Original: 17th Century Printed Petticoat

 Dutch petticoat from the second quarter of the 18th century; the fabric is a printed cotton made in India.


Petticoat, c.1725-49, VAM.

While there's unfortunately only the one photograph, the magnified view is excellent: you can see every detail of the intricate four-color floral pattern. The fabric is described as glazed, and from the image, the petticoat appears to be faced in a plain white (possibly also glazed) fabric, with a narrow tape waistband.

Sunday, January 29, 2023

Flounced Petticoat Research (c.1840-1865)

In response to a research inquiry, I started compiling the primary sources I could find about flounced petticoats in the period 1840-1865. For this project, I looked at petticoats or underskirts worn as foundational garments, and not the visible petticoats used in court dress or walking ensembles (Balmoral petticoats). I was mostly searching for evidence of how commonly flounced petticoats were used (especially before the advent of hoops), and how they were constructed.

Written sources 
 
For this part, my search terms where for the word "petticoat" along with: ruffle(d), flounce(d), frill(ed), and/or tier(ed). The results included both descriptions of flounced petticoats, and passing mentions. In some instances, the ruffled petticoats are described as being stiffened; flounces are sometimes described in structural terms, and elsewhere treated as decorative elements.
 
I) Flounced petticoats as structural garments and alternatives to hoops. 
 
I started this project aware of one written reference to a flounced petticoat as an alternative for hoops. It is described the first paragraph under "chitchat" in the August 1862 issue of Godey's. Rather than being constructed like a flounced skirt with visible tiers of ruffles on a base, this garment is said to have graduated ruffles, where the upper ones fully cover the layers below. As far as I'm aware, this description of a novelty from France is something that never became popular in the US. A British publication and another American magazine, also from 1862, attribute this petticoat exclusively to the French Empress Eugenie, opining that the material and necessary pressing of such a garment put it out of reach for women of  'moderate fortune', but would provide ample work for seamstresses and laundresses.

Earlier references to supportive flounced petticoats pre-date the hoop:
"...Petticoat with four flounces well starched. The starched petticoat is indispensable for ball toilets." -Fashion plate description in Blackwood's Lady's Magazine, April 1852. [The plate is unfortunately not included in scanned document.]
"A lining or petticoat of crinoline is frequently adopted as a means of supporting the dress. More recently, petticoats of thick cambric, trimmed with two or three deep flounces reaching to the height of the knees, have come into fashion. The dress falls in graceful folds over a petticoat of this latter description and at the same time has sufficient support ."
-Peterson's August 1854
Flounces are also associated with stiff crinoline petticoats. Hints on Dress (1854) has decided opinions on petticoat numbers and materials, but only mentions flounces in conjunction with crinoline petticoats.
A remark in Peterson's two years later recommends that crinoline petticoats (and other stout fabrics) should have a single flounce, and that such garments are superior to hooped petticoats:
"A grass-cloth, crinoline, or moreen petticoat, should always be flounced, if the dress is desired to "stand out." Nothing can be more ungraceful than a hoop, whereas, a flounce on the petticoat always makes the skirt fall elegantly. Some have two flounces on the petticoat, the lower and wider one passing all around, but the upper one not meeting for the space of nearly half a yard in front." 
The only example I've seen of a petticoat with flounces extending all the way up is this English patent from 1857. It calls for four straw or steel-stiffened flounces, which are spaced from hip to hem--though one variation dispenses with the flounces entirely in favor of the straw. From the description, I'd classify it more like a hoopskirt than any other kind of petticoat. It's also a patent, which does not guarantee that such garments were actually produced for wear.
 
II) Flounced petticoats worn with wrappers.
 
While intending to look for true undergarments in which the flounced served a structural purpose, I did note several instances of white petticoats with flounces worn under open wrappers, like so. In one instance, an 1854 Peterson's description, a petticoat with a single deep fluted flounce is used to add volume to a wrapper. Elsewhere, the flounces are implied to be decorative:
 "White embroidered wrappers...are usually made open in front, exposing a embroidered or flounced petticoat. These are divided into several categories as follows: First, rich petticoats embroidered full almost up to the knees or with insertions. Next, those trimmed three deep flounces, hemmed and fluted a la Pompadour. Then, those ornamented with small plaits about half a yard from the bottom, and lastly those having a deep hem and edged with lace." 
--Peterson's, August 1856

Open wrapper over a frilled petticoat. The Lady's Friend, 1864.

In some circumstances, ruffled petticoats under wrappers may carry a connotation of being over-dressed. In a short story from 1864, a petticoat with lace and ruffles worn under an open morning gown is dubbed 'too elaborate' for wearing aboard a ship. A story in the Lady's Friend that same year mentions a soon-to-widowed lady (with the questionable taste to wear rouge) donning a ruffled petticoat under a crimson wrapper. 
 
III) Other References to Flounced Petticoats

Peterson's (1855) mentions flounced petticoats replacing embroidered ones. I set this reference apart, because it goes on to mention straw sometimes being used to stiffen the hem, in order to continue the line of the underlying hoops. So, this appears to be an instance in which the flounced petticoat is being used with hoops, but the flounces themselves are implied to be decorative, and there's an additional structural element for shaping (the straw-reinforced hem).

A short story from 1855 mentions a character wearing petticoats trimmed with tape and frills under a flounced silk dress. These are not described in more detail.

A ruffled dimity petticoat is appropriate for wear under a ballgown in a 1859 story.
 
The "simply ruffled petticoat" is contrasted with the expensive embroidered and fringed petticoats currently in fashion (1859). 

'Ruffled petticoat' is used as metonymy for 'a pretty girl' in an 1865 narrative.

IV) Pre-Made Frills.

Towards the end of the hoop era, ready-made frills are sometimes named as a petticoat trim.

An 1862 ad for ready-made cambric flounces recommends the largest size for "the new Paris fashion of frilled petticoats." The reference line suggests these are about 2" wide.

In 1864, The Lady's Friend gives instructions for a muslin petticoat. The skirt is made of gored panels, then finished with two 3.5" gauffered frills around the edge

 
Original garments 
 
I've yet to see an original petticoat from the 1840s-1860s constructed like a flounced skirt. There are a couple examples of surviving petticoats with a single ruffle or flounce near the hem, like this:
 
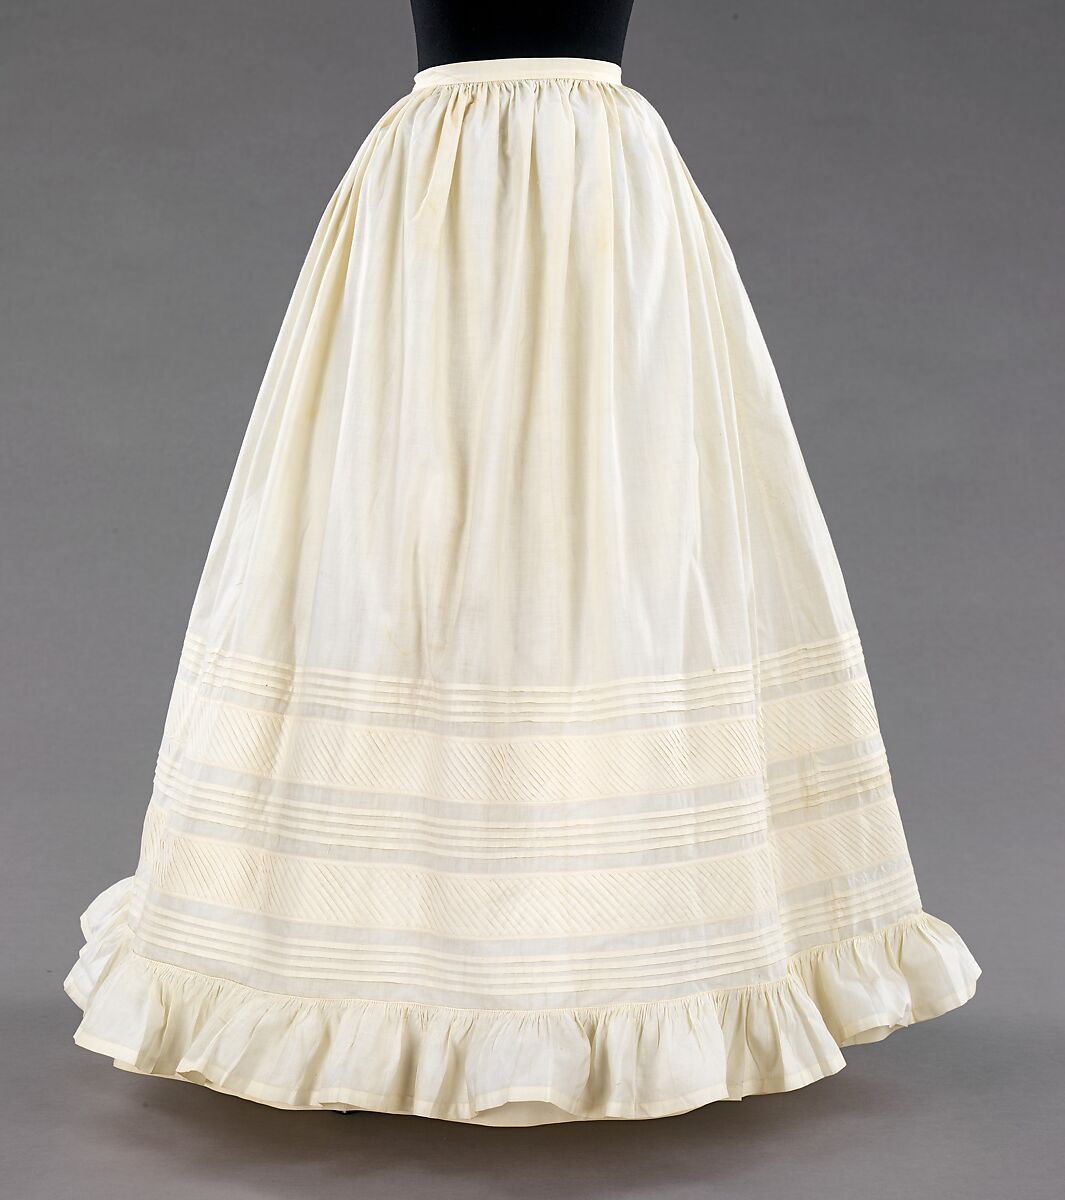
Petticoat with one small frill around the hem.
American, 1850-1860, in The Met

The Kent State University Museum also has an 1840s quilted petticoat with an "applied tucked ruffle at [the] hem." A 
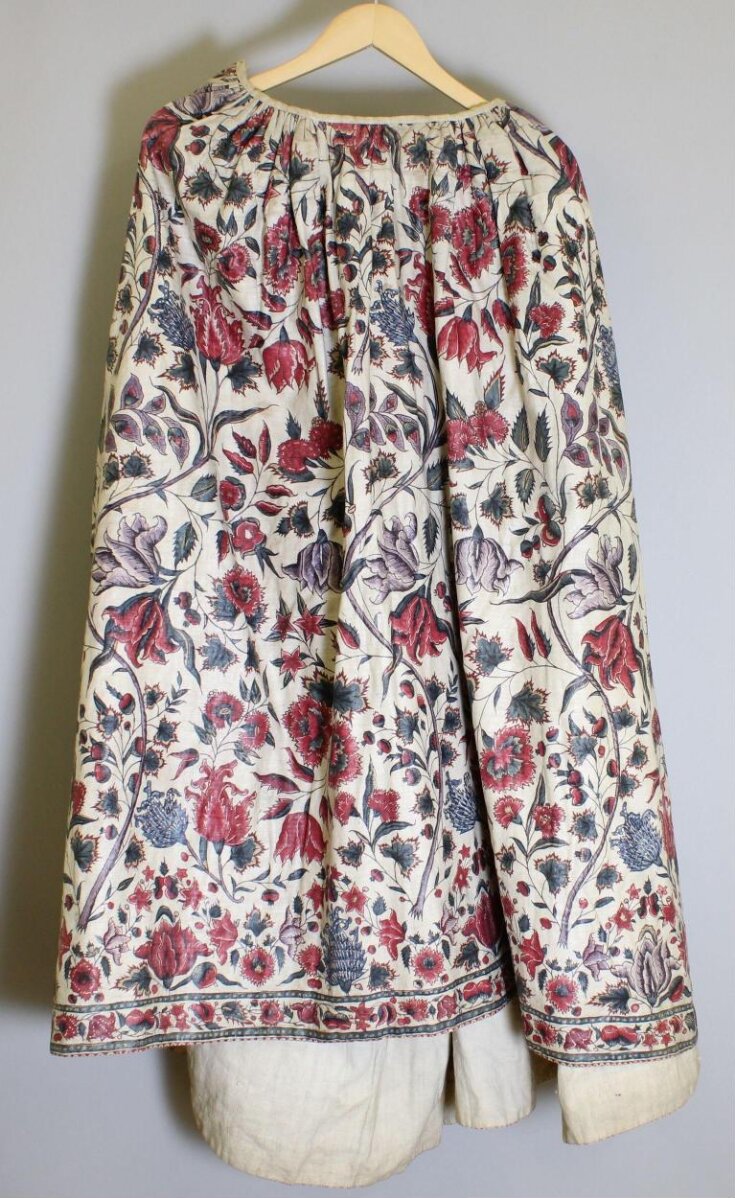
tucked petticoat from the 1840s in the Smithsonian has a scalloped edge slightly gathered into a frill. There's also a petticoat with a deeper single flounce in the V&A, though I suspect it's from the 1865-1874 part of its date range rather than the 1850-1860 part--the shape is awfully narrow up top, apparently gored to join the waistband smoothly with no fullness.

As described in contemporary texts, there are also flounced crinoline petticoats. The few of these I've seen tend to have their single flounce higher up on the garment, like so:
 
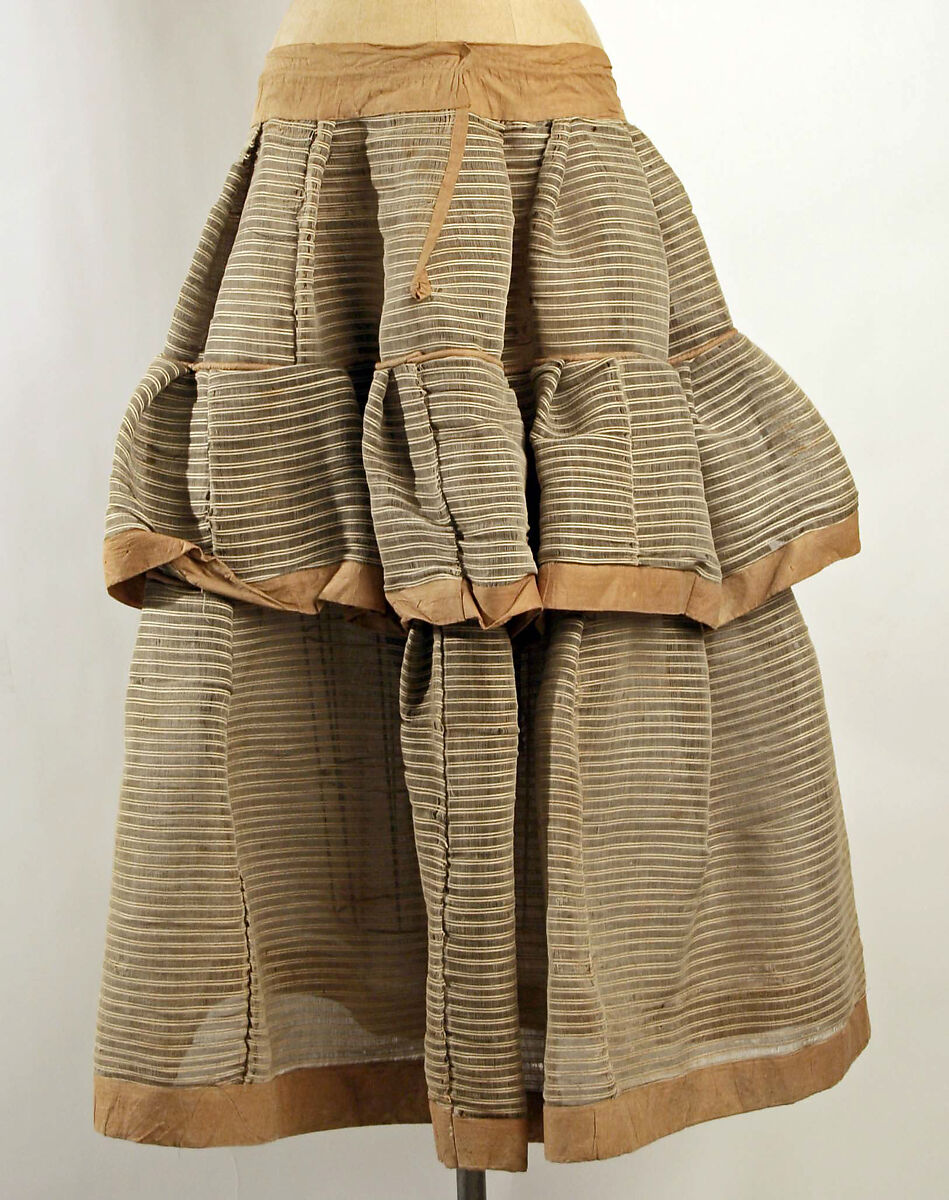
Crinoline Petticoat, 1840s, The Met.

I searched my main online collections (LACMA, the Met, V&A, MFA, also Kent State, Williamsburg, and the Smithsonian), and didn't find any other petticoats with flounces from the 1840-1865 period. Their collections are full of quilted, corded, embroidered, tucked, and even petticoats trimmed with lace, but not flounced ones. The relative scarcity of flounced petticoats in museum collections may arise from a variety of causes. Flounced petticoats may have been uncommon, with few ever existing in the first place. Alternatively, they may have been so common that they were not deemed as worthy of preservation as petticoats with expensive lace or embroidery. The flounced petticoats may also have been good candidates for re-making and re-modelling as styles changed.
 
Conclusion
 
From the textual evidence, flounced or frilled petticoats did exist and were used prior to the invention of the hooped petticoat. Some sources from the late 1850s to early 1860s put flounced petticoats into competition with steel-hooped petticoats, while others imply or outright state that frilled petticoats were worn over hoops.
 
Surviving garments and detailed descriptions of flounced petticoats are not abundant, but the ones I have found so far indicate that the norm was 1 or 2 ruffles extending no higher than the knee, with 4 flounces as the maximum. Some of these garments may have used the flounces or frills as adornment, not just for volume. Mentions of flounced petticoats not infrequently pair them with open wrappers.
 
I have so far found no evidence for white cotton petticoats being constructed like tiered skirts, with flounces extending the length of the garment.

Saturday, April 2, 2022

Original: Chemise c.1850

I still need to remake most of my 1850s underthings, and decided some inspiration was in order.

American or European chemise, c.1850. The Met.

Even at the highest magnification, I can't tell what technique is used on the decorative infill. My first thought it wavy braid (as on the chemise in my own collection), though the completely contained circles would be a pain to make in that technique, which leads me to suspect tatting or crochet. However, I can't clearly see any of the stitches to make a determination. I'm certainly not copying this garment, though, so for now it can remain a mystery.
 

Sunday, December 26, 2021

1780s Stays

For the second day of Christmas: the stays I cut out a year ago last April. I actually finished binding them over the summer, but never managed to photograph the finished garment. The chamois leather was much easier to sew than any other sort I've work with; I ended up using a regular sharp needle rather than a leather needle, and it didn't have any sticking trouble. 

Finished Stays


I realized after I'd committed to the style that the shoulder straps really shouldn't have been bound. I also watched a couple of Luca's videos on original 18th century stays (via Foundations Revealed) while doing said binding, and now want to completely re-make these stays, with slightly different grainlines on the pieces.


Underarm guards are based on several examples in PoF 5


Easing the leather around the curves got easier as I worked, but it was still annoying, and there are several points I've less than pleased with--but I can live with that as an alternative to re-doing the binding.

Still rather pleased with the eyelets, if not the tab binding.

Monday, November 1, 2021

Original: Royal Monogramed Stockings, 1887

Wool Stockings with Silk Adornments, 1887. In the Met.

Got onto another research project, and encountered these gorgeous silk-embroidered wool stockings from Queen Victoria's Golden Jubilee, 1887. In addition to the crowned VR ("Victoria Regina") monogram embroidered in silk, the stockings have royal orbs and the United Kingdom's horticultural symbols: Scottish thistles, Irish shamrocks, and English roses. No Welsh leeks, though.   
 

Sunday, May 23, 2021

French Slip, 1930s

For a change of pace, I decided to make some 20th century garments. The first is a "French slip" from a 1930s pattern I found at Mrs. Depew Vintage. It's not much to look at (especially on the hanger, as my dress form still out of sorts) but I found some aspects of the construction novel, and should probably document them for future projects.

The first point of interested is the pattern itself. Instead of full-size sheets with pattern pieces in different sizes, this pattern used graduated rulers at set angles. The whole pattern fits on a single piece of paper; you just select the ruler for your bust size, and use it to measure out each point on the pattern. Connect the dots, and you have a full-sized pattern.

I like this a whole lot better than taping together sheets of paper.

The downside, of course, is the pattern grading. The further you are from the model bust size, the more  every measurement increases or decreases: the garment's shoulder, waist, hip, torso length, skirt length, and skirt width are all directly scaled off the bust. Obviously, humans do not automatically get taller and hippier with increased bust size, so that created some grading issues which needed to be adjusted. By comparing the rulers, my pattern draft started out 4" longer, and 8" wider around the hem than it would have been if I were a B (of otherwise the same dimensions).

So, I ended up removing 4" from the skirt length, and 1/2" from the torso. I also adjusted the bust darts to take up the extra fabric sitting along the neck edge. To ensure that the whole garment could be slipped on over the head, I also added some ease into the waist.

I like how this seam turned out.

I made the whole slip out of silk habotai (China silk). I don't usually work with such light weights, except for lining parasols. It wasn't as bad to work with as I remember; it's also not quite as liquid in its behavior as a silk chiffon or charmeuse, which was a relief. Since this is a slip, I pre-washed the fabric, which I don't normally do with silks. 

The construction was straightforward: machine-sew the darts, join the pieces with machined French seams, and hem the edges by hand. Those could have been machined, but I don't care for visible top-stitching.

Not the most exciting view.

I considered using ribbon or lace scraps for the straps, but didn't have anything that suited this shade of pink. I instead used scraps of the same silk.


Saturday, March 13, 2021

Update on c.1780 Stays

 After cutting them out last year, I put the pieces for my late 18th century stays in a safe place. I finally found them again in late February, and have finished no other projects since then.


Fully boned, eyelets bound, and attaching the binding.

The stays are made of a double layer of linen canvas, stiffened with artificial whalebone. Chamois leather guards the underarms and will be used to bind the raw edges. I started out lightly boning the stays, just along the seams and openings, but decided on the first fitting to fully bone the garment instead. The boning channels are machine sewn with cotton thread; the eyelets and leather are hand-sewn with waxed linen.
  

So many eyelets.

I had also originally intended these stays to lace only down the back. Reflecting on my 1820s long stays, and what a pain they are to lace, I decided to switch to a front-and-back lacing style. I hadn't accounted for the relative ease of spiral lacing versus cross-lacing behind one's back, and after going to all that trouble, I'm not sure it was worth it. 


And the three eyelets that I had to remove.

After some slight miscalculations, I ended up with 13 eyelets down the each side of the back, 14 on the front, and four at each shoulder strap, for a total of 62 hand-bound eyelets. I actually ended up sewing 65, as I was four eyelets into the second front piece before remembering that these stays were going to be spiral-laced, and thus the eyelets needed to be staggered. As I had done already done on the back panels.

Fortunately, I'd managed to open the eyelets with very little thread breakage, and managed to cut off the stitches on the three extraneous eyelets, then carefully darn over the broken threads. After the first, I found that darning from the inside made a neater and less visible mend. The structural integrity of the stays does not appear to have been compromised, though it is frustrating to have this error in the most prominent place on the garment.

With the chamois leather underarm protectors appliqued into place, all that remains is to attach the leather binding on the upper and lower edges of the stays, then cut and attach a lining made of lighter-weight linen. Even with my best sharp needles, and a very thin, supple leather, the stitching is noticeably slower and harder on my hands than a moderate-to-fine linen or cotton.


Wednesday, December 23, 2020

18th Century Linen Petticoat

 Another project from the "to do" basket: a basic linen under-petticoat from The American Duchess Guide to 18th Century Dress-Making. Three years later, I finally made a project from the book.


The material is a mid-weight linen from Fabrics Store, with the waistband of 3/4" linen tape (bleached) from Burnley & Trowbridge. The petticoat is entirely hand-sewn, which went a bit quicker than expected. Considering that it languished in the in-progress basket for most of a year, it was a little embarrassing to realize that I could have finished the whole thing in the span of two Christmas movies.

Thursday, July 30, 2020

More Smock Repair

Faire would be starting this weekend, so I did some much-neglected repair work on my other smock (removing the sleeves and felling the raw side seams). While I don't find felling the interior seams necessary to comfort (the usual reason I hear for doing so), linen just tends to ravel along the cut edges over time. At one point I overcast much of these seam allowances (which did keep things together), but when a hole recently developed along one underarm gusset, it was time to secure everything more permanently and neatly.


Close up of a white linen smock showing the felled interior seams.
Not much to look at, but still feeling accomplished
(= a good 90" of running and felling).

Monday, June 29, 2020

Renovated Renaissance Smock

After four years of wear, I decided to remake my first 16th century smock.

The problem was that the sleeves were too short by an inch or two. It was wearable, but any sort of arm extension would leave the cuffs tight below the wrist, and putting strain on the side seams below the gussets. Unfortunately, I really like how the buttons and cuffs turned out, so lengthening the sleeve ended up looking like:
  • Remove sleeve from smock.
  • Remove gusset from sleeve.
  • Piece 3" strip of linen to upper sleeve (and fell the seam; piece width includes extra allowance for felling).
  • Reattach gusset to longer sleeve and close the extra underarm seam length (and fell the seams).
  • Reattach sleeve to smock (and fell the seams).
  • Take apart the side-seam at the same time, and re-do it with proper felling so the allowances stop fraying.
  • Decide that the collar pulls weird, and add the shoulder gussets omitted last time.
  • Piece neckband to fit the larger opening.
  • Realize the neck is now too large, revert to earlier size, but add small tucks to ease the fabric. 
  • Make new thread loop fastener, replace broken thread reinforcement at center front slit.

Close up of a white linen shift, showing piecing at the upper sleeve.
I'm more excited for this shift than I probably should be.

The process ended up more involved than it's appearance would suggest, but it's now more comfortable and fits better (and hand-sewing linen is always a treat). I think the most surprising thing was how large and awkward the collar stitches looked to me as I was undoing them--my default stitch to reattach the collar was about half the length of the previous work.

Tuesday, April 21, 2020

Cutting Stays c. 1780

I'm taking a short break from sewing masks to mentally recharge with a different project. Back before Things Fell Apart, I commissioned three custom corset patterns from Marie at The Fitting Room. The mock-ups fit beautifully, and I was very excited to start work on the late 1890s corset as the foundation for an 1896 opera ensemble. That performance of La Boheme has since been cancelled.

So I decided to try a completely different era, un-shadowed by disappointment or uncertain deadlines, and started working in earnest on the 18th century stays.

Off-white fabric with pattern pieces and silver-colored dressmaking sheers.
With very careful layout, I got all the pieces cut
(on the grain) from 1 yard of 56" wide canvas.

Several original garments were considered, with this pattern primarily based on a c.1780 set of stays in Nora Wraugh's Corsets and Crinolines. I debated making it up with front-lacing (or both front- and back-lacing), but decided to try this first set with back only, as it appears to be the most common arrangement of the time.

So far, I've just cut two layers of linen canvas (Fabrics-Store's 8 oz bleached, if I recall correctly), for each of the pieces. There will also be a lining of finer cotton or linen. Eventually.

Sunday, June 16, 2019

Late 18th Century Shifts

A mannequin wearing full undergarments from the late 1700s
Shift/chemise, last quarter 18th century.
Shown with stays and panniers LACMA

Some notes I put together in preparation for actually making 18th century costume.  One must, of course, start from the innermost layers, which usually translates into shifts and stays.


Shift, French, 3rd quarter 18th century. The Met.

Shift, American, c.1780. The Met


Shift, American, 1780-1810. The Met.

The construction is easier to see flat, as in this example from Williamsburg:

Shift c.1780-1810. Colonial Williamsburg

 There are more examples in the Williamsburg collection (the site doesn't direct link, but a search for "shift" turns up two more late 18th century, as well as some early 19th). The shifts all cut square, and flare towards the hem (sometimes achieved with gores); the necklines are rounded, and some are controlled with drawstrings; the sleeves vary between mid-bicep to upper elbow length, and have a square gore under the arm to allow movement. Some of the more sheer fabrics reveal a facing at the point where the sleeve is joined to the body.

Additional sources:
There is good research by Larsdatter. Kendra of Demode has a short timeline of original chemises.  And here is nother example by Mara Riley (I love it when measurements of the original item is included!). Marquise.de has some cutting diagrams adapted from French and German sources.

Sunday, June 2, 2019

Another Batch Of Chemises

Haven't given up on Victorian clothing, just slogging through a round of repairs, alterations, and less-than-fascinating underthings. It's almost enough for me to start a survey of wear patterns...

The fascinating world of white cotton undergarments.
With these, I'm now up to a total of two untorn chemises.