Tuesday, January 3, 2023

More Muffattees on CSM

It's the 9th day of Christmas, and time for more Christmas presents:

Two pairs of knitted muffatees, both knit in the round in a ribbed pattern. One is pale pink and relatively light weight, the other sage green and heavier.
A Study in Gauge

When I was looking for muffattee patterns to adapt, the simplest was to simply knit a 3-3 rib to the desired length (either in the round or knit flat and then seamed). For examples, see "Lambs' Wool Muffatees" in Woman...An Epitome of Social Duties (1843) and "Plain Ribbed Muffatees" in My Knitting Book (1845) among others. 

Since I'm still not up to using the ribber on my Autoknitter, I decided to follow instructions from the 1868 Bickford Family Knitter instruction manual, which treats the mock-rib technique (removing needles) as equivalent to ribbing. However, I've found that 3-3 really doesn't looking like ribbing when worked this way. Fortunately, Mlle Riego's The Winter Knitting Book (1859) gives a "Simple Muffatee for a Gentleman" worked in 2-2 ribbing in the round, which I took as permission to do a 2-2 mock rib. Her version is doubled to create a lining and has no thumb gap, but considering the intended recipients, I decided to make those changes. [These are for my coworkers, who spend a lot of time typing in a cold building.]

The pink muffatees were knitted with a very light lace-weight wool from my stash, on a tension of 5L3 (if I recall correctly). I failed to note the tension on the green, which made with a heavier sport-weight wool from the stash). The pink ones ended up very lacy in their effect, particularly when worn, while the heavier yarn make the green look more like true ribbing.

Monday, January 2, 2023

2023 Costume Resolutions

 I have some actual deadlines/goals for this year:

  • One full 1873 ensemble. New corset, dress, and skirt supports will be needed. I can/will probably end up using 1850s chemise and drawers, since this is a one-day event. And indoors, so outerwear isn't as urgent. 
  • One full 1909 ensemble. Dress, corset, supports.. Suffrage event in summertime. I'm going to need one of those huge hats....

In my usual eras:

1570s: I would like a better-fitting kirtle and gown, but I'll settle for having 3 shifts and a pair of comfortable garters in time for fair.

18th century: Finish the cape, maybe mess around with the short gown pattern if I have time.

Regency: No goals, though I'll flag re-sizing dresses and upgrading my petticoat as the most needful things. Though I still would like a pelisse...

1850s: It's past time to focus on making new chemises and drawers. No other goals for this period, since those need to come first.

mid-20th century: Some warmer wool skirts for daily wear would be lovely, and maybe another split skirt for the summer.

Other:

I'm enjoying the machine knitting and intend to make a lot more socks, hopefully working out those square heels. 

I'd also like to try making 1 pair of shoes.

Getting my research projects posted and my blog drafts down below 50. (Currently: 95).

Sunday, January 1, 2023

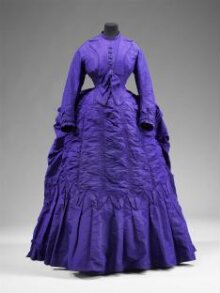
Original: 1873 Purple Silk Day Dress

 Happy New Year!

Day Dress,1873, VAM.


Going back 150 years for this number: a purple silk day dress (bodice with skirt), credited as part of a 1873 trousseau.  Definitely check out the Victoria & Albert Museum's page for this item: there are a further 15 pictures, which are really needed to capture the variety of detail that went into this ensemble. There's piping, bows, fringe, shirring, bustling, folded trim, and two different styles of ruffle, all worked in the same fabric. Also some lovely matching thread-covered buttons. The bodice detail shots appear to show a moire pattern in the fabric, though that might be a photographic artifact.

Saturday, December 31, 2022

Reviewing 2022 Goals


Looking back on this year, it mostly didn't go to plan. I did a little mending and worked on some long term projects, but mostly only wrote up my culinary experiments. I also spent more time on knitting projects than I had anticipated.


Main Wardrobe Goals (c.1855-65)

Four chemises. I did a lot of emergency make-it-work-one-more-day repairs, but didn't get the nice ones done.

Four pairs of drawers. Ditto.

Four pairs of everyday stockings. Started sorting these, but didn't make any new ones.

Silk and wool stockings maintained. Also made new wool stockings.

Quilted and corded petticoats maintained. Took my corded apart and still need to get it on the new waistband.

Three nice white petticoats. Repaired the one where some of the stroked gathers came out.

Four usable collars (most 1855, one 1860s). Currently at 3 for 4.

Four useable sets of undersleeves or cuffs, suited to the dresses (most 1855, some later)

Make or re-make one work dress (1855)

One fashionable ensemble (1855). Arguably my blue plaid, which I did alter. However, the sleeves still tear out every time I wear it, so there's more alterations in its near future.

Two aprons. Repaired both the pink print and my white sewing apron.

One nice bonnet (1855) It has problems, but technically my white crepe meets this.

One sunbonnet Techincally true: the purple plaid's still holding on, and I have been working on its replacement.

Winter Mantle (c.1855) Posted just under the wire.


UFOs

Embroidered coif. Slowly progressing.

That red-print Empire gown. Paused with finished bodice, skirt, and sleeves needing to be joined, but I haven't touched it since Jan 2020 and it probably will need to be re-sized now.

Repair sewing kit. Needs to be a priority in 2023. I use it all the time, but the cardboard is truly given out.

Puffed Undersleeves. Paused from January 2020, though not for a particular reason.

Straw soft-crown bonnet. Nearly done!


Stretch Goals (I have materials but no pressing needs)

New 16th century kirtle and gown Did preliminary drafting and fitting, but not complete.

New 16th century smock Was waiting on Typical Tudor

Rustic straw hat

Linen sheets

Tablet or pick-up woven bands Not exactly.

18th century peignor Still paused with a million yards of ruffles to hem.

18th century short gown and petticoat

18th century skirt supports for fancier gowns

18th century pocket

18th century hair pads

18th century cape Actually making good progress on this.

Empire pelisse

Coarse straw bonnet

Net lappet cap, 1850s

1870s spoon-busk corset

1900s corset  

1912 Wrap Cloak Mock-up cut out, still fussing with the dart adjustments.

Undergarments for early 1900s traveling suit

1940s/1950s skirts and dresses One finished. And a second almost done.

Dancing slippers

Knit Stockings Modern. Period for the early 20th century technically...

Refresh 1860s bonnets

New 1800s/1810s bonnet

Bathrobe. Drafted and cut out. Sewing in progress.


Unplanned projects:

Linen hose 

Plain Coif and Forehead Cloth 

16th-17th Century Cloak

Knit wristlets

A Whole Bunch of Muffatees

Apron from The Workwoman's Guide 

Straw Mattress Experiment


Mending posts? I did one or two (and three). There was more mending that never got written up, though not as much as I would have liked to get done.

Research posts? I didn't post any of these, but made substantial progress on four, which should go up early in the new year.

Drafts: 88

Friday, December 30, 2022

Winter Mantle, 1857

Just in time for winter events, I finished my new 1850s mantle, based on a pattern from the December 1857 issue of The Englishwoman's Domestic Magazine.

Winter Mantle. Englishwoman's Domestic Magazine, December 1857.

Per the description, the mantle is made of wool broadcloth, trimmed with velvet ribbon and fringe. Black or brown with matching trim is the preference, though the description also suggests using black trims "with any dark cloth."

I selected a grey broadcloth, which ended up being a few shades lighter than intended. That being said, I think the lighter color is more cheerful than a solid black would have been, and I like how it looks with my mauve hood and knitted comforter.

The buttons and cord fastener don't photograph well against the velvet.

Materials: 

Scant 3 yards grey broadcloth

6 yards of  2" black (cotton) fringe

12 yards 3/8" wide black velvet ribbon

5 yards 1.5" wide black velvet ribbon

8 wood button molds

~6 yards of black beading silk to make the cord fasteners.

Scraps of black silk taffeta and white linen for covering buttons

Scraps of fringe for the 2 tassels

I sketched the 3 pattern pieces--front, back, sleeve--to scale, then made a muslin to test the shoulder and neck fit. The sleeves were delightfully easy, in that there's no underarm seam: just a generous side opening that will easily fit large 1850s pagoda sleeves, and a cape to cover. I sewed the construction seams using a double row of running stitches in grey silk thread, based on the construction notes from an 1780s broadcloth cape in Costume Close Up (which also proved successful on my 16th-17th century cloak). The ribbon and fringe are both attached by small uneven running stitches.

I attempted to make silk tassels out of size FF beading silk, but didn't like how the material behaved; instead, I used the off-cuts of the fringe, sewn tight around the head, to form the two tassels. The finished mantle shows a double line of buttons with cord, which is how I interpreted the fasteners (based on examples like this mantle which uses more elaborate frogging). I considered applying the buttons as a decoration only, and using concealed hooks-and-eyes, but decided to try the buttons and cord loops first. I couldn't find any black cord that I liked, so I used my straw-spinner to twist an 8-strand cord (first twisting two sets of 4-strands, then plying them together). 


Plying cordage.

Compared to the original image, I could have used a darker broadcloth, and I think the proportions would stand for wider trims. I went with these ones because I couldn't find any fringe longer than 2" or velvet ribbon wider than 1.5", and I wanted to maintain the proportions of the narrow and wide ribbons. That being said, I rather like how it turned out, except that the 3/8" ribbon was difficult to manipulate over the fringe header. Practically, I find the current fringe length very practical to wear

Thursday, December 29, 2022

December Mending

Lots of little mending projects, mostly for Fort Steilacoom. Reattached a bow that came off my sewing apron. Fixed the plaid dress sleeve again. Reattached a loose lining on my fur cuffs and finally added the hooks and eyes, so I can stop pinning them in place.

Trapezoidal-shaped 1850s fur cuffs, lying with the white fur facing down and the polished-cotton lining facing up.
Very warm even when pinned, but the hooks are much easier to fasten with one hand.


Wednesday, December 28, 2022

Book Review: Costume Close Up

Book cover showing a red cloak on a black background with the title "Costume Close Up
Costume Close-Up (1999) by Baumgarten & Weston
 
Another book-review that I keep neglecting to post. Costume Close-Up: Clothing Construction and Pattern, 1750-1790 by Linda Baumgarten and John Weston is a detailed exploration of 25 items of the late 18th century clothing from the Williamsburg Collection. Three are ensembles with multiple components, giving a total of 30 garments featured. 
 
The book itself is 120 pages. It begins with a 6-page introduction which broadly covers 18th century fashionable silhouettes, how to study antique clothing, 18th sewing techniques, and garment terminology. Excepting 2 pages of end-notes, the rest of the book is divided into 25 sections, each investigating one garment or ensemble. Thirty short 'side topics' (each about a paragraph long with an illustration) are scattered throughout the relevant sections to provide context on how the garments/materials were made, what kinds of people worn them, etc. There's also a 5-page spread of color photographs.
 
The different sections each begin with the artifacts' identifying information. Short paragraphs then discuss the garment category, the materials used in this example, any evidence of how this specific garment was altered, and the construction methods present in it. The last category is the longest, with each technique or point of interest getting its own short paragraph. Each garment or outfit has at least two black-and-white photographs (full length and a detail), as well as line-drawings of all its component pieces on a scaled page (in inches & cm). Where relevant, line drawings are also used to show embroidery patterns or particular construction methods. There are one or two asides depending on the item, often accompanied by a contemporary image of similar garments. For example, the #5 quilted petticoat has an aside addressing 'who wore quilted petticoats?' with an 1783 engraving of a woman wearing one, and a second aside on block printing accompanied by a c.1780 print.

Per the authors' introduction, this book is not a manual for sewing 18th century clothing, but was intended as an introduction to studying antique garments. I think that it does this job admirably, while also providing useful information for recreating specific garments. I appreciate the amount of detail that is included, and admire how approachable the authors have made it. I have my copy shelved right next to Patterns of Fashion 1, but I could see myself handing this book to a new researcher or repro sewist where I would hesitate to start someone on PoF.
 
The two things that would make this book even better are more color pictures, and an actual grid on the pattern diagrams. Admittedly, I believe the latter was a deliberate choice, as it allows the scales on the edges to be marked in both metric and standard, but I do personally prefer having the grid when scaling up designs. For the former, Williamsburg has digitized over 1200 items from their costume collection (including every item from this book that I've searched for).

Stars: 5

Accuracy: High. It's all original garments.

Skill Level: Suitable for all levels as a guide to garment study. Advanced for garment recreation (would be need to be comfortable scaling pattern diagrams, fitting, determining work order, etc.) 

Strongest Impression: Really shines on the details. Has the diagrams and descriptions of a Janet Arnold book, but with more pictures and more explanations.