Wednesday, May 31, 2023

May Mending

This month's non-project sewing mostly involved altering bridesmaids' gowns, but I did finally put the last few stitches into my corded petticoat remake. Which was a good idea, since it's getting way too warm for the quilted one.

Also switched the buttons to ties on the new waistbands.

I started this petticoat with the intention to set it in stroked gathers (replacing the earlier gauging), but as it turns out I still hate sewing stroked gathers, so they became regular gathers after the first 4 inches. Gauging is easy, but something about lining up the waistband crease with the stroked gathers, and stitching into a poorly-defined sewing line just sets my teeth on edge. I cut a new waistband, and replaced the button and button holes with cotton tape ties.  I really like how they've functioned on my quilted petticoat and plaid petticoat, so I'm hopeful that these ties will also solve some minor annoyances I've had with buttons on undergarments before (wearing out the button-holes, compensating for size fluctuations, breaking buttons in the laundry). Admittedly, most of those incidents involved drawers.

Tuesday, May 30, 2023

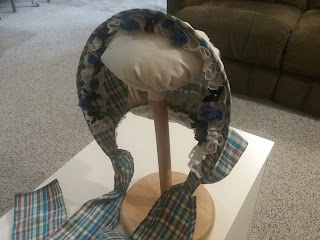
Soft Crown Straw Bonnet, 1858

From Frank Leslie's New Family Magazine, October 1858:

WILDE'S HAT--This pretty hat is in a style which is just now very fashionable; the groundwork is of fine white Belgian straw surrounded with a border of plaid velvet with a cap crown also of plaid velvet separated into puffings by narrow bands of velvet edged with lace. Encircling the crown is a row of rich Chantilly lace, which nearly covers the straw front, the points just touching the velvet border. Very wide strings barred with velvet, side ruche and bandeaus of small mixed blossoms completes this handsome October bonnet. 


Plaid silk velvet not being an option, I decided to use a silk tafetta for the crown, binding, and ties. I also changed the color palette to be more spring-like, with white lace and white velvet ribbon. The front flowers are not visible, so I chose to use a mixture of blue cornflowers and violets for the "bandeau of small mixed blossoms." I omitted the lace from the edges of velvet ribbon because I couldn't get the scale to look right. The picture seems to suggest a sort of double-layer curtain, but as this is not confirmed in the description, I decided to keep it a simple single layer.


Back view.

The pattern is based off of one of the Timely Tresses round '50s bonnets (possibly the smaller cutting line on the Ada Gay). The brim is machine sewn from hemp braid. The rest of the bonnet is hand-sewn. The ties are narrow-hemmed strips of the same taffeta used for the crown, binding, facing, and bavolet, with both curtain and crown lined in cotton net for extra body; I believe this fabric came from Portland's Fabric Depot. The lace overlay and frill are both cotton levers lace from Fine French Laces.

From the front. The flowers aren't so dark as they appear.


Monday, May 29, 2023

Tablet Woven Band

Inspired by this video, I decided to break out the tablets and actually attempt a polychrome pattern. The design is a 8th-10th century eastern European pattern, which Lady Elewys conveniently wrote-up. In addition to the simple warp pattern (solid borders, are other cards the same, alternating S/Z), the appeal of this project was that all the tablets are moved together, and the same direction. When the warps get too twisted, you just start working the other direction until they're too twisted the other way. This was perfect for me, since I wanted an easy project that I could take to a Ren Faire, and work on amid interruptions, without need for notes.  


Band loom all warped up with 10 tablets.

I managed to finish the piece over one weekend, interspersed with spinning and netting and amusing children (who apparently love helping turn the cards).


Weirdly enough, the crewel yarn held up.

The single-strand crewel held up just fine as warp. It's a bit less tightly spun than I would have liked, but that's what I had on hand which came in multiple colors, was wool, and was the right size. I have ordered some 2/20 silk for next time.

Finished(?) band.

I had a thought of making this piece into garters, since my last pair ended up with the second band a hair too short to comfortably knot. To make sure there was plenty of warp of adequate garters, fringe, and the loom waste, I cut 3 yard warps. Exclusive of fringe, this gave me a 96" long piece of tape, so...that was successful. Now I just need to decide whether to cut and fringe two garters out of it (and a bit of left over), or have a really impressively long belt.


Wednesday, May 24, 2023

Medieval Drawstring Pouch

Continuing the catch-up posts, last spring I made some fingerloop braids at the Two Rivers Faire, with the intention of making a round purse based on some of the archeological examples from Amsterdam:

  • Leather purse (c.1300-1700), 11" diameter, 64 punched holes (~1/2" for a hole plus its adjoining space, punch size probably ~1/8 inch with 3/8 gap judging by how large the punched holes appear relative to the space between)
  • Another, 5.6" diameter, ~48 holes (~3/8" for hole plus space, holes probably ~1/8")
  • And a third, 12.5" diameter, ~72-74 holes (~just over 1/2" per hole, hole size nearing 1/4")

Of course, since embarking on this endeavor, the database has been updated to indicate that the ties were likely leather. Despite the simple design, my leather-punching skills proved inadequate, and I ended up letting this simple item linger in the To Do pile all winter. It's just a 9.5" leather circle, with 40 holes punched around the perimeter, and the striped fingerloop braid threaded through.

The pouch, open almost flat.

Closed pouch. Holds my replica coins and dice very well.


Monday, May 22, 2023

HFF 6.6: Literary

Detail from an 1850s painting with a woman's hands gesturing over a table of food.


The Challenge: Literary. Try a making a dish mentioned in a song or story.

It's time to try the famous Paprika Hendl that so impressed Jonathan Harker in Dracula.

The Recipe: While I did find paprika hendl in the 1866 Viennese cookbook "Die" Soldaten-Kuche, I decided to try looking for it in translation as well. I found a few English recipes for "Hungarian Pepper Chicken" which at a glance use the same ingredients (chicken, onions, paprika, cream), and opted for one of those. From The Domestic Monthly:
PAPRIKA CHICKEN OR CHICKEN WITH HUNGARIAN PEPPER--Take one tender fat spring chicken; cut it in quarters; cut up one white onion very fine; while cutting it have one ounce of butter into a pan to heat; when hot , but not at all scorched, put in the chicken and onions; cover up closely ; fry very slowly for fifteen minutes; then put in half a pint of sweet cream and what paprika or Hungarian pepper can be put on the point of a knife. Have ready a few small flour dumplings and add them when the chicken has cooked fifteen minutes. Let them cook ten minutes longer and serve. This dish will have a reddish color from the paprika. 
The Date/Year and Region: 1885, New York

How Did You Make It: On a half scale (a whole chicken would be too much for me). I started by melting 1 oz of butter on the stove, while setting a pan of water to boil. I then set about making a batch of Norfolk dumplings (The School Cookery Book, 1881) but combining a scant cup of flour with 1/2 tsp baking soda and 1/2 tsp salt, then adding 1/2 cup cold water. Worked into a dough, these were dropped in the boiling water to cook for ~20 minutes. I then diced half an onion, and added it to the melted butter, along with 2.5 lb chicken bone-in thighs (my approximation of "half a chicken," which isn't an option at the grocery store). I covered the chicken and let is cook for 15 minutes, turning the meat over twice. At that point, I added 1 cup of heavy cream and 1 "knife-point" of paprika (which I'd estimate around 1 tsp), and stirred it all together, then added the cooked dumplings. I let it all cook a further 10 minutes.

Time to Complete: ~35 minutes

Total Cost: $8

How Successful Was It?: Tasty. I was worried about the lack of salt, since the fricassed chicken recipes I've tried have turned out insipid without salt, but it tasted fine. I found that adding a pinch of salt to my serving did enhance the flavor a bit. I was also concerned about having sufficient paprika: the instructions describe it as "red" from the spice, but my version is a pretty sad orange at best. It still tastes fine, but certainly didn't make me start chugging water the way Jonathan does upon trying the dish in Dracula. The dumplings I was also a little worried about (they differ from my usual in having no egg or pepper), but they held their shape just find and took on the sauce flavor beautifully. So, I now have a new go-to dumpling recipe when eggs aren't convenient.

How Accurate Is It?: Fairly. I used a modern kitchen. As noted, my main departures were using the chicken thighs instead of quartered chicken, and the possible confusion about the paprika amounts (though I did measure it on a butter knife). During a previous book-club discussion, it came out that paprika comes in both sweet and hot varieties, but that this dish usually uses the milder paprika.

Nearly all cooked.

Paprika hendl, except not red.

Sunday, May 21, 2023

Late 16th century Silk Codpiece (With Concealed Flask)

Remember those silk points from the lace bend round? Armed with those, a replica schnapps flask, a copy of The Typical Tudor, and a whole bunch of scrap fabric, I decided to embark on my most luridly-colored project of the year. So far.

Step 1) Tracing the Pattern. 

To fit the flask (and extra padding around it), I cut a muslin mock-up of the codpiece with very generous seam allowances, then pinned out the excess. The result was a that I ended up extending the side edges of the codpiece pieces by 1/4" (leaving the overall length the same).

With the new pattern, I then cut out all the requisite silk fabric, linen lining, and wool padding pieces called for in the pattern. Additional, I cut a linen interlining and gathered some smaller wool scraps for padding out the flask.

Materials all assembled.
 

Step 2) Initial construction.

 I didn't get a good picture of this step, but I started by decorating the outside silk piece with optional slashes, basting in the pull-throughs, and then joining the two silk halves along the center seam. The interlining also was also pieced at this time.

Step 3) Padding. 

To get the proper mid-16th century shape, the codpiece needs padding. To allow room for the flask, I made an abbreviated version of the prescribed pattern (using 2 thin and 1 thick piece layer of wool) to give a smooth line to the fabric. I set this into the fashion fabric, added the flask, then started cutting small pieces of wool to fill in the gaps.

Adding extra layers to surround the flask's neck and support the base.

Graduated circles to fill in the hollow under the flask.

Padding ready to be basted in place.


Step 4) Interlining.

With the wool padding in place, I attached the linen interlining. The idea was to give a smooth interior for the flask, so the interlining was cut to match the exterior; it's joined by stitching all around the outside edges, leaving the wool padding sandwiched between the silk and linen layers.


Flask in the finished interior.


Step 4) Lining and binding.

Next up, I need to add the final backing, which makes the other half of the actual pouch for the flask. It's also joined to the front along all three sides, those seams being then covered by a self-fabric bias binding. For the top, I hemmed the lining and bound the exterior separately, joining them with some blind stitching just near the corners.


Step 5) Eyelets.

To attach the points, I made a pair of eyelets in each of the upper two corners, going through all the silk and linen layers. This, of course, if how I discovered that the aiglets I used are a bit bigger than either of my fabric awls. Combined with the green silk having a non-woven backing (giving the fabric great body, but being bad for piercing), these four eyelets were basically the worst part of this project. Once done, the points were put through, and tied in jaunty half-bows.


Voila: one slashed silk codpiece with a hidden flask.


Conclusion: As a decorative gag gift, I'm quite happy with how this project turned out, and expect the recipient to come up with an amusing story about confiscating it from one of the Landsknechts (if not something more outlandish). I'm not certain this codpiece could actually work as worn, given the weight distribution and discomfort of the glass poking the wearer. If firming sewn along the side/bottom, I do think it could be attached to hose, though I would be concerned about the top gaping, possibly necessitating a third point at the center top. 

If making again, I'd add more padding to the back lining, possibly increasing the overall size of the item to ensure there's plenty of space to pad the back with enough material to get a smooth finish despite the rounded flask. If intended for wear, I'd want to both make up some regular codpieces for practice, and also test the aforementioned fit issues, with feedback from the wearer. 

 That being said, if any of my doublet-and-hose-wearing acquaintances are interested, I would like to experiment with making a comfortable, wearable, concealed flask codpiece.

Tuesday, May 16, 2023

Net Bag

 Over the weekend, I netted a medium-sized bag after Sally Pointer's Roman Net Bag video. While she used it for an pre-medieval impression, it's quite similar to the bags seem holding vegetables in Ruth's 13th-century cottage in Secrets of the Castle, while the knots and technique are the same I've seem in 19th century books and on modern craft kits.

Net bag and the shuttle/mesh used to make it.

It's diamond-netting, worked in a spiral from an initial set of 18 loops in a circle, expanded to 24 stitches per round, and then continued until I ran out of cordage (about 10 rounds?). The material is a hemp cord I found in a thrift-store grab bag. I used color remover on a hank from one of the three purple cakes, which gave a nice neutral-looking pale brown shade. I used a wooden shuttle I've had for ages, with the tail acting as a mesh. This was very tricky on the initial half-sized rows, since the shuttle was passing through loops its exact width, but was easy and convenient for subsequent rows.

Despite a few unsightly errors, the bag seems to be both strong and light. It can hold two loaves of Wrocław Trencher Bread, with room for a third. I think it'll also come in handy during the onion harvest later this summer.

Monday, May 15, 2023

Revisting Wrocław Trencher Bread

Last spring, I tried making a medieval wheat/rye bread from Medievalists.net, which was in turn quoted from Maria Dembinska's Food and Drink in Medieval Poland (1999). The recipe is a reconstruction based on 14th century bread regulations from the city of WrocÅ‚aw, so the ingredients are well-documented, though the method is speculative (and the results delicious). 

Since last year, I have found spelt flour (a particular wheat variety) and so decided to see how that changed the results compared to generic whole wheat.

As I do not have any mixing bowls large enough to contain a whole batch, I once again opted to make this recipe on a half-scale:

4 cups rye flour
3.5 cups spelt flour
1 cup beer
1/4 oz (2.5tsp) dry yeast in 1/2 cup water
2 additional cups water
1 Tablespoon salt

As given in the instructions, I started by mixing the flours together, then taking half of the mixture (~3 3/4 cups) and adding the proofed yeast, beer, and water. 

The 'before' picture of the sponge.


After sitting overnight (and through the workday), I added the remaining flour and salt, kneaded ~20 minutes, and took periodic breaks from kneading to hit the dough with a wooden rolling pin.
 
The dough then rose for another ~2 hours until approximately doubled in size. I kneaded it once more (with stick-hitting) for about 10 minutes, then shaped into 5 loaves each between 3" and 4" in diameter. I let the dough rise for another 90 minutes until the loaves expanded to 5"-6" across, then baked 15 min at 400F and a further 15 at 375F.
 
Finished bread.
 
The bread turned out perfectly edible: tasty, with a decent texture, though a touch dense. I think I could have gotten a better crumb by extending the final knead to a full 20 minutes and letting the loaves rise just a little longer, and will probably try that next time. The loaves were quite the second day after baking (approximately T+36 hours), though the crust was rather hard to cut the day after that. As usual, this half batch was more than sufficient for a two-day event. I really should start making quarter-batches...

Sunday, May 7, 2023

Chirography Resources, 16th-18th Century

I need a good hand for 16th century writing, and thus started gathering this list of letter forms and copybooks available online:

Excerpts from A booke containing divers hands (1550-1602) including Italic and Secretary letter forms. [Columbia University Library has also digitized the title page.]

Incomplete alphabets derived from 16th-18th century sources (Italic, Secretary, and Chancery hands)

The Pens Excellency (1618) includes the forms for Secretary hand (pgs 13-14); Bastard-Secretary or Text (p.18); Roman (p.21); Italian (p.24); Court (p.28); Chancery (p.29); as well as the Greek (p.30) and Hebrew (p.31) alphabets.

The Pen-mans Recreation (1673)

The Paul's Scholar's Copy Book (1709)

Round Text. A new copy-book (1712)


Tuesday, May 2, 2023

Ink, 17th-18th century

I went looking for a home-made ink for 16th century use, and ended up finding a number of recipes from the 17th/18th centuries:

The Mysteryes of Nature, and Art (1654) has a page of recipes for different colors of printing ink, as well as a "good writing ink".

Naturall Experiments, or Physick for the Poor (1657) has instructions for red, green, blue ,and gold-colored ink. 

Eighteen Books of the Secrets of Art and Nature (1661) page 272 has a simple receipt with copperas, oak galls, gum arabic, and white wine

Polygraphice (1685) Another oak gall/copperas/wine/gum arabic receipt

Modern Curiosities of Art&Nature (1685) has recipes for India ink, powdered ink, "an excellent ink for writing", ink for parchment or grease-paper, silver and gold ink, etc.

New Curiosities in Art and Nature (1711): India ink recipe with horsebeans 

Three Essays in Artificial Philosophy (1731)

Dictionarium Polygraphicum (1735) the "Another good black ink" receipt with copperas, oak galls and stale beer looks promising. 

The Laboratory (1740):Same as others, uses alum, sal ammonia.

The Instructor; Or Young Man's Best Companion (1742) Like the others, with rock alum added

I decided to try the common combination of oak galls and copperas (aka ferrous sulfate aka iron (II) sulfate), which are both conveniently available at my favorite dye supplier. The main difference between the first and last of these seems to be the inclusion of alum in the later 18th century versions. There's also some variety in whether the solvent is water, beer, or wine.

 I went with the stale beer/copperas/oak gall/gum arabic version from Mysteryes of Nature, at a 1/2 scale (1/2 pint beer, 1 handful galls), though the vitriol quantity is not given (the gum is to be 1/3 that amount). So, I filled in from the Dictionarium Polygraphicum which calls for 2-3oz vitriol/3 pints solvent, which I ended up approximating as 1 tsp vitriol and 1/2 tsp gum arabic.

Ingredients assembled.


Coarsely cut oak galls, in a not-for-food-use glass jar.


The galls soaked in beer overnight.

I let the galls soak almost 24 hours, having intended to leave them overnight, then running into scheduling issues. The liquid stayed a dark, gross brown the whole time. [It also smelled of off-beer, as a warning.] I filtered through muslin to remove the galls and some of the scum, then added the vitriol and gum at which point the ink started turning black. I stirred it in a hot water bath as it darkened, letting it go about 2 hours total. This is more than was called for, but as some of the other recipes want you to heat it for days at a time, this seemed reasonable. I decanted the ink into a storage container (and my clay inkwell) and gave it a try.

Finished ink. It writes well with a steel nib, now to try some quills.


Monday, May 1, 2023

Original: Sheer Lingerie Dress, c.1900

 I went looking for some inspiration for a c.1909 ensemble for my next new event. This dress is a little early, but it looks refreshingly cool for summertime. I particularly like the diagonal stripe effect achieved by the lace insertion.


Cotton dress, USA, c.1900. LACMA.