Thursday, May 27, 2021

Cosmetic Workshop

 I will be teaching a workshop on mid-19th century cosmetics at Fort Nisqually on Saturday, June 5. If you've ever wanted to make your own Victorian make-up, here's a chance to do so without needing to source all your own supplies. 

You can register here. Registration closes on Monday (June 1).

Wednesday, May 26, 2021

Morning Cap, 1856

 Revisiting the 1856 cap pattern from Parisier Damenkleider Magazin


This time, I made the cap from a light-weight cotton batiste. It's more opaque than the lawn I used before, and also has more body. It's still light and airy, but sits a little more crisply.

Sunday, May 23, 2021

French Slip, 1930s

For a change of pace, I decided to make some 20th century garments. The first is a "French slip" from a 1930s pattern I found at Mrs. Depew Vintage. It's not much to look at (especially on the hanger, as my dress form still out of sorts) but I found some aspects of the construction novel, and should probably document them for future projects.

The first point of interested is the pattern itself. Instead of full-size sheets with pattern pieces in different sizes, this pattern used graduated rulers at set angles. The whole pattern fits on a single piece of paper; you just select the ruler for your bust size, and use it to measure out each point on the pattern. Connect the dots, and you have a full-sized pattern.

I like this a whole lot better than taping together sheets of paper.

The downside, of course, is the pattern grading. The further you are from the model bust size, the more  every measurement increases or decreases: the garment's shoulder, waist, hip, torso length, skirt length, and skirt width are all directly scaled off the bust. Obviously, humans do not automatically get taller and hippier with increased bust size, so that created some grading issues which needed to be adjusted. By comparing the rulers, my pattern draft started out 4" longer, and 8" wider around the hem than it would have been if I were a B (of otherwise the same dimensions).

So, I ended up removing 4" from the skirt length, and 1/2" from the torso. I also adjusted the bust darts to take up the extra fabric sitting along the neck edge. To ensure that the whole garment could be slipped on over the head, I also added some ease into the waist.

I like how this seam turned out.

I made the whole slip out of silk habotai (China silk). I don't usually work with such light weights, except for lining parasols. It wasn't as bad to work with as I remember; it's also not quite as liquid in its behavior as a silk chiffon or charmeuse, which was a relief. Since this is a slip, I pre-washed the fabric, which I don't normally do with silks. 

The construction was straightforward: machine-sew the darts, join the pieces with machined French seams, and hem the edges by hand. Those could have been machined, but I don't care for visible top-stitching.

Not the most exciting view.

I considered using ribbon or lace scraps for the straps, but didn't have anything that suited this shade of pink. I instead used scraps of the same silk.


Monday, May 17, 2021

Mareschal Pomade, c.1775

This is a fun variation of the common pomatum with mareschal powder. I used for the base the same lemon/neroli pomatum that went into the hard pomatum, figuring that it would work well with the spices in the powder.


Mareschal pomade. It's quite lovely,
and will probably be my go-to receipt for 18th century.


The pomatum is a bit paler than I expected, but it still has a mild spicy scent. I was pleased to discover that the spicy odor is imparted on the hair (it's very faint, but pleasant). Otherwise, this pomatum worked just like any other I've made and used. It's one of the mutton-fat tallows, so a bit on the hard side compared to my earliest Victorian ones, but practically that just means I have to work a little slower (digging out small pieces of pomatum and rubbing it in my hands to warm it up).

Saturday, May 15, 2021

St. Cecelia Vinegar, 1865

The first skin-care receipt in The Handbook for Ladies' Maids:

ST. CECILIA VINEGAR. This vinegar is used for cooling and strengthening the skin. Spirits of wine 10 parts, Strong white vinegar 10 parts, Gum benzoin 10 parts. The gum, powdered, and the spirit are macerated till the former is dissolved, the materials being kept in a close bottle. The vinegar is then added. The employment of a dozen drops of this liquid in half a glass of water will give a healthy tone to the skin which is bathed with it and will be followed by no ill effect. 

---The Handbook for Ladies' Maids, 1865

Equal quantities of benzoin gum, spirits of wine, and white wine vinegar is fairly straightforward. 


Vinegar, spirits of wine, and gum benzoin powder.

Equal quantities of benzoin gum, spirits of wine, and white wine vinegar is fairly straightforward. I used 10 mL of each, and in my first attempt discovered that failure to stopper the bottle will result in the alcohol evaporating. A second start proved more successful. However, this quantity of benzoin doesn't fully dissolve in either liquid. It suspends for a while, but even with time and regular shaking, it still precipitates out.

Finished vinegar and the water ready to use.

Adding 12 drops to 4 oz of water gives clear water with a faint odor of benzoin gum (and fainter vinegar). I didn't notice any particular sensation or effect on my skin. Looking at some of the other receipts, I suspect that this author believes gum benzoin to be a skin-care panacea. I have not found any modern opinions on how benzoin affects the skin: it appears more popular for perfume, incense, and flavoring than as a skin-care remedy.


Thursday, May 13, 2021

Mareschal Hair Powder, c.1775

Back to The American Duchess Guide to Beauty, with a hair powder variation. This is builds upon the basic hair powder, but colored and scented with powdered spices.

Favorite cosmetic jar to open. It smells so nice!

 When I first looked at the recipe, I was concerned that this powder would be too dark for my not-quite-brown-or-blond hair, but it turns out to be a perfect light brown shade, which works fine. It also has a nice spicy scent (noticeable in the hair, very noticeable while applying the powder).

Left: pomaded & powdered hair. Right: au natural. 

Ultimately, there's little difference in color between powdering my hair with the common powder versus the mareschal. The common powder is a little lighter when applied, but I'm not convinced that's entirely the powder (versus my inexperience in applying it).

Left: common hair powder. Right: mareschal powder.

Tuesday, May 11, 2021

Flat Five-Strand Plaits

 "There are few real novelties in hair-dressing; the plaits of five, seven, ten, and even more strands, woven more or less openly, and arranged differently on the head, the "Grecian" plait, and the "basket" or "chain" plait, and the "cable" plait, are repeated again and again in various forms and convolutions.

--- Godey's Lady's Book (June 1855) repeated verbatim in The Englishwoman's Domestic Magazine (March 1857)


For she had her hair to oil and brush and braid up in that five-strand plait which Mrs. Mabury's maid had taught her; and sometimes it was awkward to get the braids to sit nicely, just so as to show under the curtain of her bonnet. 

--Janita's Cross by Eliza Stephenson (1864) 


I've waited on this tutorial for a while, because it's really hard to photograph. Holding five strands in place means a hand is always blocking something critical. The concept, however, is really simple: take an outside strand over the neighboring strand, then under the next one. For a wider braid of 7, 9, or more, continue going over then under until the active strand reaches the center. Repeat from the other side with the next strand.

It's so simple, that I couldn't find any contemporary hair-styling instructions which explained the basic* "five, seven, ten, and even more"-strand plaits. The Workwoman's Guide does explain them for straw-plaiting. The main complication for hair is just holding all of the strands. Straw has the benefit of being a single piece, so you only have to handle the ones you're currently working with. 

To start, divide the section of hair that will be braided into five equal groups. Pick the side that you'll start on, and take three strands into that hand. Hold the two remaining strands in your other hand.

Taking the right-most strand over
the second-right-most strand and under the center.

I started on my right (viewer's left), holding three strands in my right hand and the other two in my left. I took the right-most strand over the second-most-right strand and under the middle-most strand; as it went under the center, I passed this active strand from my right hand to my left.  

Tightening the plait and preparing for the next pass.

At the end of that first round, the old right-most strand is now in the center, and there are three strands held in the left hand, ready for the second pass. This will take the left-most strand over the second-left-most strand, under the center strand, and into the right hand. These two motions repeat until the braid is done. Over, under, over, under, over, under...

Three-strand and five-strand plaits.

Compares to a standard three-strand braid, the five-strand is flatter and slightly wider. Visually, it has as a distinct woven look from each strand going alternatively over and under its neighbors as it zig-zags down the plait. Practically speaking, I found this five-strand plait a little trickier to start: it's more sections of hair to keep ahold of, and I have much less practice dividing into fifths compared to thirds. Once I got started, though, it progressed fairly easily.  

Here's the same braiding with multicolored ribbons, which are a bit easier to photograph in motion.

Sunday, May 9, 2021

White Paint (Chalk White), 1857

The Druggist's General Receipt Book (1857) has some general observations on the different materials used in rouge and white paints. For the latter, it mentions the vinegar-treated talc I've already experimented with, as well as the widely-condemned white lead and liable-to-turn-grey-while-worn bismuth "pearl powder". An intriguing note I've not seen elsewhere is that French chalk can be used in place of talc, with or without the addition of zinc oxide*. Starch and magnesia (MgO) are also named as "face whites", the later primarily in America.


The wood mortar is good for breaking up clumps.

I started by setting 20 mL of powdered chalk and 40 mL white vinegar to sit for a week; without specific amounts given, I used the same proportions as in the talc. This vinegar step is supposed to make the talc or chalk more white, but I haven't noticed any color changes. As expected, the slightly basic chalk reacted with the acidic vinegar, producing gas bubbles. Otherwise, the process went just like the before: stirring every few days, then pouring off the vinegar, rinsing the chalk with water until the vinegar scent is gone, then allowing the chalk to dry. The chalk does settle more easily than the talc did, making it easier to decant off the vinegar/water. I took part of the chalk and mixed it with an equal volume of zinc oxide*.
 
Barely visible to the eye, and not visible in the photograph.

I tried both the chalk and zinc-chalk powders on my skin, but observed no differences between the two. There really was no change in color, and even looking closely I saw only the slightest hint of white. Compared to the talc white, neither of these chalk whites are very noticable.  


*Which is used in modern sunscreens. Though the Victorian distaste for wearing paint during the day (/at all) probably means this was not used an early attempt at sun protection. The toxicity data I could find suggests that ZnO is safe for topical use, but this powdered form might present an inhalation risk. Since this is an experiment (and I won't be using it regularly), I decided to make part of the batch with the ZnO to see how it behaved. 

Friday, May 7, 2021

Yoga Pants

They're not much to look at, but I always feel a sense of accomplishment at making something for daily wear. And also just pants in general. I don't sew pants often.


I wore out all my other pairs in 2020.

The material is a French terry knit from Fashion Fabrics Club. For a pattern, I just traced the pieces of my favorite pair of badly-worn-through-because-2020 yoga pants. I like how those fit, so my only real concern was whether I'd adjusted the ease properly while patterning one stretchy material off an another. The original pants have a flat elastic waistband, which sits more gracefully than the casing on the new pants, but the change allowed me to use elastic I already had.

Wednesday, May 5, 2021

Cold Cream, 1850

Cold cream for excoriated nostrils, chafed upper lips, or chapped hands may be made nearly as above [red lip salve] but with one third suet and two thirds lard and no alkanet. When it has boiled thoroughly, remove it from the fire, and stir in gradually a large portion of rose water or a little oil of rhodium, beating very hard. Put it into small gallicups with close covers. 
--Miss Leslie's Lady's New Receipt Book (1850)


I actually made this at the same time as the aforementioned red lip salve, just melting the remaining 3 oz of washed suet with 6 oz of lard, stirring in 1 Tbsp of orange-flower water as it cooled. As with the lip salve, I found the straining to be the hardest part (even with careful picking, there will be bits left in the suet). Having now tried several mutton suet recipes, I'm not convinced there is a material difference between using the mutton tallow and suet on salves and pomatums, save that the suet requires the extra picking/straining.

Cold cream. It looks like every other skin/hair pomatum.

This cold cream is much more malleable than the different wax/spermaceti/mutton tallow pomatums and ointments I've been experimenting with lately. The closest comparison is to the rose ointment; of the two, I find this softer one much easier to actually apply. It does soothe rough skin as intended, but with a little of the greasiness I've come to expect in animal-fat-based skin preparations. It's not as tidy as modern lotion, but it does the trick.

Although the recipe calls for rosewater, the related lip salve allows for either rose or orange-flower water; since I already have a rose-scented cold cream made up, and hadn't made any other rose-scented lip salves lately, I decided to reverse the scents on these two. The amount of orange-flower water is a guess, and more probably wouldn't hurt. It is sufficient to cover any lingering lard/suet scents in the tin, though I can detect a faint sheep odor when applied. More importantly, this salve hasn't had rosewater [orange-flower water] pooling or leaking out as in the most recent batch of red lip salve and the rose ointment.

All told, I think this will continue to be my usual cold-cream recipe, though I'll probably stick with the tallow over suet, and probably beef tallow over mutton (for the smell). The

Monday, May 3, 2021

Kitchen Garden, May 1819

MAY
Water your beans, peas, &c. occasionally. Destroy the weeds, and hoe between the rows. Sow some small-salading weekly. Sow purslain and endive. Plant a large quantity of beans and peas, and French beans to succeed the others. Plant out savoys, cabbages, and red cabbages; and water them well.. 
---Modern Domestic Cookery, and Useful Receipt Book (London, 1819)

Sunday, May 2, 2021

Asparagus Peas (1861)

It's May! The longer I experiment with historic bills of fare, the more I come to appreciate the abundant variety of produce in season during the summer.


Asparagus Peas

Today I returned to the Fort's kitchen for the second time since The Plague began. One of the dishes we tried was Beeton's Asparagus Peas (in season May-July). 

Contrary to the name, there are no peas in this dish, nor does it call for the asparagus pea (winged bean). My best guess is that the small cut pieces of the asparagus are meant to resemble peas, but otherwise I have no idea.

Per the instructions, I cut the asparagus into small, even pieces (aiming for 1/4" based on the name), and set them on the stove to boil, draining them once fork-done. For the sauce, I started by melting butter on the stove with sliced scallions (substituted for the green onions), and parsley. Per the instructions, I let this go about 10 minutes, added the sugar, a large spoon of flour, and a splash of water, then brought it to a boil. I then moved the pan to the back of the stove, added the egg and cream, and almost-simmered it.   

All told, it's boiled asparagus in a Hollandaise-like sauce. It was fairly well received by the interpreters. I thought it tasted alright, but could use some salt. Of course, checking over the receipt again, I realized that I missed the "add salt" step near the end, so that's something to fix for next time. 

The two intentional changes I made were substituting the scallions for the green onions (I have a lot of immature onions in my garden), and leaving the parsley & onions in the sauce. The last was because we were short on time. I wouldn't do it for a formal dinner, but under the circumstances, I think it was necessary and didn't detract from the dish. 

I intend to try this again with the salt, and properly straining the sauce. It'll be useful if I find myself cooking for a historic dinner in the late spring/early summer when asparagus is in season. Though in my reading, "forcing" asparagus through the winter was possible with hand-glasses and a hot-bed (dung and compost buried beneath the plants to heat soil), so circumstances might arise in which I could justify serving asparagus in the winter or early spring..

Saturday, May 1, 2021

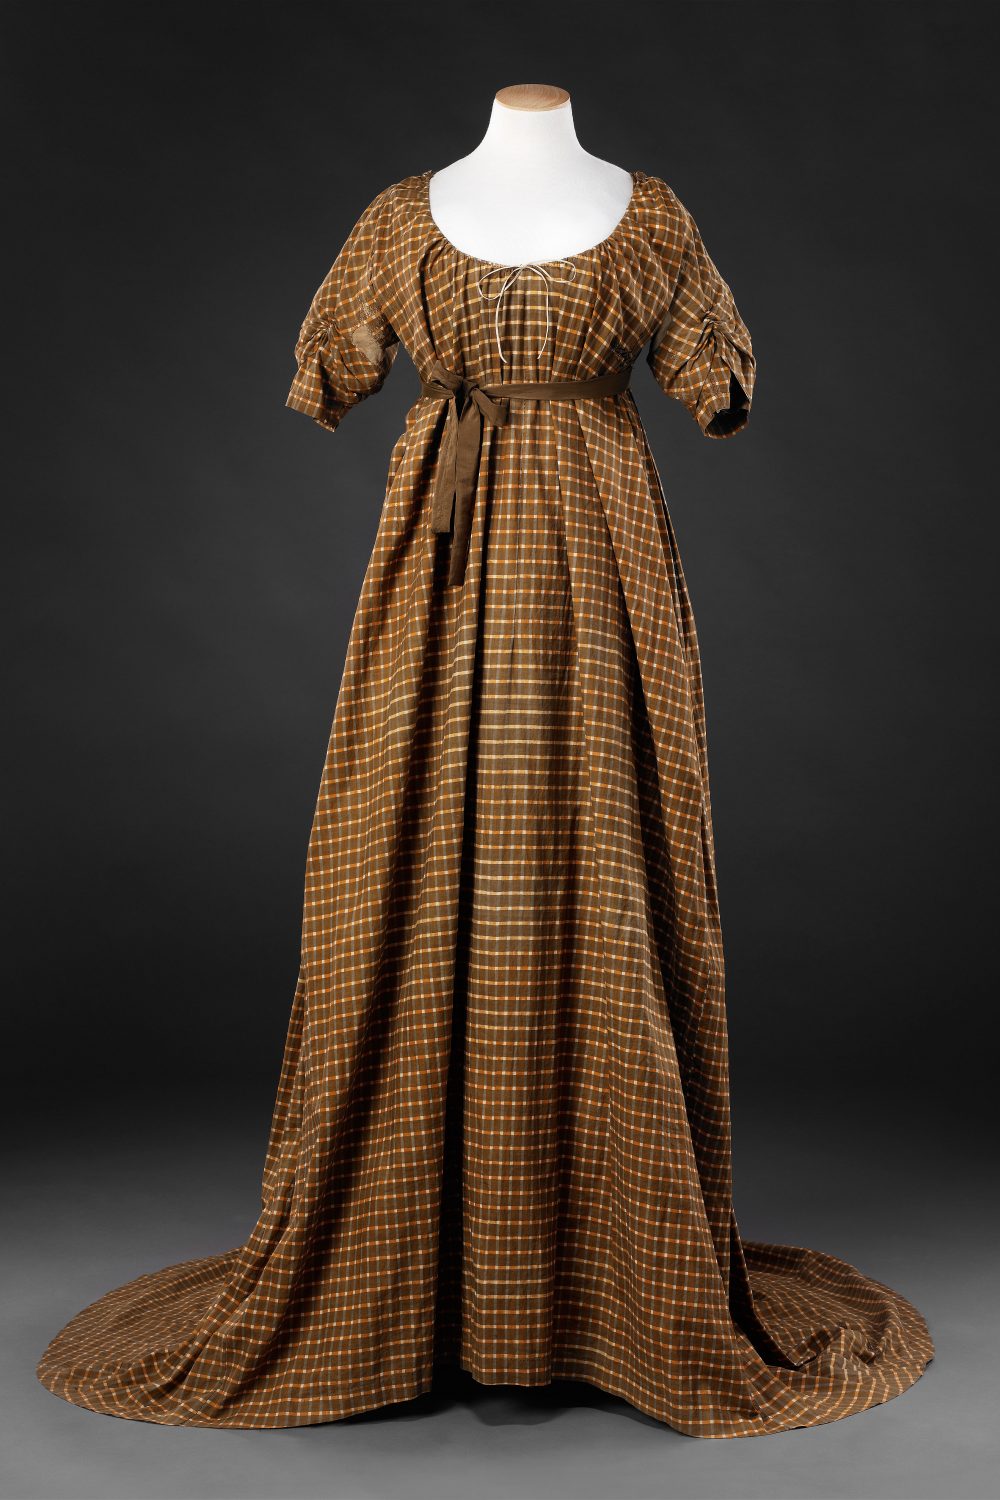
Original: Gingham Bib Gown, c.1800

Silk/cotton gingham dress c. 1800.
In the John Bright Collection.

I picked this dress because it's a lovely example of a bib-front dress that's not in white cotton. Also, I wish I'd found this back when I was making mine, as the the museum obligingly photographed the bodice under-structure (click through for that, as well as a back view). There's also a very interesting layered detail on the sleeve.