Monday, June 29, 2015

Hair-Dressing: More early 1860s side braids

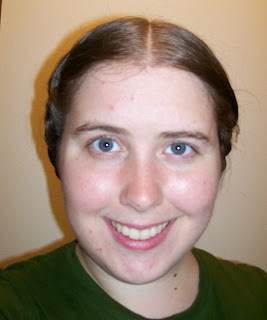
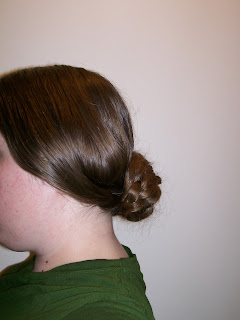
Here's two more slightly-different ways of doing the side braids for an early 1860's hairstyle.

The first is based on the 1862 Braid With Roll; the instructions mention that if the roll doesn't suit, the braid can be done alone.  This ends up looking a lot like the front plaits from the 1860 braided coiffure.

Step 1: The usual T-part, and dress the back hair as you choose. (See basic hairstyle, etc.)

Step 2: Braid the side hair from the temples.


Step 3: Take the side braids to the back and wrap around the back hair.

The second option is taken from this 1862 hairstyle:

From Peterson's, September of '62, page 169.
It's reprinted in the December
Godey's, page 541/617.

(I attempted to duplicate the entire coiffure, but discovered over the course of an hour that I have too much hair for the "S" twist, and that it also doesn't hold a crimp well.)

Step 1: T-part and put up the back hair as usual.

Step 1B: Crimp or wave the front hair near the scalp, if desired. (Some period methods are mentioned here).

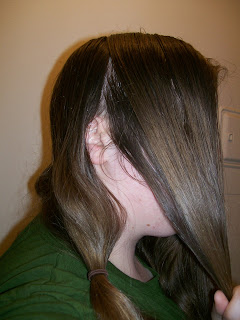
Step 2: Separate the side hair, reserving a small portion at the top front.  Braid the rest.

Step 3 Pin the braids around the bun, as usual.


Step 4: Brush the remaining loose hair over the top of the braid (this makes the braid seem to "sprout" out of the head).  Twist it around the bun and pin into place.

Voila:
Viewers' Right: Plain braid (first option)
Viewer's Left: Braid with plain header (second)

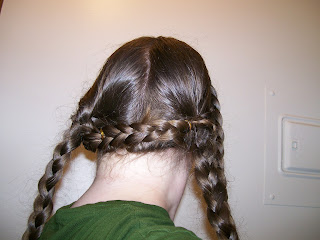
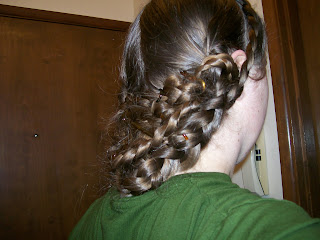
Back view, the usual mass of braids.

Friday, June 26, 2015

One last look at HMP-250

Two more dresses for the fort's volunteer wardrobe, using the Historic Moments/ Sewing Academy Girls' Dresses pattern (see the review here, and more options here).  There's another "infant style" dress, this one with the fullest bodice option, and puffed sleeves.  It has a drawstring in the neckline, and another at the back waist, making it somewhat adjustable.
Adjustable full infant bodice dress with short puff sleeves, from SA/HMP-250
The material is actually a very fine white and pink
"gingham" check, not a solid.
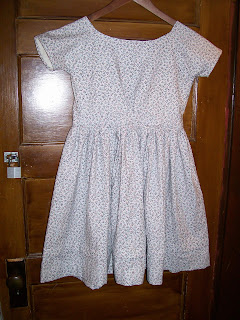
The other is a yoked bodice, this one with the higher "jewel" neckline and the short, smooth sleeve.

Yoked bodice dress with short smooth sleeves, from SA/HMP-250
It's a little small for the hanger.
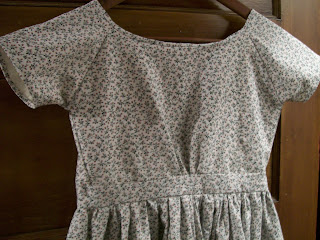
Yoked bodice with jewel neck.
Better view of the fabric and yoked bodice.


Wednesday, June 24, 2015

Hairstyling: Braids for a Young Lady, 1860

Here's another variant of the side-braided style, this one with additional crossed braids at the back rather than a chignon. I believe it's from the July 1860 issue of Godey's.*
"Coiffure for a Young Lady", Godey's, July 1860
"Coiffure for a Young Lady":
Side-braided hairstyle with crossed back braids.
Not having access to the original magazine, I can't refer to the description of the hairstyle, and am thus using the image alone as a guide. I'm trying it with three-strand braids, though 5 or more strands could be fun.

Step 1: Part the hair down the center, as usual, and then part it again behind the ears.  Do not combine the back sections, but keep four distinct bunches of hair.

Hair parted in quarters.
Hair divided into four sections.
Step 2: Braid the two back bunches of hair, starting the plaits close to the scalp.

Step 3: Brush each side bunch outward, and braid it from the temple.
Front braids for an 1860 hairstyle.
The braids need to start very close to the head.
  Step 4: Let the side braid fall down along the face, then take it underneath the back braid on its same side and across the back of the head. 
Front braid tucked under back braid.
Front braid goes under back braid.
Step 5: Pin the braid to the opposite side of the head, tucking the ends underneath the opposite back braid. My hair ended up being too long for this, so the braid was looped around the top of the opposite back one, and doubled back.

Front braids pinned across the back of the head.
Side braids crossed and tucked in.
Step 6: Take the back braids to the outside of the side braid (allowing it to fall straight down over the side braid), and then cross it to the other side and pin, once again tucking the ends under. Or, in my case, doubling back along the length of the braid and then tucking in the tails.

Back braids taken to the outside and crossed.

Step 7: Voila
1860 Godey's "Coiffure for a Young Lady"

This is definitely a style good for moderate to long hair rather than very long.  Braids just-past-the-shoulders through mid-back should make for a nice, tidy style.  Waist-length hair, as demonstrated above, just gets too bulky for neatness, and the beauty of the style is lost.

*The illustration is attributed to "Godey's 1861" on various modern sites, but I've checked that whole year of Godey's, and it's not present.  Rather, I believe it to be from volume 61 of Godey's (July-December 1860), based on this index, which lists the two named illustrations on consecutive pages; the image of this "coiffure" appearing on page 4 of the July 1860 issue, and a description of it follows on page 95.  Neither Google Books nor Internet Archive has the 1860 run of the magazine, however, so I can't confirm this.

Monday, June 22, 2015

Hair-dressing: 1862 Side Braids With Rolls

It's time for another hair post; let's look at those lovely face-framing side braids of the early 1860s. This is one of my staple styles for ACW: the braids make for a stable base, and it's the first arrangement for which I found actual period instructions.

September, 1862 issue of Godey's (picture on page 226, description on page 311).
"New Style of Arranging the Hair", page 226 of Godey's, September 1862


"New Style of Arranging Front Braids", page 311 of Godey's, September 1862

Braids with Rolls, original method:

Step 1: T-part the hair and put the back into your favorite low bun/chignon (see "Basic Hairstyle", steps 1-5).

Step 2: Brush the side hair out from the temples, as for a roll. (see "Basic Hairstyle", first pic of step 6).

Step 3: Braid the side hair, keeping the top as loose as possible.
Braiding the side hair for an 1862 hairstyle.


Step 4: Twist the braid back, forming the roll.  A brush and pomade may be useful
Twisting the side braid into a roll.
I neglected to use pomade at this step, and things got a bit untidy.
Step 5: Coil the braid around the bun, tucking in the ends, and pinning it in place. 
Taking the side braid to the back.

Although that is the period method, I've never been able to get a really nice roll from it.  Here's my slight variation, which seems to get the desired effect a little easier.

Alternate Step 3: Give the brushed hair a one or two twists "up" (ie, clockwise when twisting the left side, CCW on the right). 
Twisting the side hair.

Alternate Step 4: Holding the roll in place, braid the hair below it.
Braiding the front side hair.

Alternate Step 5:  Twist the roll again, if needed, until desired shape is achieved.  Then take the braid to the back and pin it in place.
Side braid with roll above.


Here's the front view:
Side braids with rolls, two methods.
Viewer's Right: Roll & braid from period method
Viewer's Left: Roll & braid from my variant.
Back chignon with braids wrapped around.
The back, of course, is it's usual twisted mess of braids.

Wednesday, June 17, 2015

A Plain Cap, early 1860s

Plain cotton cap for 1860s wear.

Recently completed: a plain cap for a female ACW nurse.  Research here.  The material is white cotton batiste left over from another project.  The shape is taken from an 1859 night cap pattern (#3 on the research post); the idea for the cord through the brim comes from Liz Clark's infant cap pattern (SA-100), though a center back drawstring also appears on pattern #1 of the research post, as well as the c. 1850 woman's cap featured therein.  As per the descriptions of nurses' caps being "plain" and "unbecoming", this cap is made without trim or ornament, save for three 1/4" tucks, which add some body to the brim. 

I opted not to include ties under the chin, as I rarely use the ties on my own morning cap, and the period illustrations show a mixture of caps with and without ties.  I will add some later, if needed.

Monday, June 15, 2015

My Weekend

Happened to involve a lot of time sewing at the Fort.  I got to try out some of the other sizes and style variants on the Historic Moments Patterns/ Sewing Academy 250 pattern.

Infant bodice dress with smooth sleeves, Sewing Academy 250.
Infant-style bodice (smooth fit) with narrow sleeves

Close up of smooth infant bodice on girl's dress.
Bodice close-up.

Smooth bodice girls' dress with bishop sleeves; SA/HMP-250
Smooth fit bodice with jewel neckline, bishop sleeves.

Smooth gathered bodice, bishop sleeves, and sleeve caps on girl's 1850s dress.
I adapted the smooth short sleeve piece to make sleeve caps.

Tuesday, June 9, 2015

Plain Cap, early 1860s, research

Working on a cap for a friend who does an ACW nurse impression.  She needs something to cover a a hair 'transition', but also lightweight to avoid heat problems.

A cap, white and plain, seem to be synonymous with "nurse".  Both in fiction and non, descriptions of nurses frequently refer to their white caps (and aprons, and collars and cuffs), and plain dresses.

"While linen collars--white aprons--and a plain white cap--compose their very homely but convenient attire." - The Southern Literary Messenger, 1864 (description of Roman Catholic lay volunteer nurses)

"... she should wear a common dress and linen cap, and be no way remarkable to the eye of the patient..." -Sowing and Reaping, 1867

"Their dress is simple, black, with white collars and undersleeves, and, when in full dress, a Swiss muslin cap."-The Employment of Women, 1863

"She put on the coarsest clothes to be bought for money, a light cap... and went into the largest hospital in Washington as a nurse..." -"The Stolen Bond" in Peterson's Magazine, 1866

"I shall go as a volunteer nurse. In Baltimore the nurses have a uniform, -- a black or brown merino dress, tight sleeves, no hoops, tiny linen collar and cuffs, and a white tarleton cap." Anecdotes, Poetry, and Incidents of the War, 1866

German Protestant "deaconesses" who work as nurses wear "...a gown of blue and a white collar and cap."

"Her dress was plain black from throat to heel, with a skull cap of white, like a Moravian sister." -The Fortnightly Review, 1867

"For her to be a soldier's nurse meant something very different from wearing a white apron, a white cap, sitting by a moaning soldier's bed, looking pretty." -Women's Work in the Civil War, 1867

"He rejoins the army, while she follows as a nurse to 'St. Marc's, a military hospital, and dons a muslin cap and other unbecoming articles of attire, and devotes herself to the saintly work of alleviating human suffering." -The Knickerbocker, 1864

The only color given is white; the materials include linen and fine cottons ("muslin", "tarletan"); the caps are "plain", or even "unbecoming".  Such a ubiquitous but non-decorative article must serve some sort of practical purpose--keeping the hair clean, out of the way, or concealed.  The white cotton/linen ensures easy washing.

A plain linen child's cap, 19th century, in The Met.
Cap, British, 19th century
This linen cap is the plainest original I've found; from the size, however, it's a child's cap.
1850s plain, white cap in The Met.
Cap, American, c. 1850
Of course, searching for cap patterns in the magazine of the '60's can get very trying.  There are plenty of mentions of caps, descriptions of them, and occasionally even an engraving.  Patterns?  Between 1855-1865, I've found three, all night-caps.  The best source I know of for cap patterns is the 1840 Workwoman's Guide, which has pages upon pages of the things, for all possible occasions.  Unfortunately, twenty years have elapsed between the publication of that book and the outbreak of the war, including radical changes in hair-dressing and cap-wearing.

My usual go-to in such cases is the The Ladies' Self-Instructor in Millinery and Mantua-Making (1853).  Though less comprehensive than the WWG, it's closer to my target dates.  Unfortunately, all is has to say about caps is that there are many different styles and you should pick one which suits you.

If pictures are being provided, but not diagrams, then the magazines of the early 1860s are assuming that ladies either already know how to make up caps (and thus only need inspiration) or are hiring someone who does.  The only dissemination of such information that I can find is in earlier sources like the WWG, and an adult woman of the early '60s would be familiar with the styles/techniques therein from childhood...but it's still a bit of a stretch for me. 

One thing that the WWG does mention, though, is that certain patterns might be used to make nightcaps, or day caps for servants/poor persons.  If this holds true to the '60s--and as far as I can tell night caps, servant's day caps, and nurses' caps are functional head-coverings meant to shield/conceal the hair more than adorn it--than those three night-cap pattern are probably my best bet.
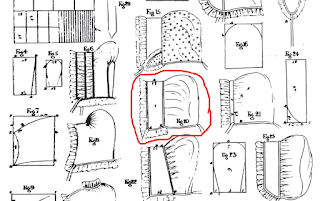
Plate 20 from The Workwoman's Guide, showing cap varieties.
(No. 20): "This shape is particularly suitable for day-caps for young
servants, or night-caps for any age or station."
From The Workwoman's Guide. Plate 9; instructions on page 66.
Option 1: Peterson's Magazine, 1859.  A night-cap from their series on home-sewing:
Night cap from Peterson's Magazine, March 1859. Pre-Civil War.
Night-cap. Peterson's, March 1859. Page 242.

Night cap diagram from Peterson's Magazine, March 1859. Pre-Civil War.
Diagram of Night-cap.

Number 2: There's another night cap from Peterson's ('61) that's a bit more "novel" in it's design:
Nightcap from Peterson's Magazine, 1861.

Number 3: An 1859 pattern from the The Young Lady's Book. This one is also made up in two pieces, with a straight front piece (brim) and mailbox-shaped crown.
1859 Nightcap from The Young Lady's Book.
Of the three, I prefer the definition of the first and last pattern; made up plain, I don't think the round crown will look as becoming as it would trimmed.  The batiste remnants available for the project make number three look like the best bet, as it doesn't need to be cut in a single piece. 

Sunday, June 7, 2015

Hair Dressing: 1855

"After a few experiments, a lady may very easily decide what mode of dressing her hair, and what head-dress, renders her face most attractive."

So, how were women wearing their hair in 1855?

Empress Eugenie, 1855, Winterhalter
The Empress Eugénie Surrounded by her Ladies in Waiting (1855) by F. X. Winterhalter
"The Last of England" (1855) by Ford Brown
The Last of England (1855) by Ford M. Brown
"Harvester with Sickle" (1850-1855) by Corot
Harvester with Sickle, by J.-B.-C. Corot, c. 1850-5 

Magazine illustration, 1855
So, whether looking at the Empress or the agricultural worker, we have some consist styling. There's the basic T-part (center front to back, and then perpendicular behind the ears) with the back hair arranged up--likely in a chignon or coil.  The two major treatments of the side hair are ringlets, or brushed out over the ears to look as wide as possible.

An 1854 article in Arthur's Home Magazine notes that:
"For ordinary wear, plain bands on each side the temple, drawn out wide where the size and shape of the head admit of it, are principally seen. The back hair is formed into a French twist flat to the head, around which the rest is disposed in a close circle, either twisted, roped or braided, leaving the smooth twist displayed in the centre."
Incidentally, this "wide over the ears" look persists into the later '50s:
Six hair styles, from "How to Arrange the Hair" (1857)
From "How to Arrange the Hair", 1857
To do it, we'll start with the T-part and low braided bun from "Basics" post.

T-parted hair with back bun, basic 1850s-1860s hairstyle.
Starting point: back hair braided and coiled at
back of the head, side hair loose.
Even with my long and rather thick hair, some sort of structure is required to get the proper side-on fullness. Enter the rats.

Rats or frizettes for 1850s hairstyling.
Hello, rats!
The "rat" is a small bundle of hair--typically gleaned from the brush over a few weeks--which is held together by an invisible net.  I've also seen them made up with stretchy fabric (like old nylons) over hair or other padding, but my p.c. citations so far are for hair or silk (not that I've found an image or description of the latter).
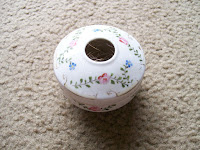
China hair receiver, date unknown, from the author's collection.
It is not at all weird that I store hair on my dresser.
Anyway, after brush out my side hair, I separate it horizontally (about 75% above 25% below), and pin the rat underneath the bulk of the hair.  Small combs or wig clips stitched to the rat are preferred by some people--including Dana, the awesome lady who taught me how to do this properly.

Dividing the side hair.

Pining the rat into place.

Next, I smooth the hair over the rat, and adjust the positioning until I'm happy with it.  I then twist the hair behind/below the rat slightly, to help hold it in place.

Smoothing the hair over the rat, and twisting the excess.


Further fiddling occurs.  Once I'm satisfied with the look, I pin the twisted portion of the hair to the existing back bun.  I keep twisting the remaining hair and coiling it around, tucking in the ends once it's complete.

Finished 1850s wide side bands with rats or frizettes for volume.


Now, the tricky bit is to repeat the process on the other side, trying to get the rats in the same position, so the hair style is symmetrical.

Wide 1850s hair, top front view.

Once all my hair is pinned in place, I get a little pomade on my hands and rub it in over the top.  This help give a smooth, tidy period appearance--note the sheen in the period images.  I used to apply the pomade before styling, but it made my hair too slippery and the pins tended to slide out.

If desired, an invisible net can be added to help contain fly-aways.

Finally, the comb or other decorations are added.

1855 hairstyle: wide side bands with back braided bun.