Sunday, April 30, 2017

Soft Pomatum, 1854

Experimenting once again with cosmetics, this time with soft pomatum from Makenzie's Five Thousand Receipts: In all the Useful and Domestic Arts (Philadelphia, 1854).

From page 189: Soft pomatum Take 25 pounds of hog's lard, 8 pounds of mutton suet, 6 ounces of oil of Bergamot, 4 ounces essence of lemons, half an ounce of oil of lavender, and a quarter of an ounce of oil of rosemary. These ingredients are to be combined in the manner as those for the hard pomatum. This pomatum is to be put up in pots in the usual way. 

Not needing thirty pounds of hair product, I scaled this down to a mere ten ounces (8 oz lard to 2 oz tallow, having no ready source for suet).

1854 Soft Pomade Recipe: Lard and Tallow
Solid lard and tallow.

The process was very straight forward: I melted to the two fats together over low heat, allowed the solution to cool for a few minutes, then stirred in the scents, poured the liquid into tins, and set it aside to solidify.  Excluding the final cooling/hardening, the process took about fifteen minutes.

1854 Soft Pomade Recipe: Lard and Tallow Melting in Saucepan
The fats melted quickly over low heat.

For the scent, I maintained the 24:12:2:1 ratio, but as I was working at ~1/50 scale, I didn't try to calculate miniscule fractions of ounces. Instead, I opted to use 2 drops of rosemary essence and adjust from there (4 drops of lavender, 24 of lemon, 48 of bergamot).  This amount seems to work well, imparting a notable, but delicate, odor.

1854 Soft Pomade Recipe: Liquid pomade with bergamot, lemon, lavender, and rosemary essence.
The final liquid was faintly yellow and translucent.

Batch size note: the 10 ounces of fat (by weight) exactly filled the three 4-fl-oz tins I had prepared.


1854 Soft Pomade Recipe: Final product
The pomatum grew opaque and white as it solidified.

The final pomatum is somewhat softer than the one I previously used.  Where that one was a solid, and needed to be rubbed on the fingers to liquefy it for use, this pomade is ready to go--if it was any softer, it'd be liquid.  I'm a little concerned about how it'll fare during the summer heat (both in use and in its container), but am optimistic that it will be easy to use and won't leave tiny white specks behind in my hair, as happened when the other pomade aged and separated.

I'm tempted to also try the hard pomatum recipe in this book (white wax and suet); if I end up liking the soft version, I intend to try it again using fresh lard and suet, to see how that affects its consistency and behavior.

Update: Having now used this pomatum, I am pleased to report that it soldified still further, and was a perfectly nice consistency when I went to use it.  The melting point of the combined fats is just around body temperature, so very little friction was needed to work it into my hair. My hair styled easily (as much as it ever does) on the first and second day, after which the pomatum washed out easily with shampoo.  The scent proportions I used seemed fine to me; if anything, it was a hair strong, and I would be tempted to try it with half of the oils (1:2:12:24) to compare.  That being said, one of my friends still thought that the tin of pomatum smelled too strongly of lard. 

Saturday, April 29, 2017

Nisqually Album Quilt Ideas

I've had a few quilt ideas bouncing around in my head (like the wool one that I'll be starting on as soon as I get two more dresses cut out, and thus have some 'cabbage' to play with).  One quilt that I would like to make is another album quilt, this time with signatures from all my west coast reenactment friends--my first ever attempt at a reproduction quilt being a chimney-sweep album signed by my Minnesota reenacting circle. I like having it as a memento, and would love to do another incorporating scraps from my different projects.

Design 1: Crosses, 1840-1860 [tilted variation of the 'narrow X' album block with sashing in between].
Crosses Quilt, c.1840-1860, IQSCM 2008.040.0165
IQSCM 2008.040.0165
It's an album block, and I like how the sashing and orientation have played with its visual effect. The narrow stripes of white would limit inscription length, but this could still be a fun design. I could also try a different setting of the blocks.

Design 2: Hourglass, c.1840-1860
Hourglass Quilt, c.1840-1860 IQSCM 2008.040.0037
IQSCM 2008.040.0037
This example fits my time frame well. Though not an album quilt, the many white blocks could be employed for signatures and verses, and I like the symbolism of the turning hourglasses for a reproduction quilt signed by reenactors.  The block is straightforward, but isn't one I've made before.  I will need to find a nice print for the border (maybe one of the large-scale designs from Reproduction Fabrics).

Design 3: Nine-Patch, c.1850
Ninepatch Quilt, c.1850 IQSCM 2003.003.0185
IQSCM 2003.003.0185
The unbalanced nine patch is a classic pattern, and easily executed. I like how this version created a unified effect through repeated colors and sashing. The white spaces could admit signatures. Unfortunately, only five fabrics are used, including the border, so it wouldn't be good for incorporating dress scraps.

Design 4: Eight-Point Star set in stripes, c. 1830-1850.
Eight Point Star Quilt, c. 1830-1850, IQSCM 2006.043.0218
IQSCM 2006.043.0218
It's a little before my main years (1855-1865), but this one's pretty and the white triangles could be turned to signatures. I would need to find a suitably awesome period fabric for the vertical stripes, though.

Design 5: Birds in the Air, c.1845-1865
Birds in the Air Quilt, c.1845-1865, IQSCM 1997.007.0289
IQSCM 1997.007.0289
It's pretty, falls within my reenacting time span, uses a lot of small pieces, and can be machine-pieced. I am also seriously coveting some of those prints. The downside is that there is no obvious place for signatures.  While it won't fit my current needs, I'll have to keep this example for future consideration.

P.S. I'm still working on my hexagons, but the amount of hand sewing ensures that one will be 'in progress' for some time.

Thursday, April 27, 2017

Band Loom


Red, white and green narrow band woven on JK Seidel medieval-style tape loom.
First warp-faced band woven on the loom.
First project on my newest loom: a medieval-style tape loom from J.K. Seidel. It has a rigid heddle, which I used for the red, white, and green warp-faced cotton tape which constituted my first project.  The loom can also be warped for card weaving, which I hope to try over the summer.
Medieval-style band or tape loom with rigid heddle, made by JK Seidel.
On the loom.
Meanwhile, I'm experimenting with hand-woven fringe.  The narrow width of this loom makes it much more practical for this work than any of my others, but weaving with such fine thread is a slow process. The tension difficulties aren't helping, and so this is likely to be my only attempt at weaving fringe of this weight (unless I find a much smaller heddle).
Silk fringe being woven on a medieval-style band or tape loom with rigid heddle, made by JK Seidel.
An upcoming project.

Saturday, April 8, 2017

Sontag, 1860

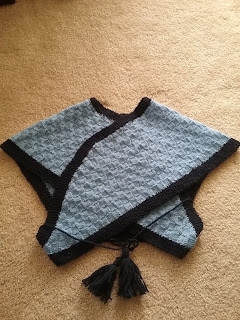
Whew. Some of my winter projects are finally starting to wind down. Here's the first: a knitted sontag from Godey's. 

Godey's 1860 sontag.
Finished sontag, front view.


I used Colleen Formby's suggestions for sizing it up (which worked perfectly for the back and shoulders). For better fit over a generous bust, I extended the front portion by 12 rows of blocks after the 'decrease every four rows' point. If making it again for myself, I would have decreased the width a bit more at that point, as I hadn't accounted for the trim and could have used a little more length.

The main body of the sontag is worked in a basket weave (alternating 5 knit, 5 purl). I knit it on size 2 needles, and used exactly 3 skeins of Cascade sport-weight wool (as in, there was literally no yarn left when this was done: even the tiny scraps went into the seams). The trim was done the same, but in plain knitting. I scaled it down to 6 stitches wide, from 12, as it was coming out disproportionately wider than the main piece---I had also tried to do 9 stitches, but ran out of yarn 3/4 of the way through. The neck area is 4 stitches wide. I tried knitting one continous piece of trim, but the front and neck corners were too curved for it to lie nicely; instead, I knit 6 separate pieces (outer and inner edges for each side, neck, and back waist) and sewed them in place.

Knit gauge for sontag trim, 1860.
Twelve stitches was way too wide for the trim.

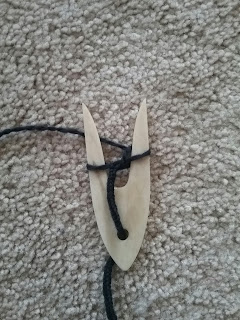
For the cord, I used a lucet.  It's my new favorite commute craft: emminently portable, easy to set down, and no one has mistaken it for knitting (yet).

Bone lucet with blue wool cord.
Lucet with cord.

The skein of dark blue wool made the trim, cords, and tassels (no leftovers--a side effect of making tassels, sure, but it was nerve-wracking while I tried to work out if there would be enough yarn!).

Handmade blue wool tassels for 1860 sontag.
Tassels!

The other change I made was to the buttons. Instead of putting one on a front corner and a loop on the other, I put a loop on each front corner and two shell buttons on the back corners (this gives a little more room through the front, since I couldn't make it longer).

Godey's 1860 sontag or bosom friend, back view.
I like this picture best,
and am now tempted to wear it backwards.

And here it is laid out:
Godey's 1860 sontag or bosom friend, dull view.
Yes, that was a lot of knitting.


Friday, April 7, 2017

Ribbon Belts

Ribbon belts with buckles for Victorian dress.
Shinies!

I'm getting excited for the upcoming reenacting season, and picked up these beauties to finish a few ensembles. My focus for this year is going to be coordinating accessories with my dresses to get a really 'put together' look. 1862 (and 1855, with that one 1859 event), here I come!

The buckles are from Ensembles of the Past, the ribbon from Duchess Trading.