Tuesday, December 31, 2019

2019 Resolutions in Review

On the 7th Day of Christmas, I got introspective about my 2019 costuming resolutions. This time last year, I wanted to complete:  

Late 18th century chemise, maybe one more 16th century smock [de-prioritized since my early 1800s will do, and I haven't completed other 18th century gear]
That linen gown*
Partlet
Tablet-Woven Garters* [maybe next year]
Another pair of turnshoes [still needed, hopefully for next summer]

1770s corset* [nope, got the supplies though!]

Empire ballgown remade
Dancing slippers [in progress]
Bib-front Empire dress*

1848 Dress and Bonnet [bonnet form made up]

Fix mid-19th century corset [repeatedly, replacement in progress]
New sets of 1850s undergarments
Braidwork coat* [some preliminary planning complete]
Blue Wool* Sleeves Reworked
Black or red plaid wool worked up* [some work done]
Gaiters*
That knitting apron*

1890s corset*

Items completed that were not on the list:
1790s Short Stays
Regency Shoe Roses
16th century apron
1830s reticule
1840s Walking Parasol
Plaiting kit
The Eternal 1850s Chemisette
16th Century Infant Clothes
Elizabethan Hood with Bongrace
1857 Opera Gown (complete, to be posted)
And 18 medieval to early 19th century hair coverings

Monday, December 30, 2019

Knitting Apron, 1860

Finally finished the knitting apron from Peterson's May 1860--the one which has been haunting my to do pile at 70% compete for three and a half years.

The ground fabric is a sheer white cotton with a windowpane design woven into it; the ribbons are light weight silk 'tafetta'. All hand-sewn.

Knitting Apron in sheer white cotton with silk trim.
From Peterson's Magazine, 1860.

If re-commencing this project, I'd probably use a sheer with more body or even make it up in a moderate weight silk. I'd also do the self-trim in the (now, to me) straightforward way instead of installing it in the weird-backwards-mess-way that delayed this apron so long (I have some questions for past me).

Other than the fabric drape, my main concern is the pocket shape: they are extremely wide and shallow, which seems a recipe for spilled yarn. I already tacked the top center of each to keep the pockets from gaping, though I don't expect those stitches to hold (and rather hope they give rather than let the fabric tear).

Sunday, December 29, 2019

Black Ground Calico Dress

Final adjustments are underway, but here's another of my autumn projects for the annual 12-Days-of-Christmas-Blog-Backlog-Reduction-Blitz. It's a mid-19th century reproduction dress (mid 1850s to early 1860s), with gathered bodice and bishop sleeves.

My camera gets weird about dark ground
fabrics; in person, it's quite cute.

Sleeve close-up, showing the colors better.


Saturday, December 28, 2019

American Duchess Stockings

I have silk stockings. Now to find a ball to attend.
I received a pair of the American Duchess ivory openwork silk stockings for Christmas, and am pleased to report that they fit. Between my small feet and calves-of-doom, this is usually not the case for stockings (or even modern knee socks which are 100000% spandex and still too loose/tight in turn). I was expecting that I would need to shorten the foot and/or that the tops would be too tight: fortunately, they aren't. The uppers are rather snug, so I might tamper with the cuff a little anyway, but I can get them on, and there's no bagginess about the ankle or toe, so score!

Friday, December 27, 2019

Plaid Wool Dress, late 1850s

I've been sitting on this one for a while--that is, I made up the skirt 2-3 years back, wore it with different contrasting basques and waists, finally made the bodice for last year's Christmas Regale, fit the sleeves badly so they tore out during use, and now have it in approximately working order. Ish.


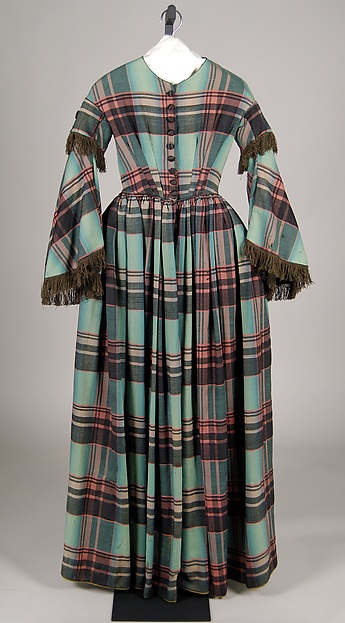
The inspiration piece is this plaid wool from The Met, dated to the latter half of the fifties.  I'm mostly in 1855 at the fort (with forays into 1857/1859), so it's a good fit.
1855-1860 Wool Dress from The Met
Wool dress, c. 1855-1860, from The Met
The original dress has open sleeves which appear to be pagodas (they could be funnels, but seem to curve at the seam as pagodas do); both the wrist edge and the sleeve caps are edged in fringe, a popular trim choice for the mid-to-late 1850s.  The bodice is fitted with three darts on each side of the center front opening, which fastens with functional buttons (button holes are visible on the left side of the three lowest buttons).  Self-fabric piping finishes the bodice at the armscye, waist, and possibly at the neckline, though the latter may simply be bound.  There is no waistband.  The skirt is finished with hem tape, which appears to be tacked on the wrong side of the hem, or sandwiched between the skirt and facing (it is not folded over the hem edge).  The skirt is gauged at the waist--uncommon for wools by the 1860s, but not unknown in the 1850s.

So far as I can tell, the sleeve cap takes up about 1/4 of the total sleeve length (at the inner seam), and 1/5 at the outer; adapting for my sleeve length, that's about a 4"-4.5" long jockey, and suggests that the fringe is about 2.5" long. My version has shorter fringe due to fears about tangling it (and the time took to make). I do like the look of the deeper fringe, though...


A blue and white plaid dress, with silk fringe trimming the edges of the sleeve jockeys and the lower edge of the open sleeves.
The dress form is stuck on its lowest setting,
so nothing really sits right on it.

Thursday, December 26, 2019

HFF 3.26: Obsolete


The Challenge: Obsolete: End the year with a recipe, ingredient or technique that has been superseded by modern practices. I'm opting for a cake raised with only eggs and extensive mixing [no chemical leaveners], and baked in a tin hoop instead of a modern cake pan.

The Recipe: Plum Cake from The Cook and Housewife's Manual

The Date/Year and Region: 1837 [6th ed], Edinburgh/London

How Did You Make It: There are three recipes for plum cake: I went with with #1007, the pound cake variation, as I neglected to procure cream. 

As directed, I started by beating a pound of [unsalted] butter "to a cream", then continued mixing in 5 well-beaten eggs. The original instructions called for 9, but recent reading has suggested that modern eggs are so much larger than pre-20th century varieties, that the amount should be halved. I tried that here, and found the batter somewhat thicker than a modern boxed cake, but still thin enough to not be a dough. I decided to continue without adding additional eggs.  

I then added 11 ounces of sugar [amount not given, so I estimated and made some math errors: the following plum cake recipes call for 1:1 or 2:3 ratios of sugar to flour by weight], 1 1/4 lb flour, 8 oz currants, 2 oz raisins ("a few"), 8 oz candied peel, 2 Tbsp cinnamon and half a large nutmeg (spices "to taste"). The whole time, I continued beating the batter.

I baked the cake in a tin hoop--with double layers of parchment paper on all sides--for 2 hours 15 min at 325F.

The icing is #1006, with four egg whites and a pound of sugar (and 2 tsp orangeflower water to flavor). A single batch (2 egg whites) might do if beaten to sufficient volume. The first batch I made was not enough, but the second was larger and might have  een enough on its own.

Time to Complete: About half an hour to mix up (including leaving the mixer on while I quickly cleaned the oven), and 2 1/4 hours to bake.

Total Cost: Eggs $2, currants ~$4, candied peel made at home from leftover fruit peels throughout the year, other ingredients on hand.

How Successful Was It?: Tasty. A bit on the dense side, as is usual when I make mid-19th century cake recipes. In general, I'd compare it to the other Christmas/12th Night/Ginger Cakes I've made before. The cinnamon, peel, and currants all come through nicely; in the future, I'd probably increase the amount of nutmeg since I didn't taste it through the other flavors. The cake was also less sweet than similar cakes I've made, so I'd probably try increasing the sugar as well.

The bottom of the cake scorched a bit, so I need to remember to put extra paper there in the future: otherwise, the double layer worked perfectly on the sides and top.

How Accurate Is It?: As noted, I tried to adjust the egg proportions to better reflect period egg sizes (whee, further research ideas), and used the hoop rather than a modern pan. I did use an electric oven and mixer. The icing contains pasteurized egg whites. 

Tin hoop, lined with paper, containing cake batter with peel and currants, on a paper-covered cookie pan.
Baking the plum cake.

Cake with white icing on a pink transferware plate.
Ready to serve.

Wednesday, December 25, 2019

Tuesday, December 24, 2019

Christmas Eve Reading

In case anyone was looking for a shorter, more didactic version of A Christmas Carol:
A Christmas Dream (1860) by James T. Brady, illustrations by Edward S. Ball.

Monday, December 23, 2019

Historical Food Fortnightly Season Four Challenges

Time to start thinking ahead to next year. With thanks to Quin for many ideas.


  1. January 1-14: One Last Holiday Hurrah. Pick a holiday, any holiday, and start the New Year with some in- or out-of-season merriment.
  2. January 15-28: Downstairs Dinner. Make a dish of the working classes.
  3. January 29- February 11: The Tiffany Problem. Have you ever come across a dish that is older than you expected? That seems like it should be an anachronism, but isn't? Now's the time to give it a try. [Explanation of term.]
  4. February 12-25 Heart-y Fare. Whatever "hearty" or "heart"-y foods speak to your heart.
  5. February 26- March 10: Centerpiece Dish. Pull out all the stops to make something pretty and eye-catching to adorn your table.
  6. March 11-24: Erin Go Bragh! Actual Irish dishes, or those with only the most tenuous associations to Ireland and/or St. Patrick's Day.
  7. March 25-April 7: April Foolery. Surprise foods, deceptive foods, funny foods, and/or foods with "April" or "Fool" in the name.
  8. April 8-21: Egg-actly What You'd Expect. Make something with some connection/resemblance to eggs. Clever egg substitutes also accepted!
  9. April 22-May 5: Flower Power. A dish that is floral, flowery, or flour-y, as you desire.
  10. May 6-19: Sing for Your Supper. Make a dish associated with a song or with music.
  11. May 20- June 2: Commemorative Dishes. Try preparing something associated with a famous event or person.
  12. June 3- 16: Get Saucy! Make a sauce, relish, or topping.
  13. June 17-30: Summer Sun. Try a food suitable for summer, or involving the sun.
  14. July 1- 14: Fresh Start. Half-way through the year, make something 'fresh'. If you've fallen behind on challenges, take this as a chance to re-start.
  15. July 15- 28: Tea Party. A delicate refection for teatime, and/or party food.
  16. July 29-August 11: First Fruits. Cooking with fruit, or beginning the harvest.
  17. August 12-25: In a Jam. Jams, jellies, and all sorts of preserves.
  18. August 26-September 8: Labor of Love. A dish that's hard work, an ingredient you love, or a combination thereof.
  19. September 9-22. Eat your veggies. Make a dish with vegetables.
  20. September 23- October 6: What's In a Name? Pick a food with a fun name--person, place, thing, or just something fun to say.
  21. October 7-20: Let Them Eat Cake. Make a cake. Or cakes.
  22. October 21-November 3: Fear Factor. Here's the challenge to challenge yourself: pick an intimidating ingredient or technique. 
  23. November 4-17: Comfort Foods. A food that is comforting to eat or comfortable to make.
  24. November 18-December 1: Serve it in a bowl. Soup, stew, broth, ice cream: anything that you would serve in a bowl.
  25. December 2-15: Yuletide Head-Start. Make a seasonal dish for the holiday of your choice, or a food that needs to be prepared in advance of serving. 
  26. December 16-31: Hindsight is 2020. Your chance to revisit an earlier challenge (from any season or from outside the HFF challenges), and try it again. Use the lessons you've learned, try a variation, polish up your technique, or address an issue that arose last time you made it. 

Thursday, December 12, 2019

Quilted Silk Hood

Silk hood.

From Anna Bauersmith's quilted hood pattern. It only took three years for me to get started, after which it went together very quickly. The hand-quilting took a single weekend event, and the pieces went together in only a few more hours work. Using a machine it could go even faster.


Quilted pieces.

I used a silk exterior, polished cotton to line, and a single layer of wool quilt batting inside. The garment is hand-quilted, using one of the sample designs included in the pattern. The ties are self-fabric, with a rolled hem. Trimmed with white rabbit fur, to match my winter cuffs. I considered adding a narrow trim along the bavolet, but didn't like how it detracted from the quilting (I rather like how it turned out there).

Fur was mentioned as a trim option in the pattern, but my searches didn't reveal many antique examples to use as inspiration. I did find a written reference to a silk hood with chinchilla fur.

I found this hood comfortable to wear, and it kept the water off without crushing my hair. It was a little less warm than previous hoods I've made, as it didn't sit so close to the face. All in all, I am very satisfied with it.

Tuesday, December 10, 2019

HFF 3.25: Waste Not, Want Not


The Challenge: Waste Not, Want Not: Historic recipes for leftovers.

The Recipe: A Cheap Gravy For Hashes, &c. from Beeton's Book of Household Management
440. INGREDIENTS – Bones and trimmings of the cooked joint intended for hashing, 1/4 teaspoonful of salt, 1/4 teaspoonful of whole pepper, 1/4 teaspoonful of whole allspice, a small faggot of savoury herbs, 1/2 head of celery, 1 onion, 1 oz. of butter, thickening, sufficient boiling water to cover the bones.
Mode.—Chop the bones in small pieces, and put them in a stewpan, with the trimmings, salt, pepper, spice, herbs, and celery. Cover with boiling water, and let the whole simmer gently for 1–1/2 or 2 hours. Slice and fry the onion in the butter till it is of a pale brown, and mix it gradually with the gravy made from the bones; boil for 1/4 hour, and strain into a basin; now put it back into the stewpan; flavour with walnut pickle or ketchup, pickled-onion liquor, or any store sauce that may be preferred. Thicken with a little butter and flour, kneaded together on a plate, and the gravy will be ready for use. After the thickening is added, the gravy should just boil, to take off the rawness of the flour.
Time.—2 hours, or rather more.

The Date/Year and Region: 1861, London

How Did You Make It: I took the bones and trimmings from a half-dozen pork chops, and placed them in a stock pot with 1/4 tsp each of salt, whole peppercorns, whole allspice, the off-cuts of a head of lettuce, 1 white onion (chopped) and the last of the parsley, winter savory, marjoram, and sage from my garden (amounting to a scant handful).  I covered these with water, and let them stew for about 2 hours. I strained the liquid, then boiled it again, adding a roux made of 1 oz of butter and about 1/4 cup gluten free flour. This still seemed a little thin, so I added a bit more flour, but didn't stir well enough, resulting in lumps.

I ended up with about a quart of gravy.

Time to Complete: 3 ish hours, though much of that time was just the stock boiling on the stove.

Total Cost: All items on hand.

How Successful Was It?: The flavor is great, which was a relief. I'd been worried, since my cooking experience has always been that gravy comes from a packet--making my own from recognizable foodstuffs really felt like an accomplishment. It also helped achieve the event goal, since I was trying to make a gluten-free, mostly meat-free [though not this dish] period meal for some friends with food sensitivities. Making the gravies and stocks from scratch helped me limit the risk of accidental allergens. 

This gravy ended up a little lumpy. At the same time, however, I tried a no-meat gravy [Beeton's Brown Gravy Without Meat, sans beer because of the gluten, though it still tasted great], in which I mixed the flour in better, and did not have this problem. So, the lumps were more a technique than a recipe failure. 

When I need a gravy in the future, I will probably use one of these two recipes, depending on whether I have left-over bones and/or need a vegetarian-friendly options.

How Accurate Is It?: Fairly. I did use the modern stove. The gluten-free flour (a 1-to-1 substitute containing a mixture of rice flour, arrowroot, and xantham gum) was an intentional change to suit the occasion; savory herbs are not closely defined in any source I could find, so there was some guesswork there. 


Two mason jars containing a pale brown gravy.
Rest assured, I didn't try to can the gravy,
I just ran out of containers for the leftovers.

Monday, December 9, 2019

Jumbles

Not a challenge, but I'm writing up the recipe in case I want to venture it again in the future.


The Recipe: Jumbles, from a c.1500 cook book, translated into modern terms by Historic Royal Palaces [2 eggs, 100 g sugar, 1 tsp caraway or anise, as much flour as makes a paste; form into twists, boil, then bake.]

The Date/Year and Region: English, c.1500

How Did You Make It: Ground star anise. Beat 2 eggs, added 1/2 cup of granulated sugar, and 1 tsp of the ground anise. Added flour (~2 cups) until a workable paste was achieved. Divided the dough into ~ 20 pieces, rolled each in hand to make a short rope, twisted it around itself, and dropped into boiling water. When a piece started floating, it was removed to a paper-lined cookie sheet, and the lot baked at 350F for ~20 minutes.

I also did a batch flavored with 1 tsp caraway seed, but accidentally doubled the sugar--either due to this or because they went first, the caraway batch didn't bake well, ending up with a slimy texture. 

Time to Complete: About 30 minutes to make up (set the water to boil before mixing dough), and 40-60 minutes to bake two pans.

Total Cost: All ingredients were on hand.

How Successful Was It?: The flavor was nice for both (the anise being like my favorite Christmas cookies, while the caraway reminded me of many Victorian receipts). The texture was a bit odd--dense and rather chewy on the last of the four pans, slimy for the first three (after which I decreased the size of each jumble to 10/egg and then  increased the baking time to 20 minutes). I'll probably experiment with these in the future, because they are portable and keep pretty well (that is, they would be good for events if I can get them palatable in texture). 

How Accurate Is It?: I used an electric stove/oven. The recipe was already adjusted for modern egg sizes, though I could always do more research on sugar varieties...

Sunday, December 1, 2019

Original: Silk Damask Gown, 1860

Silk damask gown with fabulously large pagoda sleeves.
LACMA.
LACMA's staging makes me happy, albeit in a jealous sort of way. This one doesn't have alternate views, but the enlargement does make it a little easier to see the sleeve trim (pinked, possibly box pleated, and with a fun overlap on the upper arm).

Thursday, November 28, 2019

HFF 3.24: Take a Break

A genre painting detail of a cook's hand at work over a table, with the words "The Historical Food Fortnightly" in script.

The Challenge: Take a break! Make a food that is meant to be broken and/or is bread.

The Recipe: Toffee from Cassell's Dictionary of Cookery 
Toffee-- Melt three ounces of fresh butter in a small brass saucepan over a clear, bright fire. As soon as it is dissolved stir into it one pound of good brown sugar and keep stirring until it is done enough. In order to ascertain when this point is reached let a cup of cold water be placed close at hand and keep dropping a little of the toffee into it. When the toffee thus dropped hardens immediately and breaks between the teeth without sticking to them it is done and must be poured out at once or it will burn. The flavour of this toffee maybe pleasantly varied by stirring into it a tea spoonful of slightly moistened powdered ginger or the grated rind of a small lemon. Pour the toffee upon a buttered dish and put it in a cool place to set. Time to boil fifteen to twenty five minutes.

[Interestingly, Cassell's Household Guide (1869) uses treacle for half the sweetener. I also came across similar recipes throughout the century, like this from 1882 (which also has an almond variation) and it, in turn, is almost identical to one from 1832 (which admits the option of adding lemon juice to the finished product). I also found similar recipes from 1855  and from 1857 (lemon peel and juice added), and from 1869 (which allows for lemon peel or powdered ginger).]

The Date/Year and Region: London, 1883.

How Did You Make It: Melted 3 oz of unsalted butter on the stove, stirred in 1 lb of brown sugar, and kept stirring until the mixture lost its graininess (and a drop of the liquid solidified in cold water). I then poured it into buttered tins, adding 1/2 tsp of ginger to one of the pans, and scored the toffee. After it cooled, I broke toffee with a toffee hammer.

Time to Complete: About 18 minutes to melt the butter and sugar together over medium-low to medium heat; the toffee set promptly, and was fully cool within the hour.

Total Cost: About $1.50.

How Successful Was It?: Perfectly satisfactory. It tasted like toffee, though I occasionally caught a whiff of burned sugar, so I think I'll make future batches over medium-low heat only.
The ginger batch was alright: both toffee and ginger flavors came through, and it was perfectly palatable, I'm just not sure the toffee needs the ginger. I do think I'll try the lemon variant at some point, but the toffee stands well on its own.  Using the toffee hammer was a ton of fun, so I'll definitely be making this again. I think future batches need deeper score lines, though.

How Accurate Is It?: I used an electric stove instead of a clear fire, but didn't knowingly make other changes.

Two pie tins full of unbroken toffee, with a toffee hammer.
Cooling toffee and hammer.

One bowl and one glass candy dish of toffee.
Finished toffee is less rectangular than planned, still tasted fine.

Monday, November 18, 2019

HFF: 3.21 Remember Remember


The Challenge: Remember, Remember--Try a recipe that has minimal instructions or tells you to "make in the usual fashion".

The Recipe: Ginger Cup-cake from Elizabeth E. Lea's Domestic Cookery
Ginger Cup-cake. Three cups of flour, one of sugar, one of molasses, one of butter, a table-spoonful of ginger, one teaspoonful of salæratus, and three eggs; bake in pans. A pound of stoned and chopped raisins is an improvement.
The Date/Year and Region: 1859, Baltimore (1st ed. 1851)

How Did You Make It: I did check the beginning of the cake section for general advice, and it reminded me about baking the cake slowly with paper around it, and to hold the egg whites upside down to establish that they were solid enough. Mostly, I tried to remember the other cakes I've made from mid-century receipts.

I started by separating and beating the three eggs (yokes and whites). In a separate bowl, I blended the 1 cup of sugar and 1 cup of butter, then added the cup of molasses [supplemented with corn syrup because I ran out], and the egg yokes. When this was well-mixed, I added the rest of the dry ingredients, stirring all the while: 1 Tbsp ground ginger, 1.25 tsp baking soda (substituting for 1 tsp salæratus), and 3 cups of flour. Then I added the egg whites, beaten to still peaks, and finally I stirred in the pound of raisins. The batter was rather thick; it went immediately into the oven.

I baked the cake at 325F for 2 hours; I used a tin cake hoop, with double layers of parchment paper above, below, and around the interior.

Time to Complete: About 3.5 hours including baking.

Total Cost: Ingredients all on hand.

How Successful Was It?: I was skeptical of the raisins, but there were just fine. Most settled in the lower half of the cake, leaving the upper portion clear of fruit.

The cake itself had a nice molasses and ginger flavor, neither insipid nor overwhelming; the texture was light and moist. It's similar to, but less dense than most of the gingerbread recipes I've tried.  The only problem is that the bottom fairly burned. I think I should try using 3 or 4 layers of parchment paper beneath the cake in the future (and maybe increase the top and sides to 3 layers each). 

How Accurate Is It?: I am probably going to culinary hell for substituting corn syrup for the few ounces of molasses I was short. As noted, I also used baking soda instead of saleratus, so I may be missing the bitter aftertaste I sometimes hear attributed to it. I did use my repro cake hoop, though. 


Monday, November 4, 2019

HFF 3.22: Fear Factor


The Challenge: Fear Factor. Try something a little scary--an intimidating recipe, a new technique or a 'spooky' food.

A friend of mine makes gorgeous jelly-filled orange slices from Francatelli's recipe. I decided to try them for this challenge, since presentation is one of my major weaknesses.

The Recipe: Oranges Filled with Transparent Jelly (#1429) and Maraschino Jelly (#1424) from The Modern Cook (1846) by Charles Elme Francatelli
MARASCHINO JELLY. To one pint of clarified syrup, add two ounces of clarified isinglass, the filtered juice of two lemons, and a gill and a half of genuine maraschino; pour this into a jelly mould ready set in rough ice. 
ORANGES FILLED WITH TRANSPARENT JELLY. Select half a dozen oranges without specks on the rind; make a hole at the stalk end with a circular tin cutter about half an inch in diameter, and then use a small teaspoon to remove all the pulp and loose pith from the interior; when this is effected soak the oranges in cold water for about an hour, then introduce the spoon through the aperture and scrape the insides smooth and after rinsing them again in cold water set them to drain on a cloth. Next stop up any holes that may have been made in them while scooping out the pulp and set the oranges in some pounded rough ice contained in a deep saucepan; fill three of them with bright pink orange jelly and the remainder with plain jelly. When the jelly has become firm wipe the oranges with a clean cloth cut each into four quarters dish them up tastefully on an ornamental pastry stand or upon a napkin and send to table.
The Date/Year and Region: 1846, London

How Did You Make It: 

First I prepared the oranges by punching a hole over the stem. I used a large round decorating tip (Wilton 2A, just a 1/2" diameter circle) for want of a tin punch the same size. It worked well to remove the stem edge. Unfortunately, I do not possess a spoon less than 1/2" wide with which to scrape the inside of the oranges, and instead ended up improvising with a 1/2 teaspoon measure and a butter knife. My finger ended up being more effect than either of those (no one else is eating this batch, so it's less of a problem, but will need to be solved if I ever make these for others).

An orange sitting in a replica Renaissance bowl. The orange has a metal icing tip embedded in it.
Step 1: Stab an orange.

A bowl containing orange juice and pulp, in front of another bowl containing the two hollow orange rinds.
Step 2: Eviscerate the orange.
Then I then clarified a sugar syrup (#1410) of 1 pound granulated sugar and a generous pint of water, with half of an egg white added. Brought to a boil, skimmed off the scum, and set aside to cool. I ended up with 2 1/4 cup syrup.


A yellowware mixing bowl containing a clear liquid; behind it, two hollowed out orange rinds in a metal bowl.
Step 3: Mix jelly.

Once the oranges had soaked an hour, I gave them a final scrape, then set them on ice (attempting to put together the torn edges--this worked well enough that I didn't try mending them with flour paste, which was my next idea for how to 'stop any holes'.  I hen prepared the jelly by juicing two lemons, and adding the strained juice to 3/4 cup maraschino liquor, 1 pint of the prepared syrup, and 4 packets of gelatin (substituting 1 packet gelatin for 1/2 oz isinglass). Mixed this up, and got a transparent, almost colorless liquid. I poured it into the oranges, and set the bowl in the refrigerator to encourage faster setting.  The jelly was mostly set in just over 2 hours.

Seven orange slices arranged in a starburst shape on a purple transferware plate. Each slice is a wedge of transparent, almost colorless, jelly set in a section of orange rind.
Final: Orange slices that are actually alcoholic gelatin.

Time to Complete: Didn't time the initial orange preparation; clarifying the syrup took about 25 minutes (done during the hour the oranges were soaking), preparing the jelly and finishing the oranges took about half an hour. The jelly set in 2-ish hours, but I think more time would have been useful.

Total Cost: $2 for two oranges, other ingredients on hand.

How Successful Was It?: I need some practice, but the jelly set well enough to cut the orange slices, so I'm not complaining. I need to figure out a better way of cleaning out the oranges and to practice a bit more before making this recipe for others.

The jelly tastes like maraschino, with the lemon not really coming through. Tasty enough, though I'd be tempted to try kirsch or one of the other options next time.

How Accurate Is It?: I substituted prepared gelatin for the isinglass; while the book does gives instructions for gelatin jellies, those start with boiling hooves. That was the main modern shortcut, with the use of a refrigerator as a second. 

Friday, November 1, 2019

Original: Bathing Suit, c.1920

A sleeveless, knee-length one-piece black bathing suit, covering in what appears to be black fringe.
Bathing suit, American c.1920.
From LACMA.


I have questions... They mostly are variants on 'what is up with that fringe'?

Friday, October 18, 2019

ALFHAM Western Regional Conference

This year it was in Forest Grove, Oregon, and was a lot of fun.

A two story white house with attic, in mid-19th century style
We visited the 1854 Alvin T. Smith house.

Fadded and damaged wall paper section, showing white motifs on a beige background, with blue stripes.
And I got much too excited about their
ORIGINAL WALLPAPER.

We also explored the old train depot (home to the Friends of Historic Forest Grove), as well as taking tours further afield. The sessions were great: I got to hear Linda from the High Desert Museum talk about engaging audiences, and Eileen from Talbott & Co. discuss research on the brig Euphemia and the sorts of goods it carried between San Francisco and Hawaii. I also demonstrated straw-plaiting, with no fatalities (though it precluded seeing Peggy's Victorian fly-fishing program).


Tuesday, October 15, 2019

Opera Coiffure, 1856 (first attempt)

Two engraved images (front and back view) of a fashionable hairstyle from the late 1850s, with double rolls on the side and a back coil of hair surrounded by feathers.
Opera Coiffure, suitable for a young married lady, Godey's, 1856.

Meantime we open our own novelties, commencing with a simple but extremely tasteful headdress, suited to a young married lady, for opera, or an evening reception.
Fig. 1.—Front view, showing the division of the hair into two rouleaux which are marked by two small jewelled or ornamented hair-pins, placed over the ear; these are softly shaded by the outline of the plumes at the back of the head.
Fig. 2.—The back hair twisted into a smooth coil, on each side of which pure white ostrich plumes are arranged turning in towards it at the end. Plumes are sometimes worn by young ladies, but are more suitable for those who have a right to be addressed as "Madam," though not sufficiently staid for chaperones.
--Godey's, November 1856

My first (very bad) attempt at the hairstyle. It was a Murphy's Law sort of day, but posting these pictures will hopefully guilt me into re-doing them properly as I've been putting off for a month. The main issues I need to address are:

  1. Making new rats that fit under half the side-hair. The ones I usually use could not be positioned securely and out of sight. Parting the hair on a diagonal rather than vertically will likely help.
  2. Anchoring the smooth coil at the back effectively. After the second failure, I threw it into a braid to make it stay put.
  3. Using the right feathers. All my ostrich feathers went into hiding last Opera Night, so I ended up using mirabeau. They really didn't work.


The author, hair arranged in two twists on either side of the face, each twist topped with a hairpin containing a pearl cluster.
Front rolls. They need to be done over rats (not these small twists).

A back view of the author, wearing light brown hair in a large braided coil, with white mirabeau feathers around it.
Braided rather than smooth coil. And the mirabeau (above)
don't really give the same effect as ostrich.

Monday, October 14, 2019

Opera Dress Research, 1817

The most useful fashion plate and description is from Ackerman's Repository, for none other than an opera dress (March 1817):
Opera Dress, March 1, 1817, in Ackerman's Repository
Accessed through LACMA
Description: Plate 16.--Opera Dress
A blue crape dress over a white satin slip; the dress trimmed round the skirt with a deep blond lace, which is headed with a light and novel trimming, composed of white floss silk and small pearl beads; this trimming is surmounted with a beautiful deep embroidery of lilies surrounded by leaves. The body and sleeves of this dress, as out readers will perceive by our print, are extremely novel. Head-dress, tocque a la Berri; it is a crown of a novel form, tastefully ornamented round the top with lilies to crorespond with the trimmings of the skirt, and a plume of white feathers, which droop over the face. Earrings, necklace, and bracelets, sapphire mixed with pearl. The hair dressed in loose light ringlets on the forehead, and disposed in full curls in the back of the neck. White kid gloves, and white satin slippers.

The above opera dress mas much in common with other formal attire from that year: the dress trim is concentrated near the hem of the skirt, and with similar motifs repeated on the sleeves (here a bit less so, though the white and blue color scheme is repeated there). Other examples of evening dress from 1817 also show very short bodices, heavy trim around the skirt, and often two layer construction (gown of net or crepe or some other sheer fabric over a silk slip, usually a satin). In April, the magazine mentions that gauze is replacing tulle in full dress, there is an example in the June issue (fashion plate).

[The April issue of Ackerman's observes that short bias-cut 'gipsy' cloaks, lined with blue or pink sarcanet, are worn to the opera.]

A few extent dresses that may be useful, though some are slightly later. The first is a sheer dress for wearing over a colored slip (early 1820s). There's an example in Costume in Detail where the sheer dress and slip are joined at key seams, but I was intrigued at this one being an entirely independent garment.

Sheer dress, c.1820-25.
The Met.
And a few more from LACMA:

Sheer dress c.1815. LACMA
Another, c.1820. LACMA

There are also a few intrinsic dresses, including this one c.1818, which is closer to my target date; I'm including it here for reference, because I'mm interested in several of the design elements. There are two rows of trim at the bottom, the sheer material is pleasingly full on the sleeves, and I like how it's also been disposed over the bodice. The descriptions for 1817 prescribe a plainer effect there, unfortunately.

Evening dress, c.1818. Met.

And another later dress (c.1825) which shows the two-layer look very well:

Dress c.1825. LACMA

[The other specifically "opera" dress I've found is from 1813, and it's mostly covered by a wrap.]

Thursday, October 10, 2019

HFF 3.21: Beverages


The Challenge: Beverage. Make something to drink.

The Recipe: Negus (for children's parties?!) from Mrs. Beeton's Book of Household Management

The Date/Year and Region: London, 1861 (many recipes were previously published in the Englishwoman's Domestic Magazine and/or copied from earlier sources)

How Did You Make It: Half-scale. I rubbed a lemon of 1/4 lb granulated sugar (and, when that didn't work, scraped off the peel and buried it in the sugar).  Meanwhile, brought water to boil, and grated ~1/4 of a large nutmeg into 1 cup of sherry. Juiced the lemon into the sherry, added the sugar (imbued with some of the lemon's yellow color and odor), and poured 1 pint of boiling water into the mixture. Stirred and served.

Time to Complete: 5-10 minutes (scraping sugar while the electric kettle boiled)

Total Cost: $1 for a lemon, other ingedients on hand

How Successful Was It?: Very successful. Tasty, even though sherry usually doesn't work for me. Mostly the negus tastes like lemon and sugar, though there's something extra going on to distinguish it from lemonade (aside from being warm). The nutmeg and sherry aren't really coming through to me, just giving it some extra depth. That said, I'm probably missing some of the flavor complexity due to rebellious sinuses. I would like to try it with port (the preferential liquor, though sherry or sweet white wines are listed as variations) just to see how that changes the taste.

How Accurate Is It?: I'd like to try it with lump sugar to ensure all the lemon flavor comes through (the sugar was to have absorbed all the lemon' color, which it did not do), but otherwise I'm pretty well satisfied with it. Used an electric kettle to boil the water, but the result is the same as if it was boiled on a stove, hearth, or fire.

A pink transferware pitcher standing behind a bowl containing a lemon and granulated sugar. On the rim of the bowl lies a tin nutmeg grater.
Negus: easy to make, and tasty.


Wednesday, October 9, 2019

Book Review: How to Behave Badly in Elizabethan England

A montage of 16th century figures around the book title

Ms. Goodman is at it again! We're back to the 16th century, this time learning about social mores by violating them.

As usual, the writing is conversational and informative. Unlike the temporal ("a day in the life") organization of How To Be A Victorian or How to be a Tudor, How to Behave Badly is divided thematically. The six chapters cover difference way to misbehave, including offensive language, gestures, violence, poor hygiene, etc. With introduction and conclusion, the book clocks in at 293 pages.

I like how edifying the book was--I learned more than I expected to about the origins and class implications of 'swashbuckling', as well as how to bow sarcastically. I also liked how the author dissected the composition of verbal insults, and that she addressed the gender divide in both physical altercations and offensive language.  There was also attention paid to changes in good/bad behavior over the time of the book (nominally Elizabeth I's reign of 1558-1603, but including sources from c.1460-c.1700).

This book is a fun read, and manages to be thorough without becoming a reference book. As previously mentioned, the voice is generally conversational, such that it feels like conversing with an enthusiastic and well-informed friend. There are, however, times it reads a bit like a negated etiquette manual--because the author summarizes the correct behavior described in etiquette manuals in order to discuss how to subvert that behavior. The sources available for this time and topic do color the presentation and contents: in addition to etiquette instructions showing what should be done (and occasionally deploring what is done but shouldn't be), a decent amount of the bad behavior comes from the extreme cases that caused legal disputes: trial summaries from the insults that warranted slander proceedings and the fights that caused injury or property damage. There's also a certain amount of recourse to contemporary literary characters who typify boorish or foolish behavior.


Stars: 5

Accuracy: High. Sources are cited in-line, and a primary-source-heavy bibliography is included.

Overall Impression: An amusing read, and full of good background information for people who interpret the 16th century. It draws heavily from contemporary advice literature and legal records, but I think it delivers on the promise to show bad behavior.