Tuesday, December 31, 2019

2019 Resolutions in Review

On the 7th Day of Christmas, I got introspective about my 2019 costuming resolutions. This time last year, I wanted to complete:  

Late 18th century chemise, maybe one more 16th century smock [de-prioritized since my early 1800s will do, and I haven't completed other 18th century gear]
That linen gown*
Partlet
Tablet-Woven Garters* [maybe next year]
Another pair of turnshoes [still needed, hopefully for next summer]

1770s corset* [nope, got the supplies though!]

Empire ballgown remade
Dancing slippers [in progress]
Bib-front Empire dress*

1848 Dress and Bonnet [bonnet form made up]

Fix mid-19th century corset [repeatedly, replacement in progress]
New sets of 1850s undergarments
Braidwork coat* [some preliminary planning complete]
Blue Wool* Sleeves Reworked
Black or red plaid wool worked up* [some work done]
Gaiters*
That knitting apron*

1890s corset*

Items completed that were not on the list:
1790s Short Stays
Regency Shoe Roses
16th century apron
1830s reticule
1840s Walking Parasol
Plaiting kit
The Eternal 1850s Chemisette
16th Century Infant Clothes
Elizabethan Hood with Bongrace
1857 Opera Gown (complete, to be posted)
And 18 medieval to early 19th century hair coverings

Monday, December 30, 2019

Knitting Apron, 1860

Finally finished the knitting apron from Peterson's May 1860--the one which has been haunting my to do pile at 70% compete for three and a half years.

The ground fabric is a sheer white cotton with a windowpane design woven into it; the ribbons are light weight silk 'tafetta'. All hand-sewn.

Knitting Apron in sheer white cotton with silk trim.
From Peterson's Magazine, 1860.

If re-commencing this project, I'd probably use a sheer with more body or even make it up in a moderate weight silk. I'd also do the self-trim in the (now, to me) straightforward way instead of installing it in the weird-backwards-mess-way that delayed this apron so long (I have some questions for past me).

Other than the fabric drape, my main concern is the pocket shape: they are extremely wide and shallow, which seems a recipe for spilled yarn. I already tacked the top center of each to keep the pockets from gaping, though I don't expect those stitches to hold (and rather hope they give rather than let the fabric tear).

Sunday, December 29, 2019

Black Ground Calico Dress

Final adjustments are underway, but here's another of my autumn projects for the annual 12-Days-of-Christmas-Blog-Backlog-Reduction-Blitz. It's a mid-19th century reproduction dress (mid 1850s to early 1860s), with gathered bodice and bishop sleeves.

My camera gets weird about dark ground
fabrics; in person, it's quite cute.

Sleeve close-up, showing the colors better.


Saturday, December 28, 2019

American Duchess Stockings

I have silk stockings. Now to find a ball to attend.
I received a pair of the American Duchess ivory openwork silk stockings for Christmas, and am pleased to report that they fit. Between my small feet and calves-of-doom, this is usually not the case for stockings (or even modern knee socks which are 100000% spandex and still too loose/tight in turn). I was expecting that I would need to shorten the foot and/or that the tops would be too tight: fortunately, they aren't. The uppers are rather snug, so I might tamper with the cuff a little anyway, but I can get them on, and there's no bagginess about the ankle or toe, so score!

Friday, December 27, 2019

Plaid Wool Dress, late 1850s

I've been sitting on this one for a while--that is, I made up the skirt 2-3 years back, wore it with different contrasting basques and waists, finally made the bodice for last year's Christmas Regale, fit the sleeves badly so they tore out during use, and now have it in approximately working order. Ish.


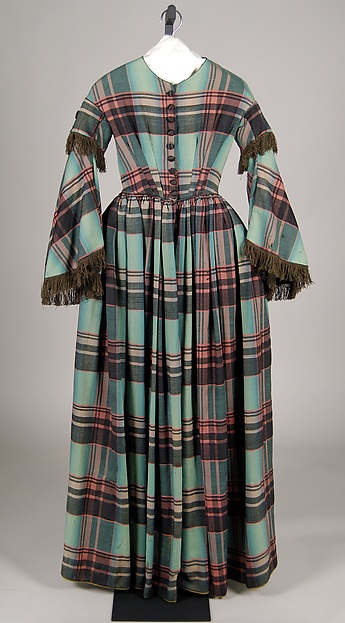
The inspiration piece is this plaid wool from The Met, dated to the latter half of the fifties.  I'm mostly in 1855 at the fort (with forays into 1857/1859), so it's a good fit.
1855-1860 Wool Dress from The Met
Wool dress, c. 1855-1860, from The Met
The original dress has open sleeves which appear to be pagodas (they could be funnels, but seem to curve at the seam as pagodas do); both the wrist edge and the sleeve caps are edged in fringe, a popular trim choice for the mid-to-late 1850s.  The bodice is fitted with three darts on each side of the center front opening, which fastens with functional buttons (button holes are visible on the left side of the three lowest buttons).  Self-fabric piping finishes the bodice at the armscye, waist, and possibly at the neckline, though the latter may simply be bound.  There is no waistband.  The skirt is finished with hem tape, which appears to be tacked on the wrong side of the hem, or sandwiched between the skirt and facing (it is not folded over the hem edge).  The skirt is gauged at the waist--uncommon for wools by the 1860s, but not unknown in the 1850s.

So far as I can tell, the sleeve cap takes up about 1/4 of the total sleeve length (at the inner seam), and 1/5 at the outer; adapting for my sleeve length, that's about a 4"-4.5" long jockey, and suggests that the fringe is about 2.5" long. My version has shorter fringe due to fears about tangling it (and the time took to make). I do like the look of the deeper fringe, though...


A blue and white plaid dress, with silk fringe trimming the edges of the sleeve jockeys and the lower edge of the open sleeves.
The dress form is stuck on its lowest setting,
so nothing really sits right on it.

Thursday, December 26, 2019

HFF 3.26: Obsolete


The Challenge: Obsolete: End the year with a recipe, ingredient or technique that has been superseded by modern practices. I'm opting for a cake raised with only eggs and extensive mixing [no chemical leaveners], and baked in a tin hoop instead of a modern cake pan.

The Recipe: Plum Cake from The Cook and Housewife's Manual

The Date/Year and Region: 1837 [6th ed], Edinburgh/London

How Did You Make It: There are three recipes for plum cake: I went with with #1007, the pound cake variation, as I neglected to procure cream. 

As directed, I started by beating a pound of [unsalted] butter "to a cream", then continued mixing in 5 well-beaten eggs. The original instructions called for 9, but recent reading has suggested that modern eggs are so much larger than pre-20th century varieties, that the amount should be halved. I tried that here, and found the batter somewhat thicker than a modern boxed cake, but still thin enough to not be a dough. I decided to continue without adding additional eggs.  

I then added 11 ounces of sugar [amount not given, so I estimated and made some math errors: the following plum cake recipes call for 1:1 or 2:3 ratios of sugar to flour by weight], 1 1/4 lb flour, 8 oz currants, 2 oz raisins ("a few"), 8 oz candied peel, 2 Tbsp cinnamon and half a large nutmeg (spices "to taste"). The whole time, I continued beating the batter.

I baked the cake in a tin hoop--with double layers of parchment paper on all sides--for 2 hours 15 min at 325F.

The icing is #1006, with four egg whites and a pound of sugar (and 2 tsp orangeflower water to flavor). A single batch (2 egg whites) might do if beaten to sufficient volume. The first batch I made was not enough, but the second was larger and might have  een enough on its own.

Time to Complete: About half an hour to mix up (including leaving the mixer on while I quickly cleaned the oven), and 2 1/4 hours to bake.

Total Cost: Eggs $2, currants ~$4, candied peel made at home from leftover fruit peels throughout the year, other ingredients on hand.

How Successful Was It?: Tasty. A bit on the dense side, as is usual when I make mid-19th century cake recipes. In general, I'd compare it to the other Christmas/12th Night/Ginger Cakes I've made before. The cinnamon, peel, and currants all come through nicely; in the future, I'd probably increase the amount of nutmeg since I didn't taste it through the other flavors. The cake was also less sweet than similar cakes I've made, so I'd probably try increasing the sugar as well.

The bottom of the cake scorched a bit, so I need to remember to put extra paper there in the future: otherwise, the double layer worked perfectly on the sides and top.

How Accurate Is It?: As noted, I tried to adjust the egg proportions to better reflect period egg sizes (whee, further research ideas), and used the hoop rather than a modern pan. I did use an electric oven and mixer. The icing contains pasteurized egg whites. 

Tin hoop, lined with paper, containing cake batter with peel and currants, on a paper-covered cookie pan.
Baking the plum cake.

Cake with white icing on a pink transferware plate.
Ready to serve.

Wednesday, December 25, 2019

Tuesday, December 24, 2019

Christmas Eve Reading

In case anyone was looking for a shorter, more didactic version of A Christmas Carol:
A Christmas Dream (1860) by James T. Brady, illustrations by Edward S. Ball.

Monday, December 23, 2019

Historical Food Fortnightly Season Four Challenges

Time to start thinking ahead to next year. With thanks to Quin for many ideas.


  1. January 1-14: One Last Holiday Hurrah. Pick a holiday, any holiday, and start the New Year with some in- or out-of-season merriment.
  2. January 15-28: Downstairs Dinner. Make a dish of the working classes.
  3. January 29- February 11: The Tiffany Problem. Have you ever come across a dish that is older than you expected? That seems like it should be an anachronism, but isn't? Now's the time to give it a try. [Explanation of term.]
  4. February 12-25 Heart-y Fare. Whatever "hearty" or "heart"-y foods speak to your heart.
  5. February 26- March 10: Centerpiece Dish. Pull out all the stops to make something pretty and eye-catching to adorn your table.
  6. March 11-24: Erin Go Bragh! Actual Irish dishes, or those with only the most tenuous associations to Ireland and/or St. Patrick's Day.
  7. March 25-April 7: April Foolery. Surprise foods, deceptive foods, funny foods, and/or foods with "April" or "Fool" in the name.
  8. April 8-21: Egg-actly What You'd Expect. Make something with some connection/resemblance to eggs. Clever egg substitutes also accepted!
  9. April 22-May 5: Flower Power. A dish that is floral, flowery, or flour-y, as you desire.
  10. May 6-19: Sing for Your Supper. Make a dish associated with a song or with music.
  11. May 20- June 2: Commemorative Dishes. Try preparing something associated with a famous event or person.
  12. June 3- 16: Get Saucy! Make a sauce, relish, or topping.
  13. June 17-30: Summer Sun. Try a food suitable for summer, or involving the sun.
  14. July 1- 14: Fresh Start. Half-way through the year, make something 'fresh'. If you've fallen behind on challenges, take this as a chance to re-start.
  15. July 15- 28: Tea Party. A delicate refection for teatime, and/or party food.
  16. July 29-August 11: First Fruits. Cooking with fruit, or beginning the harvest.
  17. August 12-25: In a Jam. Jams, jellies, and all sorts of preserves.
  18. August 26-September 8: Labor of Love. A dish that's hard work, an ingredient you love, or a combination thereof.
  19. September 9-22. Eat your veggies. Make a dish with vegetables.
  20. September 23- October 6: What's In a Name? Pick a food with a fun name--person, place, thing, or just something fun to say.
  21. October 7-20: Let Them Eat Cake. Make a cake. Or cakes.
  22. October 21-November 3: Fear Factor. Here's the challenge to challenge yourself: pick an intimidating ingredient or technique. 
  23. November 4-17: Comfort Foods. A food that is comforting to eat or comfortable to make.
  24. November 18-December 1: Serve it in a bowl. Soup, stew, broth, ice cream: anything that you would serve in a bowl.
  25. December 2-15: Yuletide Head-Start. Make a seasonal dish for the holiday of your choice, or a food that needs to be prepared in advance of serving. 
  26. December 16-31: Hindsight is 2020. Your chance to revisit an earlier challenge (from any season or from outside the HFF challenges), and try it again. Use the lessons you've learned, try a variation, polish up your technique, or address an issue that arose last time you made it. 

Thursday, December 12, 2019

Quilted Silk Hood

Silk hood.

From Anna Bauersmith's quilted hood pattern. It only took three years for me to get started, after which it went together very quickly. The hand-quilting took a single weekend event, and the pieces went together in only a few more hours work. Using a machine it could go even faster.


Quilted pieces.

I used a silk exterior, polished cotton to line, and a single layer of wool quilt batting inside. The garment is hand-quilted, using one of the sample designs included in the pattern. The ties are self-fabric, with a rolled hem. Trimmed with white rabbit fur, to match my winter cuffs. I considered adding a narrow trim along the bavolet, but didn't like how it detracted from the quilting (I rather like how it turned out there).

Fur was mentioned as a trim option in the pattern, but my searches didn't reveal many antique examples to use as inspiration. I did find a written reference to a silk hood with chinchilla fur.

I found this hood comfortable to wear, and it kept the water off without crushing my hair. It was a little less warm than previous hoods I've made, as it didn't sit so close to the face. All in all, I am very satisfied with it.

Tuesday, December 10, 2019

HFF 3.25: Waste Not, Want Not


The Challenge: Waste Not, Want Not: Historic recipes for leftovers.

The Recipe: A Cheap Gravy For Hashes, &c. from Beeton's Book of Household Management
440. INGREDIENTS – Bones and trimmings of the cooked joint intended for hashing, 1/4 teaspoonful of salt, 1/4 teaspoonful of whole pepper, 1/4 teaspoonful of whole allspice, a small faggot of savoury herbs, 1/2 head of celery, 1 onion, 1 oz. of butter, thickening, sufficient boiling water to cover the bones.
Mode.—Chop the bones in small pieces, and put them in a stewpan, with the trimmings, salt, pepper, spice, herbs, and celery. Cover with boiling water, and let the whole simmer gently for 1–1/2 or 2 hours. Slice and fry the onion in the butter till it is of a pale brown, and mix it gradually with the gravy made from the bones; boil for 1/4 hour, and strain into a basin; now put it back into the stewpan; flavour with walnut pickle or ketchup, pickled-onion liquor, or any store sauce that may be preferred. Thicken with a little butter and flour, kneaded together on a plate, and the gravy will be ready for use. After the thickening is added, the gravy should just boil, to take off the rawness of the flour.
Time.—2 hours, or rather more.

The Date/Year and Region: 1861, London

How Did You Make It: I took the bones and trimmings from a half-dozen pork chops, and placed them in a stock pot with 1/4 tsp each of salt, whole peppercorns, whole allspice, the off-cuts of a head of lettuce, 1 white onion (chopped) and the last of the parsley, winter savory, marjoram, and sage from my garden (amounting to a scant handful).  I covered these with water, and let them stew for about 2 hours. I strained the liquid, then boiled it again, adding a roux made of 1 oz of butter and about 1/4 cup gluten free flour. This still seemed a little thin, so I added a bit more flour, but didn't stir well enough, resulting in lumps.

I ended up with about a quart of gravy.

Time to Complete: 3 ish hours, though much of that time was just the stock boiling on the stove.

Total Cost: All items on hand.

How Successful Was It?: The flavor is great, which was a relief. I'd been worried, since my cooking experience has always been that gravy comes from a packet--making my own from recognizable foodstuffs really felt like an accomplishment. It also helped achieve the event goal, since I was trying to make a gluten-free, mostly meat-free [though not this dish] period meal for some friends with food sensitivities. Making the gravies and stocks from scratch helped me limit the risk of accidental allergens. 

This gravy ended up a little lumpy. At the same time, however, I tried a no-meat gravy [Beeton's Brown Gravy Without Meat, sans beer because of the gluten, though it still tasted great], in which I mixed the flour in better, and did not have this problem. So, the lumps were more a technique than a recipe failure. 

When I need a gravy in the future, I will probably use one of these two recipes, depending on whether I have left-over bones and/or need a vegetarian-friendly options.

How Accurate Is It?: Fairly. I did use the modern stove. The gluten-free flour (a 1-to-1 substitute containing a mixture of rice flour, arrowroot, and xantham gum) was an intentional change to suit the occasion; savory herbs are not closely defined in any source I could find, so there was some guesswork there. 


Two mason jars containing a pale brown gravy.
Rest assured, I didn't try to can the gravy,
I just ran out of containers for the leftovers.

Monday, December 9, 2019

Jumbles

Not a challenge, but I'm writing up the recipe in case I want to venture it again in the future.


The Recipe: Jumbles, from a c.1500 cook book, translated into modern terms by Historic Royal Palaces [2 eggs, 100 g sugar, 1 tsp caraway or anise, as much flour as makes a paste; form into twists, boil, then bake.]

The Date/Year and Region: English, c.1500

How Did You Make It: Ground star anise. Beat 2 eggs, added 1/2 cup of granulated sugar, and 1 tsp of the ground anise. Added flour (~2 cups) until a workable paste was achieved. Divided the dough into ~ 20 pieces, rolled each in hand to make a short rope, twisted it around itself, and dropped into boiling water. When a piece started floating, it was removed to a paper-lined cookie sheet, and the lot baked at 350F for ~20 minutes.

I also did a batch flavored with 1 tsp caraway seed, but accidentally doubled the sugar--either due to this or because they went first, the caraway batch didn't bake well, ending up with a slimy texture. 

Time to Complete: About 30 minutes to make up (set the water to boil before mixing dough), and 40-60 minutes to bake two pans.

Total Cost: All ingredients were on hand.

How Successful Was It?: The flavor was nice for both (the anise being like my favorite Christmas cookies, while the caraway reminded me of many Victorian receipts). The texture was a bit odd--dense and rather chewy on the last of the four pans, slimy for the first three (after which I decreased the size of each jumble to 10/egg and then  increased the baking time to 20 minutes). I'll probably experiment with these in the future, because they are portable and keep pretty well (that is, they would be good for events if I can get them palatable in texture). 

How Accurate Is It?: I used an electric stove/oven. The recipe was already adjusted for modern egg sizes, though I could always do more research on sugar varieties...

Sunday, December 1, 2019

Original: Silk Damask Gown, 1860

Silk damask gown with fabulously large pagoda sleeves.
LACMA.
LACMA's staging makes me happy, albeit in a jealous sort of way. This one doesn't have alternate views, but the enlargement does make it a little easier to see the sleeve trim (pinked, possibly box pleated, and with a fun overlap on the upper arm).