Showing posts with label accessories. Show all posts

Sunday, July 12, 2026

Linen Sleeve Protectors

Finished my 2025 Christmas presents for real, this time, back in February (though apparently I never actually published this post), with a pair of linen sleeve protectors. While the documentation I gathered back in the day suggested that such sleeves were primarily used by clerks and other people engaged in large amounts of writing, there was also scattered references to grocers' assistants, artists, and other occupations where one's forearms are at risk of soiling, but where rolling up the sleeves would be inappropriate.*


This pair is intended for one my favorite tin-smiths, who has been looking for a way to protect her dress sleeves from snags and abrasion while cutting tin. The mid-weight linen I used is fairly stout and close-woven, without being coarse, and I hope that it will do the job.

*Of course, when I repeated the search in 2026, Google Books had exactly 3 results for this kind of oversleeve in the period 1840-1865: a clerk, an artist, and a doctor performing 'chemical experiments.' 

Tuesday, February 24, 2026

Plaid Cook's Apron, c.1850s

A straight-forward pinner apron, for our favorite cook. Guess I wasn't quite done with the Christmas presents, after all.

Pinner apron.

The Workwoman's Guide (fig 14, plate 11) calls this a cooking apron, saying:

This is a neat pattern for a housekeeper, cook, or kitchen-maid. The bib is quite plain, and pins to the gown at the corners. The size given in the Plate is suitable for a girl, but the bib should be cut to suit the wearer at once, and not made by guess. The apron is made of check or strong linen. 
For the check, I used a 56" wide medium-weight plaid shirting cotton from Family Heirloom Weavers. As given in the book, it's a very simple apron design: one width of fabric, gathered to a self-fabric band, with a rectangular bib stitched along the top. To move it more into the fifties, the bib is larger and the skirt of the apron adjusted in proportion (waistlines were still a bit high when the Workwoman's Guide was first published in 1838). I also knew that the recipient likes her aprons to properly cover the bodice of her dress.

A slightly better view of the color.

The apron's skirt is narrowly hemmed along the sides (the selvedges weren't suitable to be left as-in), with a deeper 2.5" hem at the bottom edge. The top is gathered into the waistband, and the bib (narrowly hemmed on all four sides) is whip-stitched along the top of the band. Instead of adding tape ties to the back of the apron, I opted to cut the waistband and ties as one. There was plenty of fabric, and it makes a nice bow when tied.

Monday, December 29, 2025

Dotted Swiss Puffed Undersleeves, c.1858


Puffed undersleeves.

One of the last items out of the "to do" basket for this year: the puffed undersleeves I started for a long-cancelled workshop back in January 2020. At the time, I recall working from one of those small magazine illustrations, excited to find one made from Swiss dot, which I had on hand. 

Possible inspiration, Peterson's Feb 1858.

Unfortunately, I didn't seem to save illustration I'd used back then. I think it was the one above, from Peterson's Feb 1858, though I don't recall that second ruffle between the two lower puffs (nor do I can for it). Another similar Swiss dot sleeve, but with only two puffs and an extra bow appears in Godey's April 1859, though the one I used definitely had three.  

Working from an illustration only, I made up my own pattern. I decided to try using three rectangles: a base piece (width desired for upper arm by length of finished sleeve), a ruffle (2" by 1.5 times finished wrist measure), and a piece for the three puffs (about 6" wider than the base piece and 3/4 it's length). I started by closing each rectangle into a tube (running and felling the seam), then hemmed the upper edge of the base sleeve and the lower edge of the ruffle. I folded down the upper seam allowance of the puff, and then did rows of running stitches for gathering along the raw edges of the base and ruffle, as well as the upper and lower edges of the puff piece and two rows dividing it into thirds. From there, I pinned the puff to the base, then stitched all three pieces together at the wrist. Working up from the wrist, I gathered the puffs to the desired size and tacked them to the base along each of the three lines of gathers. 

I like the final effect, but am at a loss for how to iron the sleeve. More experiments are clearly in the future. 

Sunday, November 30, 2025

Plain Collar and Cuffs, Late 1850s

I didn't have much mending to do this month, and instead I was mostly finishing new projects. One of these was a simple collar and cuff set. Several of my white collars need replacing, and I have fewer pairs of white cotton cuffs than I have bishop-sleeved dresses which need them, so this was a timely project.

The aforementioned accessories.

The collar was traced from one of the 1850s examples in Liz Clark's collar pattern (and adjusted to fit my new green dress's neckline), and the cuffs are simply drafted from that dress's wrist measurements. Both are constructed of a single-layer of white cotton batiste, hemmed on three sides, and finished with a bias-band of the same fabric.  

Saturday, November 22, 2025

Eyelet Muffatees

Definitely in the interpretation realm, using the cuff and motif from the "eyelet mittens" in Miss Watt's The Ladies' Knitting and Netting Book: Second Series (1840) as a muffatee/cuff. 

Cuffs or muffatees based on an 1840 mitten pattern.

While I think this is a historically sound interpretation to mix motifs with form (for instance, the 'shell pattern manchettes' two pages later specifically mention that the pattern also works well for mittens), I also think I have enough departures from the given recipe to warrant the 'interpretation' label. Main changes:

  1. Made the muffatees symmetric by adding another section of ribbing at the far end, and working 4 plain rows before the first eyelet row, not only after.
  2. Sixty rather than 66 stitches around (limited by cylinder size).
  3. Because I still can't get the ribber working in time, I substituted mock-rib for true ribbing. I tried to compensate for any lost warmth by making the mock-rib sections double-layered (a hung hem).

On the other hand, the elements that these do have going for them:

  1. Accurate material: I made these out of a fine wool yarn, opting for an indigo-dyed light blue.
  2. The knitting machine (which did exist in the period!) makes the same stockinette stitches as knitting by hand, and the eyelets can be made on it quite easily.
  3. Historic precedence in this and other sources for the shape (knit tube for the wrist or forearm without a thumb slit), which come in variety of lengths and may be variously called muffatees, cuffs, or manchettes. 

For the set-up, I used my 60-cylinder set to a 2-2 mock-rib. I set the tension to 1L3, determined through experiment with the other muffatee patterns I've been trying in similar yarn weights. This is also how I got my gauge of ~10 rows to the inch.

1) Worked 20 rows of mock-rib.

2) Hung the hem, adding in the missing needles at the same time, and picking up stiches for them.

3) Knit 4 rows plain.

4) Knit 1 row eyelets by moving every second stitch to the previous needle.

5) Knit another 4 rows plain, 1 row eyelets, 4 rows plain, 1 row eyelets, 4 rows plain.

6) Remove every 3rd and 4th needle (transferring the active stitches from the third needle to the second and the fourth to the first).

7) Knit 20 rows 2-2 mock rib.

8) Remove from machine and sew up the hem on the second side.

I'm generally happy with how these turned out. I was surprised at how the mock-rib changed appearance between the first and second sections, and despite using the same tension settings and weight. Blocking them did help. I ended up not liking the double-layer on the mock rib as much as I thought, since it overshadows the eyelet section. Next time, I'd like to see how it looks with true ribbing, even if I have to work it by hand. Visually, I'd also like to make the eyelet section longer (maybe 5 or 7 rows of eyelet), though the overall length fits nicely over the wrist. It could also be fun to adapt this pattern into a hand-covering muffatee (ribbing at the wrist and maybe the fingers, eyelet over the hand, with a slit for the thumb) 

Thursday, October 30, 2025

Tablet-Woven Belt, 14th Centuty

Silk, made with 14 tablets. The pattern is a simple stripe (2 rows yellow, 2 rows green) based on a surviving fragment documented in Textiles and Clothing: Medieval Finds from Excavations in London (page 133, fig 100c) as a girdle or spur strap from the second half of the 14th century. It also appears in Dress Accessories (page 48). The original fragment is two colors: one source give pink and green/yellow, the other pink and yellow/white.


I wanted it to follow the narrow, long trailing belt styles popular in the 14th century (as on this statue or this surviving belt), which seemed congruent with the width of the surviving fragment. For the belt fittings, I used the "garter buckle and chape" set from Billy & Charlie's, which is meant to be 14th to early 15th century in style, and which fit the size of the band I was weaving.

The main lesson from this project was so fun that I got to learn it twice: re-read the instructions if you've set a project aside for months/years. For the weaving, I had gone so long between warping and weaving that I forget that 'using a finer weft on warp-faced tablet weave is necessary or else it will distort the pattern' is basically the first rule of tablet weaving. Alas, my clever idea of using the same silk for warp and weft to get cleaner selvedges also turned the lines of the pattern into zig-zags. And then when it came to installing the buckle and chape, I used an unnecessary extra pin (for which there really wasn't enough room), because there was a spare in the kit and I incorrectly assumed both should be needed. Again, if I'd taken a moment to check the item specs, this could have been avoided.

That being said, I did like working with the silk thread. The simple pattern made it very easy to bring this project out to public events, since it was easy to stop and start without losing count.

Monday, December 30, 2024

Guimpe, 1909

One project which did get finished this year was the proper guimpe or blouse for my suffrage train traveling suit.

I ended up using this diagram for a "tailor-made blouse" from The Elements of Dress Pattern-Making (1913) for the basic shape, including the open sides, three-piece construction, straight band collar, and use a waist-tie (fixed at center back) to hold the garment in place. The style inspiration was this illustration from the September 1908 issue of Good Housekeeping:  


I switched the sample pattern to a back-closure, giving a solid front for the vertical tucks. Estimating from the portions, I took the illustration tucks for ~1/4"-1/2", with one tuck width between each. Unfortunately, in the execution, I discovered that 1/2" tucks did not given the same fine effect, and I would have done better to use 1/4" tucks. The collar has three 3/8" tucks, backed with a flat piece of the same fabric.

Finished and newly-ironed guimpe.

My only other regret was not photographing the completed blouse before wearing it. Except for the twill tape tie, the blouse is fully made of a semi-sheer cotton batiste. It's lovely and light, and wears nicely, but it requires extensive ironing, and (even immediately after ironing it) photographs with all sorts of tiny wrinkles not evident to the unaided eye.

Saturday, June 1, 2024

Original: Printed Silk Apron, Early 19th Century

Found this intriguing piece in the Smithsonian (Cooper Hewitt, Smithsonian Design Museum to be specific). I wish their collection had more detailed descriptions: as at a first glance I took this for an embroidered silk apron, but the medium is listed as "cotton block print on plain weave." I'm now wondering whether it was printed in its final conformation, or if we're seeing motifs cut out and appliqued into position.

Apron, Swiss, early 19th century. From Cooper Hewitt, Smithsonian Design Museum.


Monday, April 29, 2024

Early 19th Century Pocket

   
Now every outfit has pockets.

Mea culpa for falling behind on posts. Again. I finally made up my long-planned late 18th/early 19th century dettached pocket last month, and then proceeded to not photograph it for some seven weeks.

Anyway, the patchwork is based on this early 19th century pocket from the Met. It uses larger square patches for the bottom of the pocket, and smaller squares and rectangles where the pocket narrows around the opening. As the Met has not kindly provided useful dimensions in their catalog, I used the measurements from a c.1840 pocket in the Old Sturbridge Village collection. I was able to draw a trapezoid from the height and two widths given, round the corners, and add a slit of the specified length. Very handy. I thought that particular example would suit this project, since it incorporates prints c.1790-1835, and mine mixes scraps from my Williamsburg haul with leftovers from a Regency dress (and chintz from a closer-to-mid-century quilting project). I lined the front and cut the back from a cotton ticking; the binding is narrower strips of chintz cut on the straight. Per both originals, I did not bind the outside edges.

I'm quite content with the capacity of this pocket, and have already used that to humorous effect in two museum programs. No one seems to expect me to pull a miniature sword out of my pocket (following the undersleeves, kerchief, hairbrush, sewing kit, knitting project, card case, pocket book, toothbrush, folding parasol, &c. This pocket can hold a lot). I do think I'll switch out the 1/4" cotton tape for a stouter article; it just digs in too much when worn without a corset, and I keep thinking the tape is going to break under the weight of items-that-fit-in-this-pocket.


Monday, April 1, 2024

Original: Net Cap, c1840


Cap, c.1840, in LACMA.

I really like how the texture of the different materials come through in this cap. But my count there's at least four different materials--scalloped lace, spotted net, striped ribbon, and a diagonal-striped fabric (bias strip?)--all in the same soft cream color. I think this adds a lot of visual interest to the cap, while keeping the overall effect light, airy, and subtle.

Friday, March 1, 2024

Original: Embroidered Pocket, 18th Century

Pocket, English, mid-18th century. LACMA.
 

I've been reading a lot of Laurel Thatcher Ulrich's Good Wives, and selected this month's antique beauty in honor of this passage at the end of chapter 1:

"Much better than a spinning wheel, this homely object [the pocket] symbolizes the obscurity, the versatility, the personal nature of the housekeeping role. A woman sat at her wheel, but she carried her pocket with her from room to room, from house to yard, from yard to street...Whether it contained cellar keys or a paper of pins, a packet of seeds or a baby's bib, a hank of yarn or a Testament, it characterized the social complexity as well as the demanding diversity of women's work."
Also, I really like the embroidery.

Tuesday, September 19, 2023

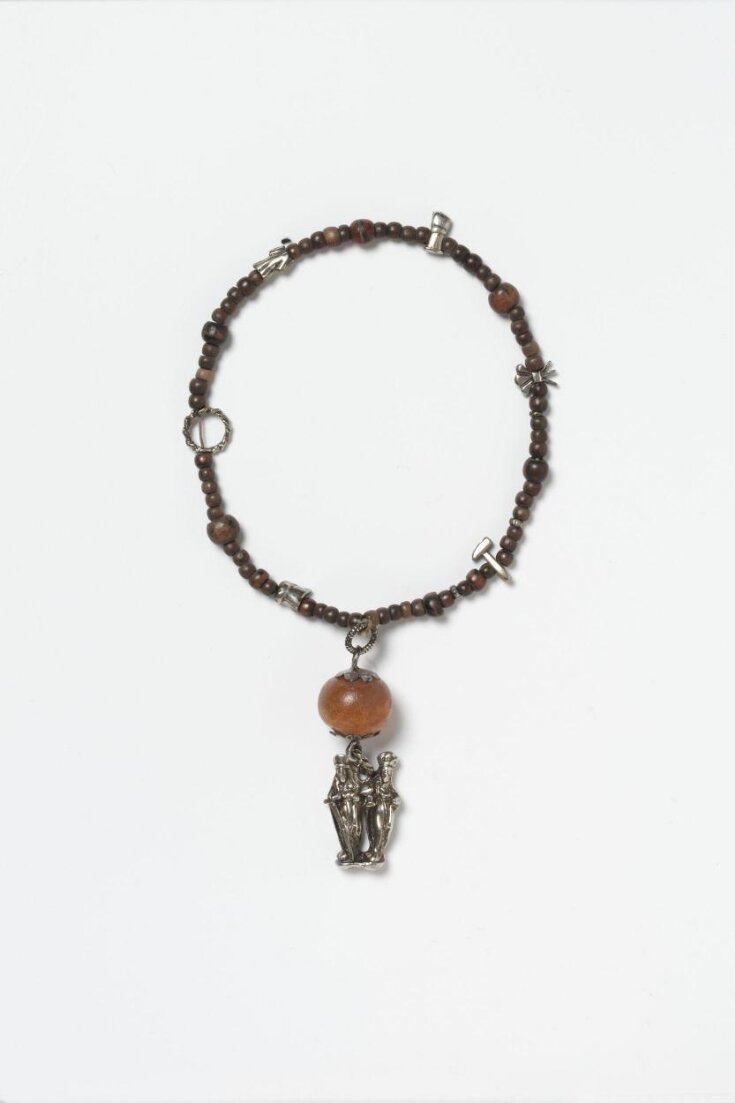
14th/15th Century Rosaries

Mostly, I made these because I wanted to do something with the wounds of Christ gauds that Billy & Charlie make. Nevermind that my main early modern impression is Elizabethan, a time and place in which owning rosaries was illegal and had been for two decades.

Anyway.

Related to that above factoid, I have so far found exactly three intact medieval or early modern rosaries in my usual British museum collections. The Museum of London has a very simple version, made as a small loop of wooden beads. This is by far the closest to the usual pictorial depictions (a very small string or loop of beads, usually held in a figure's hand). At the opposite end of the spectrum, the Victoria & Albert has a very elaborate gold rosary from the 16th century. And also this one:

Rosary/paternoster. German, 1475-1500. VAM

According to the museum's notes, this rosary has wooden beads, one large amber bead, and a set of silver gauds representing Christ's sufferings (nails, crown of thorns, etc). The pendant depicts Saints Barbara and Catherine.

Although the country of origin is given as Germany, I decided that this example would be a thematically suitable choice for using the gauds I had in mind (though they are only five in number, and are different shapes: hands, feet, and heart). So, for my first attempt, I tried to copy the original as closely as I could, using two sizes of dark brown wood beads, one larger amber-colored glass bead (the amber itself not being available), and a reproduction 15th century pewter badge of St. Barbara.

For the second--since I accidentally purchased two sets of the gauds--I decided to try a more goth version of the same design. When I was looking for examples of extant rosaries, I came across a number of individual beads, some plain amber or bone, others much more elaborate, including several which incorporate momento mori imagery such as skulls or even multifaceted deaths heads. The Met has a lovely example of momento mori beads in an extant paternoster. My version follows the same form as the first, using small bone beads with a skull-shaped bead half-way between each gaud; the pendant is an image of the crucifixion (based on 14th/15th century examples), with a large carved coral bead.

My replicas. Design from the 15th century VAM paternoster.
Components c. 14th-15th centuries.

For the stringing material, I plaited two linen cords, based on examples of fingerloop braid in Medieval Textiles. The book includes a few fragments identified as possible beading string, some narrow tablet-woven, others finger-looped (including a fragment with beads still on it, which is none other than the amber ones linked above). I couldn't get the woven version consistently round without the weft breaking on me, so I went with the fingerloop braids: one the usual 5-loop round I like for everything, but out of fine linen thread, the other a 3-loop variant of my own devising.

Silk beading cord, 3-loop linen braid, 5-loop braid.


Of course, when I went to string the beads, I found that neither braid was long enough for the wooden beads. Rather than making a 4th attempt, I simply strung those on my go-to size ff beading silk. The extra braid went into my stash of odd bits, and has already found a new use on my ear-scoop (which is really handy for cleaning one's nails of Faire dust).

All told, I like how both of these turned out. I wish I had had five more of the small wooden beads, as I ran out and ended up using a few large ones out of place. Proportionately, I think the bone version looks closer to the original, though the bone beads are almost too small to count by feel. If I was making a another one of these, I'd probably aim for the beads being a size larger than those small bone ones, with the mid-point beads closer to the size of the small wooden beads. Using smaller beads would also make the "amber" piece look larger by comparison, and thus closer to the original.


Wednesday, May 24, 2023

Medieval Drawstring Pouch

Continuing the catch-up posts, last spring I made some fingerloop braids at the Two Rivers Faire, with the intention of making a round purse based on some of the archeological examples from Amsterdam:

  • Leather purse (c.1300-1700), 11" diameter, 64 punched holes (~1/2" for a hole plus its adjoining space, punch size probably ~1/8 inch with 3/8 gap judging by how large the punched holes appear relative to the space between)
  • Another, 5.6" diameter, ~48 holes (~3/8" for hole plus space, holes probably ~1/8")
  • And a third, 12.5" diameter, ~72-74 holes (~just over 1/2" per hole, hole size nearing 1/4")

Of course, since embarking on this endeavor, the database has been updated to indicate that the ties were likely leather. Despite the simple design, my leather-punching skills proved inadequate, and I ended up letting this simple item linger in the To Do pile all winter. It's just a 9.5" leather circle, with 40 holes punched around the perimeter, and the striped fingerloop braid threaded through.

The pouch, open almost flat.

Closed pouch. Holds my replica coins and dice very well.


Sunday, May 21, 2023

Late 16th century Silk Codpiece (With Concealed Flask)

Remember those silk points from the lace bend round? Armed with those, a replica schnapps flask, a copy of The Typical Tudor, and a whole bunch of scrap fabric, I decided to embark on my most luridly-colored project of the year. So far.

Step 1) Tracing the Pattern. 

To fit the flask (and extra padding around it), I cut a muslin mock-up of the codpiece with very generous seam allowances, then pinned out the excess. The result was a that I ended up extending the side edges of the codpiece pieces by 1/4" (leaving the overall length the same).

With the new pattern, I then cut out all the requisite silk fabric, linen lining, and wool padding pieces called for in the pattern. Additional, I cut a linen interlining and gathered some smaller wool scraps for padding out the flask.

Materials all assembled.
 

Step 2) Initial construction.

 I didn't get a good picture of this step, but I started by decorating the outside silk piece with optional slashes, basting in the pull-throughs, and then joining the two silk halves along the center seam. The interlining also was also pieced at this time.

Step 3) Padding. 

To get the proper mid-16th century shape, the codpiece needs padding. To allow room for the flask, I made an abbreviated version of the prescribed pattern (using 2 thin and 1 thick piece layer of wool) to give a smooth line to the fabric. I set this into the fashion fabric, added the flask, then started cutting small pieces of wool to fill in the gaps.

Adding extra layers to surround the flask's neck and support the base.

Graduated circles to fill in the hollow under the flask.

Padding ready to be basted in place.


Step 4) Interlining.

With the wool padding in place, I attached the linen interlining. The idea was to give a smooth interior for the flask, so the interlining was cut to match the exterior; it's joined by stitching all around the outside edges, leaving the wool padding sandwiched between the silk and linen layers.


Flask in the finished interior.


Step 4) Lining and binding.

Next up, I need to add the final backing, which makes the other half of the actual pouch for the flask. It's also joined to the front along all three sides, those seams being then covered by a self-fabric bias binding. For the top, I hemmed the lining and bound the exterior separately, joining them with some blind stitching just near the corners.


Step 5) Eyelets.

To attach the points, I made a pair of eyelets in each of the upper two corners, going through all the silk and linen layers. This, of course, if how I discovered that the aiglets I used are a bit bigger than either of my fabric awls. Combined with the green silk having a non-woven backing (giving the fabric great body, but being bad for piercing), these four eyelets were basically the worst part of this project. Once done, the points were put through, and tied in jaunty half-bows.


Voila: one slashed silk codpiece with a hidden flask.


Conclusion: As a decorative gag gift, I'm quite happy with how this project turned out, and expect the recipient to come up with an amusing story about confiscating it from one of the Landsknechts (if not something more outlandish). I'm not certain this codpiece could actually work as worn, given the weight distribution and discomfort of the glass poking the wearer. If firming sewn along the side/bottom, I do think it could be attached to hose, though I would be concerned about the top gaping, possibly necessitating a third point at the center top. 

If making again, I'd add more padding to the back lining, possibly increasing the overall size of the item to ensure there's plenty of space to pad the back with enough material to get a smooth finish despite the rounded flask. If intended for wear, I'd want to both make up some regular codpieces for practice, and also test the aforementioned fit issues, with feedback from the wearer. 

 That being said, if any of my doublet-and-hose-wearing acquaintances are interested, I would like to experiment with making a comfortable, wearable, concealed flask codpiece.

Thursday, April 27, 2023

Apron, c.1952

 I decided an apron would useful in my modern kitchen, and so decided to make vintage one. As you do.

Since it's not for living history use, I just pulled fabric scraps out of my stash rather than worrying about accurate prints.

Scrap fabric. Finding two that didn't clash horribly was a challenge.


The illustration.

For a pattern, I went with the apron from the Haslan Books of Drafts No. 8 Lingerie (c.1952) No actually pattern instructions are included, so I cut the fabric as indicated, and just sort of pieced it together. I opted to use double layers on the waistband, bib, and straps, which allows most of the raw edges to be encased. I felled the seam on the lower section which joins the blue trim to the print.  The back isn't show in the pattern, so I simply joined the straps to the waistband; I'm satisfied with how it's working so far.

Finished apron.


Monday, March 6, 2023

A Lace Bend Round, 15th Century

Braid and finished point.

Braid #25 from Tak V Bowes Departed. It's a two-color braid of 8 loops, in a spiral pattern which resembles a 2-ply cord. This braid wholly uses exchanges, which was good practice, since I've mostly done 5 strand braids where you pick up the active loops with an empty finger.

I worked it in gold and black beading silk (size FF), and fitted the ends with aglets to make a pair of points. I chose this braid as I wanted the cord to fit into the aglets, though it was almost too fine in this silk. However, the knotted ends of the braids fit the aglets easily and was able to I stitch them into place.


Tuesday, January 3, 2023

More Muffattees on CSM

It's the 9th day of Christmas, and time for more Christmas presents:

Two pairs of knitted muffatees, both knit in the round in a ribbed pattern. One is pale pink and relatively light weight, the other sage green and heavier.
A Study in Gauge

When I was looking for muffattee patterns to adapt, the simplest was to simply knit a 3-3 rib to the desired length (either in the round or knit flat and then seamed). For examples, see "Lambs' Wool Muffatees" in Woman...An Epitome of Social Duties (1843) and "Plain Ribbed Muffatees" in My Knitting Book (1845) among others. 

Since I'm still not up to using the ribber on my Autoknitter, I decided to follow instructions from the 1868 Bickford Family Knitter instruction manual, which treats the mock-rib technique (removing needles) as equivalent to ribbing. However, I've found that 3-3 really doesn't looking like ribbing when worked this way. Fortunately, Mlle Riego's The Winter Knitting Book (1859) gives a "Simple Muffatee for a Gentleman" worked in 2-2 ribbing in the round, which I took as permission to do a 2-2 mock rib. Her version is doubled to create a lining and has no thumb gap, but considering the intended recipients, I decided to make those changes. [These are for my coworkers, who spend a lot of time typing in a cold building.]

The pink muffatees were knitted with a very light lace-weight wool from my stash, on a tension of 5L3 (if I recall correctly). I failed to note the tension on the green, which made with a heavier sport-weight wool from the stash). The pink ones ended up very lacy in their effect, particularly when worn, while the heavier yarn make the green look more like true ribbing.

Thursday, December 1, 2022

Original: Muff and Collar

Warm accessories for a cold December day:

Lambswool muff and collar, 1850s. LACMA.


Monday, August 29, 2022

Straw Hat, Rustic Plait

I really needed a lightweight sunshade for Faire, and decided to sew another straw hat. The inspiration for this piece was a particular painting (more on that anon), in which a peasant woman in a market scene wears a wide-brimmed straw hat with no appreciable crown. The hat instead looks like a very shallow basket turned upside down.
 
Top view of the hat.

The hat I made is fully hand-sewn from 20 yards of (commercially-plaited) straw in a 4-strand whole-straw rustic plait. It was sewn freehand, though I blocked the crown flat repeatedly during the early stages of sewing. The sewing process took about 34 event-hours, during which this hat was my main project.

I had intended to block the whole hat over a large, shallow dough bowl of the desired shape, but found that the plait tended to curve downwards naturally as I sewed it. In fact, all of the shaping after the first seven rounds (which were blocked flat until the hat got bigger than a dinner plate) came from the natural curvature of the straw as I tried to sew it as flat as possible. I'm tempted to use it for rougher working impressions at the Fort, since I can document the idea of a flat, home-made, straw hat as a harvest-time sunshade in the 1850s--and 'make a flat hat without a block' is precisely what I was doing here.


Side view showing the epic shape.

Despite the shape, I found that the straw tends to cling to my hair/coif, and will generally stay put. It's not up to really brisk walks, wind gusts, or bending over to drive tent stakes, but I managed to wear it a whole weekend without any fasteners. I'm tempted to add some woven tapes to the underside (probably to tie under my hair), but the hat does work as is. The whole-straw is heaver than the last hat I made, but lighter than any other reproduction hats I've handled (or any material).

I do not have documentation for the origins of rustic plait. My spreadsheet of Victorian sources does not include any citations which mention rustic as being new or name a date of origin; these same sources claim that whole-straw plaits originated in the 16th century, while split and double plaits were more modern inventions.

*I had remembered this painting as a Bruegel, though I can't find the exact image online, and will need to borrow the book I saw it in to confirm. In my search, I did come across other depictions of straw hats which aren't wholly dissimilar.

Sloping hats from Bruegel's Charitas (1559)

Most of Bruegel's peasants, however, favor straw hats like those above, almost conical except for a small, flat crown. The Corn Harvest shows two women wearing wider, flatter versions of the conical hat, one being distinctly straw-colored and the other black.

Wide hats in Bruegel's The Corn Harvest (1565)

Aertsen's paintings, in contrast, show deeper crowns on the wide-brim straw hats worn by many of the women:

The Vegetable Seller (1567) by Pieter Aertsen


Wednesday, August 10, 2022

Plain Coif and Forehead Cloth


Plain coif and forehead cloth.


More faire-related wardrobe additions. Having decked one coif and forehead cloth in lace and (begun) embroidering the other, I found myself without any fitted headgear appropriate to my lowly social station. That is, it's too hot to wear a respectable late Elizabethan ensemble, so I need a plain coif  to go with my kirtle/smock/apron combo. I could just tie a rail over my hair...but coifs are more fun.

I used a light-weight white linen for both, with bleached 1/4" linen ties on the forehead cloth and a linen cord for the coif.