Tuesday, August 25, 2020

Embroidered Coif, Design Test

Rectangular piece of flat linen that has been cut and hemmed with curves along the two short sides. Three repeated motifs make an embroidered  stripe down the center. Each motif is an S-shaped vine connecting an oak leave to a cluster of three acorns. The leaves and acorns are sparsely filled in with spaced stitches in lattices, lines, and alternating X and O shapes.
One column down, "2(/2) and 6" to go.

And the coif embroidery commences. The garment itself is based on original coifs dated c.1590-1620 in Patterns of Fashion 4 (it's specifically this coif, though the hair-dressing was less wrong in the version with lace).

The design I selected is an oak-leaf and acorn motif from A Schole-House For the Needle (1624, some designs as early as 1540s). The book only gives the figures themselves, leaving it to the embroiderer to determine stitches and fill effects. I therefore consulted  Elizabethan Stitches by Jacqui Carey for insight into the stitches and how to apply them. While full of lovely examples, and very detailed analysis, all of the original coifs in the book were covered in polychrome embroidery, many with metallic accents. This has given me a lot of ideas about the next coif I hope to attempt--using the wider braided stitches for the vine-like pattern elements and dense infilling of the motifs--but it isn't the single-color, more delicate blackwork effect I want for this project.

The aesthetic I'm looking at is more like this coif and matching forehead cloth in the Met, where the lines are fairly narrow, and the infilling is pretty open (quite suitable for differentiating space in monochromatic floss):
A linen coif displayed on a head form. Coif fits closely around the top, back, and sides of the head; it is decorated all over in an embroidered botanical design.
Late 16th century blackwork coif in The Met.
Looking closely at the coif, the lines seem to be done in a stitch with some width to it, making almost a row of connected dots rather than a long line (possibly a chain or coral stitch, as opposed to a stem, Holbein or backstitch); on the close view of the forehead cloth, it rather looks like a chain stitch. The coifs and forehead cloths on Elizabethancostume.net mention stemstitch, backstitch, and chainstitch among the techniques, though the images are too small to determine which stitches are used where. The amazing squirrel smock, however, does have close up images showing its embroidered motifs are outlined in a stem stitch, with no infill. In contrast, the polychrome coifs in Elizabethan Stitches use wider plaited stitches for most vine-like elements, with chain stitch among the many filling options.

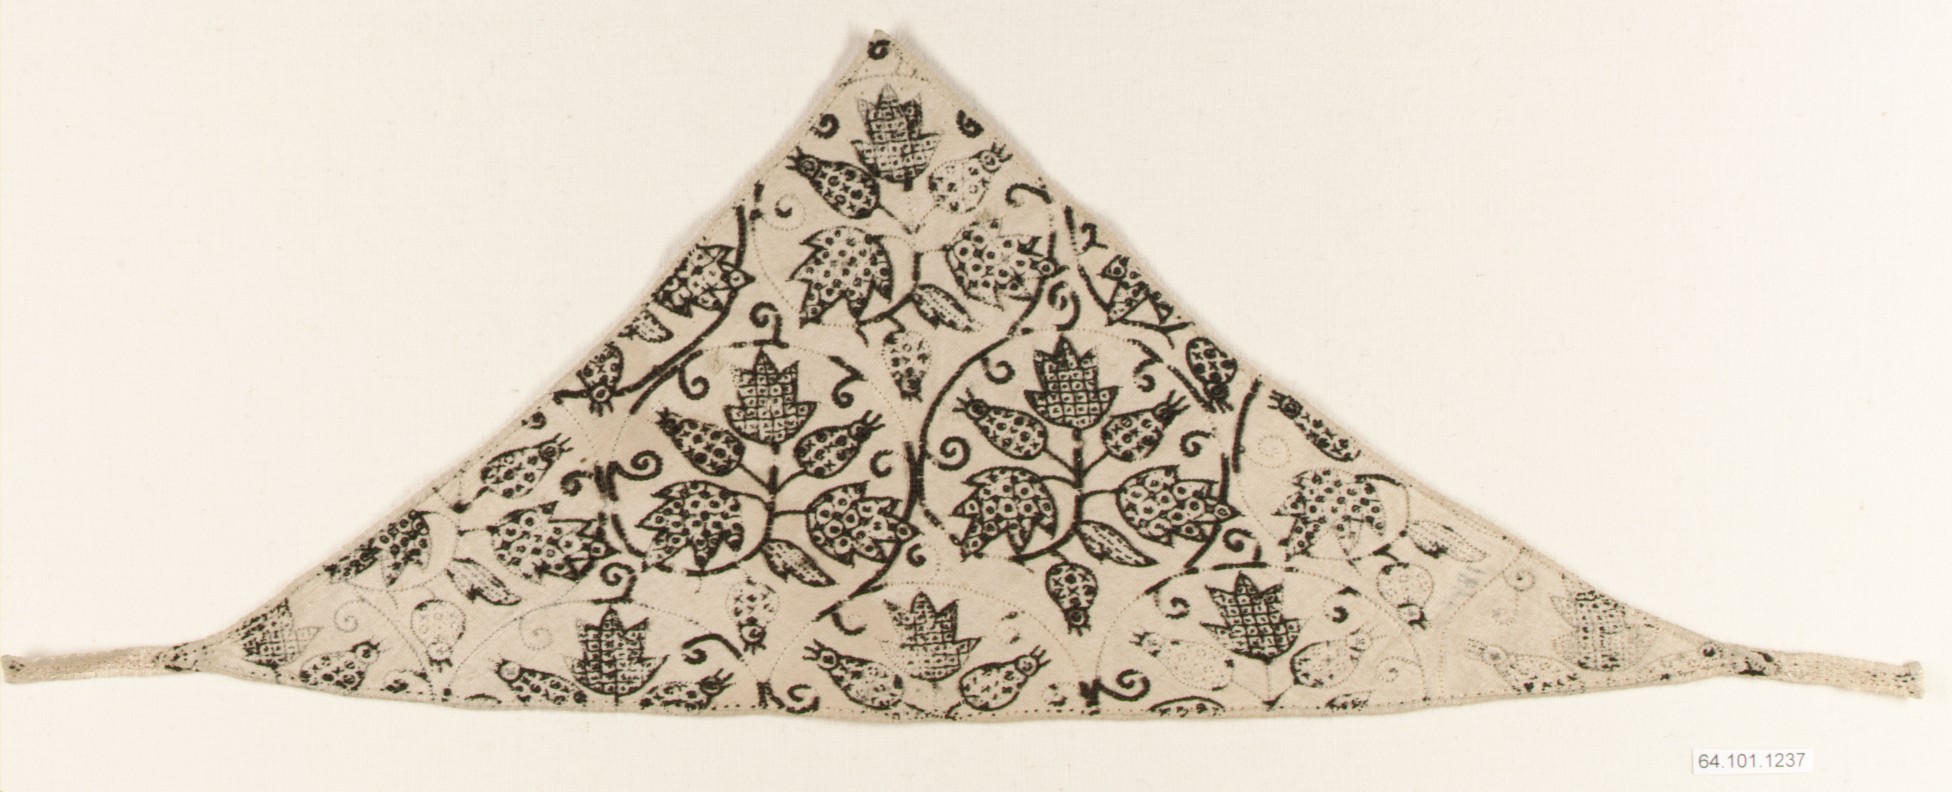
A matching forehead cloth, with good close-up images of the stitching.

In addition to the possibly-chain-stitched outline, the Met coif uses a variety of open filling patterns. The largest leaf motifs have square or diamond grids of a narrow stitch, with dots in the voids (and on the nodes of the diamonds); the fruit/flower element has alternating Xs and Os; and the smallest leaves have rows of parallel dotted lines (suggesting a running or half backstitch).

I decided to copy the squirrel smock and use a stem stitch for the vines and outlines. I borrowed the Met coif's alternating 'noughts & crosses' on the oak leaves, with its broken line pattern on the acorns to suggest the lines on a real one. For the acorns caps, I initially tried infilling the whole cap with a detached buttonhole stitch (from Elizabeth Stitches), but even on such a small area, the effect was too dark. I decided against using a herringbone or other dense space-filling stitch for the same reason. The second method I tried was using spaced Xs in reference to the crosshatched texture of an acorn cap. This worked a bit better, but didn't quite capture the true look of an acorn, while also not affording as much contrast as I would like between the caps and the other parts of the design. At that point, I decided to attempt a diamond grid, like the Met coif (but set closer and thus without the dots). I expected a backstitch to get too messy (it's not my best), and so made each diagonal a whole stitch (tacked at the intersections so the floats won't catch as easily). As far as I know, this is my own invention, but it gives neat, reasonably strong straight lines with minimal waste of silk on the verso, so I think it's in the spirit of the 16th-17th century at least. The buds or immature acorns have chainstitch infilling.

Blackwork embroidery of two vine motives with acorns and oak leaves, and two real acorns for comparison.
Another thing I learned: changing stitches until you get one
you like is apparently a-ok in this sort of work.

The fabric is IL020 (3.5 oz handkerchief weight linen) from Fabric-store.com; the thread is Soie d'Alger seven-strand silk floss from Needle In A Haystack. Even the single strand I'm using looks too heavy up close on the linen, so I'm tempted to try my next overly ambitious embroidery project on the IC64 'luxury' mid-weight. It's fine, but a bit denser, and should make up very nicely perhaps in colored floss with that gold lace...

Monday, August 24, 2020

HFF: 4.17 In a Jam


Detail of an 1850s painting showing a table laden with food, and a woman's hands holding a spoon over a dish.


The Challenge: In a jam. Make jam, jelly, or any sort of preserve.

The Recipe: Preserved watermelon rinds, from Miss Beecher's Domestic Receipt Book
Preserved Watermelon Rinds. This is a fine article to keep well without trouble for a long time. Peel the melon, and boil it in just enough water to cover it till it is soft, trying with a fork. (If you wish it green, put green vine leaves above and below each layer, and scatter powdered alum, less than half a teaspoonful to each pound.) 
Allow a pound and a half of sugar to each pound of rind, and clarify it as directed previously. [Summary: Boil together 1 cup of water per pound of sugar, plus 1 egg white per 3 lbs sugar; skim as it boils, and again after cooling.]
Simmer the rinds two hours in this syrup, and flavor it with lemon peel grated and tied in a bag. Then put the melon in a tureen and boil the syrup till it looks thick, and pour it over. Next day, give the syrup another boiling, and put the juice of one lemon to each quart of syrup. 
Take care not to make it bitter by too much of the peel. Citrons are preserved in the same manner. Both these keep through hot weather with very little care in sealing and keeping.

The Date/Year and Region: 1856, New York 

How Did You Make It: I started by slicing up a watermelon, and setting aside 2 lb of the rind (in approximately 1"-2" wide pieces, though the directions don't specify). Being short a lemon, I set the pieces aside in water for 1 day, then boiled them until soft (~35 min). I did not use the vine leaves and alum for coloring. 

[When I started this, I read 'peel' as 'remove the rind from the delicious red part'. About halfway through I realized it probably meant 'remove the hard green peel, leaving the white-green rind'. Although it never says specifically to cut the melon into the pieces or remove the inner flesh, I think the mention of layers strongly indicates that we're dealing with pieces of melon rather than a single whole melon, and that the term 'rind' indicates the red flesh shouldn't be used.]

While the rind was boiling, I separately boiled 3 lb of sugar in 3 cups of water with 1 egg white. As it boiled, I skimmed the liquid, then let it cool for 10 minutes and skimmed it again. Meanwhile, I juiced a lemon, cut the lemon peel into small strips, and put the peel into a small muslin bag. I then drained the watermelon, poured the sugar syrup over it, added the bag of lemon peel, and simmered it all a further 2 hours. I transferred the rinds and syrup to a ceramic bowl, and covered them loosely. 

The next day, I removed as much syrup as I could from the bowl (maybe a bit over half of it--it was very thick, and much of it was sticking underneath the rinds, adhering them to the bowl and each other), and boiled it again for ~10 minutes. I then added 3/4 of the juice of 1 lemon to the syrup, poured it back over the rinds, and let it sit another day.

At that point, some of the syrup had started crystallizing (mostly along the top, where the reduced syrup was introduced), while elsewhere (especially down low) the syrup remained very viscous and sticky. The rinds themselves had darkened after the initial boiling, and seemed very well encased in sugar (taking on the gelatinous texture of candied citrus peel).

Time to Complete: Several days.

Total Cost: About $4 worth of sugar and lemon for 2 lbs of rinds (otherwise a waste product)

How Successful Was It?: Er... I need to research this one further. Since I love watermelon, and even a small melon apparently leaves 3-4 pounds of rind otherwise destined for the compost heap, I'll probably be tempted to try this recipe again. That being said, neither the taste nor the texture of the preserved rinds is really compelling me to try this again.  Removing the green rind in advance will probably help with the texture issue (and the unappetizing appearance).

The texture, as previously mentioned, is sort of a solid gel (?), reminding me of candied lemon peel or ginger that hasn't dried out. However, the syrup around it has semi-hardened into a very thick, viscous material, more an amorphous solid than a liquid (like a soft taffy). The flavor wasn't quite watermelon or lemon, but definitely sweet.

Overall, this was a messy process that produced an odd food that I'm not sure if I like or what to do with. The recipe does reference to citron being preserved in the same way, which makes me wonder if preserved watermelon rind could substitute for preserved citron in some of my other receipts.

How Accurate Is It?: There's three ingredients, and the technique is basically 'boiling sugar in water' (which probably should have been my first warning....boiling sugar rarely works well for me). So, it's usual caveats about using an electric stove and modern varieties of fruit.


Yellow ware pottery bowl with chunks of watermelon rind in a sugar syrup.
Pouring sugar syrup over the rinds. 

A pink transferware plate piled with small pieces of dark green watermelon rind, all shiny with sugar syrup.
Preserved (basically candied) watermelon rinds.


Sunday, August 16, 2020

Hypocras

Tudor Travel Guide held a virtual conference earlier this summer to mark the five hundredth anniversary of the Field of the Cloth of Gold. The tastiest session was on preparing Hypocras (spiced wine). I usually make mulled wine with a red (and obviously served hot), so this version of cool spiced white or red wine is a fun change of pace.  It also seemed fitting to mark the weekend I otherwise would have been taking down tents at Faire.

I started by grinding up 2 cloves, a piece of cinnamon (aiming for ~1tsp ground), a little ginger (also aiming for ~1 tsp) and 2 black peppercorns.

A small marble mortar with the pestle laid across it; inside the mortar are small pieces of ginger root, cinnamon bark, and whole cloves and black peppercorns.
I've never actually ground cinnamon bark before.
It was easier than breaking off the initial pieces.

This goes into ~2.5 cups white wine with ~1/4 cup granulated sugar.

A quart mason jar containing wine and spices, the liquid made slightly darker by find particles suspended in it.
Very appetizing appearance.

After a day or four soaking up the flavor, the solids are filtered out, and the hypocras is ready to serve. One benefit to grinding the spices myself is that the coarse pieces sank to the bottom, and I was easily able to decant the wine. When I first tried this recipe, using pre-ground spices, I had to wait much longer for the wine to filter through all the fine sediment.


Renaissance-style painted pitcher, with a bowl and platter in the background, and a historic glass goblet full of white wine.
When done, the hypocras looks just like normal wine.


The taste is of a sweet white wine with spices; the cinnamon is the dominant note (I think I added a touch too much), but the other flavors layer on some complexity. The closest comparison I could make is to sangria, because that's the only other cold flavored-but-not-fortified wine I'm familiar with. The presenter mentioned Rhenish (white wine from the Rhineland) and claret (red wine from Bordeaux) as the usual varieties for hypocras in 16th century England. I ended up using a sweet local white wine, and while it was fine, I think a drier variety would work better (otherwise I need to reduce the amount of sugar when using a sweet wine). When I made this before, I just used a random white I had on hand, and it was also quite palatable.

Friday, August 14, 2020

Belt for 16th Century Wear

Another step towards looking slightly less disreputable.

On the one hand it feels like cheating to 'make' something by assembling it from prefabricated parts. On the other, I drilled metal for the first time, so it feels like an accomplishment.

The buckle and chape are the 'rose' style (~16th century) from Billy and Charlie's Finest Quality Pewter Goodspurse hanger from the same (undated).  I used a 1/2" leather belt blank, and so it was mostly a matter of drilling some holes, hammering six rivets, and stabbing the leather with an awl repeatedly.

Now to finish the purse...

Wednesday, August 12, 2020

Tending the Kitchen Garden, August 1819

I came across this while researching produce seasonality in period recipes, and was very intrigued by the year-round garden work scheme. Here's what we should all be doing in our kitchen gardens for August. If it's 1819.
Sow some spinach and onions on a warm border. They will live through the winter, and be valuable in the spring. In the second week, sow cabbage seed of the early kinds, and the week after, cauliflower seeds the plants of which must be nursed under hand-glasses during the winter. A week afterwards, another crop should be sown in case of accidents to the first. This last crop should be defended by a hot-bed frame. Sow the cabbage and brown Dutch lettuce on a warm sheltered piece of ground. Transplant some of the earlier lettuces to warm sheltered borders. Take up garlick, onions, rocambole, and shalots, and dry them for winter use. 
-Elizabeth Hammond in Modern Domestic Cookery, and Useful Receipt Book (London, 1819)

Tuesday, August 11, 2020

A Very Good Idea

  1. One linen coif.
  2. Five skeins of embroidery silk.
  3. A Schole-House for the Needle filled with early 17th century designs.
  4. A lot of free time.
A plain linen coif next to an open book of embroidery patterns, with several skeins of silk. An iron and a large pincushion in the background.
Not sure how this is going to turn out, to be honest.

Monday, August 10, 2020

HFF 4.16: First Fruit

Detail of an 1850s painting showing a table laden with food, and a woman's hands holding a spoon over a dish.


The Challenge: First Fruit-- Cook with fruit or the first fruits of the harvest.

The Recipe: Rhubarb Tart from Practical American Cookery and Domestic Economy (1860)

RHUBARB TART. Take some stalks of a good size remove the thin skin and cut them in pieces four or five inches long; place them in a dish and pour over a thin syrup of sugar and water cover with another dish and simmer slowly for an hour upon a hot hearth; or do them in a block tin saucepan. Allow it to cool, and then make it into a tart; when tender the baking the crust will be sufficient. A tart may be made by cutting the stalks into pieces the size of gooseberries and making it the same way as gooseberry tart. [The gooseberry tart is just 'put whole gooseberries or gooseberry preserves into a crust, and by implication add sugar to the whole fruit because we mention it being easier to get right by using preserves'.]

Most of the tart receipts in this book are sparse, so I looked to the most detailed one for reference:

APPLE TART. Use good tart apples. Peel slice and stew them with a teacup each of water and sugar to a quart of sliced apples add half a nutmeg grated a saltspoon full of salt and a little grated lemon peel or lemon extract or half a teaspoon full of ground cinnamon; set them to become cold; line small pie plates with rich pie or light puff paste; put in the stewed apples half an inch deep; roll out some of the paste, wet it over slightly with the yolk of an egg beaten with a little milk and a teaspoon full of sugar, cut in strips the width of a finger and lay it in bars or diamonds across the tart; lay another strip around the edge trim off the outside neatly with a sharp knife and bake it in a quick oven until the paste loosens from the dish. Tarts may be made of other fruits and sweatmeats in a similar manner 

The Date/Year and Region: I opted for the 'stew the rhubarb' technique, though I did cut the fruit into smaller (~1")  pieces, because I have issues with variable texture pie/tart fillings and wanted it as homogenous as possible. As the 'thin syrup' is not defined, I used 1 cup of water and 1/2 cup granulated sugar to simmer the cut pieces of 4 rhubarb stalks (each approximately 24"). 

While that was cooking down, I prepared a puff paste using the only receipt in the book (the one for pasties) at a 1/2 scale: 1/2 lb flour and 1/2 lb butter (half salted half not) with 3/4 c of water. I worked half the butter into the flour until crumbly, then added the water gradually and kneaded with a very light hand. It was still a bit floury when I started rolling it out and folding the rest of the butter (in thin slices) into the paste, but eventually came together.

I cut a round of paste large enough for a pie tin, and then cut small shapes from the remainder; both of these baked 20 minutes at 350F. Once cool, I strained the excess liquid off the rhubarb, poured it into the tart crust and made a top 'crust' using the cooked paste shapes. This is a variant I've seen in other books (and 'paste for edging dishes' does appear here, so decorating with paste is on the writer's radar), which I chose to use because it allows both top and bottom crust to be baked in advance.

Time to Complete: 1 hour simmer the rhubarb, 10 minutes to roll out a puff paste, and 20 minutes to cook it, 5 minutes to assemble.

Total Cost: *mumble*

How Successful Was It?: Better than similar dishes I've attempted. The texture of the rhubarb is fine, and the taste tart (I'd be tempted to double the sugar next time as an experiment). Considering all the extra liquid, I'd also be tempted to use less water to start. I though the crust looked a little too big for the amount of filling, and would consider using an extra stalk or two next time, but the proportion of rhubarb to paste is working for me, so perhaps not. The crust turned out perfectly, though I think an extra minute cooking time would please a broader audience.

All told, this made up easily without being boring and tastes nice. I will be adding it to my repertoire, in the event that rhubarb every makes an appearance at a cooking event. 

How Accurate Is It?: I mixed salted and unsalted butter (ran out), but as both are mentioned in the paste receipt, I think that's alright. The top crust I already explained, and think is within period norms. The receipt didn't mention other spices or flavorings (unlike the apple tart), so I didn't add any, but I think it worked just fine.


A pie tin containing a pink tart set in a thin pastry crust, with four-pointed stars made of pastry around the edges and dotting the surface.
Rhubarb Tart. The color is a little more appealing in real life.


Friday, August 7, 2020

Nisqually Brigade

It is odd having a year without a reenacting season. Today would have been set-up for the Nisqually Brigade, the second weekend in August.  With the camps set up during the day, Friday evening is the time to relax, greet old friends, and sing all our bawdy period ballads around the campfire (in those years without a burn ban).  

A small book bound in marbled paper and leather, next to a partial necklace of glass trade beads with a silver beaver pendant.
One pair of beads for each Brigade and each camp, 2014-2019.
And my song lyric manuscript.

Wednesday, August 5, 2020

Staying Cool

Since most of us don't have an ice-house handy at summer events, here's documentation for evaporative cooling as a period technique for cold beverages:

TO MAKE WATER COLD IN SUMMER--The following is a simple mode of rendering water almost as cold as ice:--Let the jar, pitcher, or vessel used for water, be surrounded with one or more folds of coarse cotton, to be constantly wet. The evaporation of the water will carry off the heat from the inside, and reduce it to a freezing point. In India and other tropical regions, where ice cannot be procured, this is common. 
--The Golden Receipt Book (London, 1848)

Saturday, August 1, 2020

Originals: The Great Sleeve Collapse, 1837


Dinner Dress, c.1837 from The Met
This dress caught my eye for the tight shaping of the upper sleeve above the large puff. It captures an interesting moment right as the large sleeves of the early 1830s start to collapse into the tighter gothic lines. The subtle moire pattern on this silk is definitely worth looking at the close-up. There's also some very intricate self-fabric details: vandykes along the wrist and neckline, dense vertical tucks on the upper sleeve and horizontal ones over the bust.