Wednesday, June 18, 2014

New Berlin Work Project-- A Flag Needlebook (Research Post)

First, from the New Hampshire Historical Society [1963.062.02] (c. 1861-1863)

Observations:
Worked in tent stitch (the Lady's Self-Instructor in Millinery and Mantua-making... (1853), states that Berlin patterns are always given in tent stitch, but may be worked in cross stitch).

Stitching dimensions: 39 sts tall, approximately 46 sts wide, blue square is 21 x 23 sts.  According to the LS-I, Berlinwork should be done on either 18-count or 10-count canvas--which would give the total dimensions 3.9" x 4.6" when done in the latter, or about 2.2" x  2.6" in the former. The museum gives the case dimensions as 3" x 3.9", which indicates a canvas size of 12-13 stitches per inch.  Apparently, the LS-I isn't definitive for 19th century canvas sizes...

13 "stars" in a grid pattern 3/2/3/2/3, with solid blue border of 2 sts on the sides and 3 rows top & bottom; stars made up of 5 sts in a + shape.

Inside cover appears to be a white silk with woven design.  Red, white and blue 'pages' have a matte finish, and are likely (wool) flannel--the recommended material for needlebook pages in both The American Girl's Book and The Girl's Own Book.  The pages are different sizes and have pinked edges.  The museum gives the material as "textile, wool, silk".

Ribbons in red white and blue adorn the spine.  These will be silk; the upper white loops appear to be the same width as 6 stitched rows, making the ribbon about 1/2" wide (varies with canvas size); the red ribbon at the lower bow looks even narrower.  

The large leaf of blue flannel forms the the back cover, which would explain why it's larger than the other two leaves (same size as the front cover), and why there's a strip of blue along the left-hand edge in the top picture.  A red decoration (embroidery? applied trim?) follows the top and bottom edges of the back.

It is not clear whether the canvas in the front cover has a solid support underneath it.  Looking at the worn places, it seems like the white silk backing is visible through the canvas, though it could be a white paper/paste board in between the two.  From my reading, it seems more typical to make the covers of needlebooks out of pasteboard, with a decorative fabric covering rather than just using the fabric alone.  That being said, my berlinwork cardcase does very well with only silk-backed canvas.     

Second: 35-star needle book (c.1863-1865)

Total size: 26 sts x 50 sts; blue section 14 sts x 20 sts.  Possibly worked in tent or cross stitch (hard to tell).  Stars worked as single cross-stitches in five rows of seven (one-stitch blue boundary between stars; two rows/columns solid blue border).  Each stripe is two rows of stitching.  Dark blue ribbon on binding.  No view of pages or back cover (if present).


Tuesday, June 10, 2014

Pattern Review: Kayfig Wrapper (KF611)

I just made up this pattern, and thought I'd toss out a few thoughts on it.

KF611 is a wrapper/morning dress pattern c. 1855-65.  Wrappers are (relatively) loose garments for 'undress'--the sort of thing you'd wear to breakfast, or around the house.

First, pictures:


Kayfig wrapper, with contrast lining visible.


Wrapper front (KF611).


Open coat sleeve from Past Pattern #702.


This is made up in a reproduction cotton print, with a solid lining in two colors; in the first picture, the lining has deliberately been turned out to show off the colors.  The sleeves above are not from the wrapper pattern, but instead are the "modified pagoda" sleeves (open coat sleeves) from Past Patterns #702.  The wrapper pattern includes bishop sleeves, but I made this up for a friend who preferred the open sleeves.   

What you get in the pattern:
Book of Instructions
2 pages of pattern pieces 

The pattern is printed on printer-weight paper, not tissue-paper.  The pieces are multi-sized, and the sizing is apparently based on custom slopers rather than being larger or smaller versions of a single garment (according to the information given).  All I can say is that in making it up, surprisingly little alteration was needed to be made for a good fit in the back and front lining.  The wrapper is fitted in back just like a normal c. 1855-65 dress, as is the front lining of the bodice (darted to fit).  The front fashion fabric, obviously, is very loose, being pleated only at the shoulder, and then contained with ties at the waist.  Do not panic about the lack of skirt pattern pieces--being large rectangles, instructions are given for cutting a custom size rather than printing large sheets of rectangular paper.

The booklet can be intimidating--it's 38 pages long.  It's also full of helpful information, including 6 pages of period references & pictures of antique garments, 14 pages of technical information (including pattern terminology, fitting advice, and period sewing techniques), and 15 pages of detailed cutting and construction instructions, often with a choice of techniques.  For example, three different methods of finishing the hem are presented; it also has two different styles of sleeve cuff, and so on.  The remaining pages have attributions and a bibliography for the research.  Illustrations accompany each step of the instructions.

I'm of a mixed mind on recommending this pattern for beginners.  On the one hand, I've heard of others being stymied by the instructions--either overwhelmed by the length, or confused by the construction of the front panel.  On the other, I found it a really comprehensive walk-through of period dressmaking techniques.  The technique pages, in my opinion, would be very valuable to someone who's starting out on mid-Victorian dress-making, even if the sheer amount of information is intimidating.  If you already know how to gauge a skirt, make piping, and so on, you won't need this information as much.  For what it's worth, I made my first dress 9 years ago, and I still found a new piping technique in the instructions (which I am so using on my next dress).  

There were one or two tricky moments in making up this pattern: I couldn't tell at first how the front piece would fit in over the bodice lining, but the second I laid it out according to the instructions, it all 'fell into place'.  If I were making it up again, I think I'd play with where exactly the front panel is attached to the front bodice, in order to change the fall of the pleats.  Attaching the piping/binding around the neckline also had some difficult moments around the shoulder seam, as that's where the two different front pieces met the back and one of those pieces needed to be separate, the other bound.  I ended up whipping the edge down by hand, and was still sort of winging it.

On area where I found the instructions very valuable was in giving the order in which things needed to be done.  Since I've usually worked with "big 3" patterns, I'm used to taking the pieces, tossing the instructions, and then making things up to fit based on my own reasoning and what I've read about period dressmaking techniques. Here, it's very important that the bodice, back skirt, front panels, etc. get attached in a very specific order, so that you're hemming it all the way around at one time, and getting the pleats in the shoulders set properly.  With that in mind, it's very easy to see how and why the instructions are arranged, even if, at first, you're wondering about setting aside a half-sewn bodice to start gauging a skirt.   

Most of the wrapper is machine-amenable.  While hand-sewing is suggested for easing the armhole sewing (piping and sleeves), it's only really required on the skirt gauging.  Additionally, I did it along the hem facing, and to whip-stitch the raw edge of the waist and neck piping.  The rest is easily sewn on machine, though an ambitious person could sew it by hand.  Sewing machines were available to the public by this time-period, so both methods can be authentic.

Mention is made of different trimming options for wrappers, but no specific methods/styles are given in the instructions themselves.  The research pages, however, show many variants including contrasting front panels, decorative bows, and self-fabric ruffle accents.  I think this is an interesting compromise for avoiding the dreaded 'cookie cutter' look, while making it easy for those-so-inclined to add their own authentic touches.

Pattern Score: 4.5-5 stars
Difficulty: Intermediate or ambitious beginner (there's lots of good information for beginners, but it's not an easy garment exactly)
Accuracy: Very high.  Based on original garments, and fully documented with information on making and wearing.
Strongest Impressions:  It went together well, and I appreciated all the research that was presented.  The many little variants make it easy to customize, though most of them aren't dramatic enough to change the look of the dress/wrapper.  The couple of tricky spots and the large size of the instruction book may intimidate newer sewers, but neither of those is insurmountable.  Beginning sewers should be ready for a challenge and not working on a tight deadline; those with experience constructing dresses of the period should find it very familiar. 


Monday, June 9, 2014

Plaid Sunbonnet III: Putting it all together

Continuing from parts I & II. I did most of the hand-sewing at Living History events (read: Ft. Nisqually), so there's aren't may pictures of the process.  Nonetheless, here's how it went:

First thing, I corded the brim.    The rectangular brim piece was cut with the front on a fold, giving a double layer.   The first cord was paced between these two layers, snugged up against the fold, and held in place with a small running stitch.  The next cord was sandwiched between the layers--snug against the previous row's stitching--and was secured in place with another row of running stitch.  Following some quilting advice, I concealed the thread-ends in the cords, which proved a tidy arrangement.  I opted to do twenty rows of cording over the front brim (the inspiration bonnet only has 11, but seems to have used a thicker cord).  For the second set (5 cords, up from 3 in the original), I ironed the brim flat, and marked a stitching line 3" away from the finished cording. After doing a running stitch along that line, I continued cording as before.

The brim prep complete, I trimmed the side edges even and prepared the other pieces.  A wider running stitch was made along all sides of the crown piece, so as to gather it (one thread was used along the sraight edge, another over the curve, so that the two could be gathered separately).  The curtain was cut with a selvage along the bottom (so it needn't be hemmed), but the short edges both needed to be finished with a small whip stitch and the top needed to be gathered.  The ties were narrow-hemmed along three sides (both long, one short).
Pieces for 19th century corded sunbonnet.
The pieces, ready to be assembled.
First up, I sewed the brim to the crown--the curved side(s) of the crown to the back edge of the brim, parallel to the cording.  I marked the centers of each piece with pins, then sewed then together with a half-back stitch, adjusting the gathers in the crown to fit.  Despite the added fabric in the crown, these pieces fit together smoothly, with less gathering of the crown than expected.  I blame the bias-cut brim.

Next, I tried on the crown/brim piece, and adjusted the back gathers on the crown (on the straight edge), and tied down the gathering thread to keep them in place. Then, the gathered, raw edge of the curtain was pinned & sewn to the raw edge of the brim/crown piece.  Again, a half-backstitch was used.

Lastly, the ties were added.  The raw edge of each tie was folded over twice, then attached to the inside of the brim with small stitches.

Voila:
Completed plaid sunbonnet, for 19th century living history.
Finished Sun Bonnet
  

Thursday, June 5, 2014

On-Line Patterns for Clothing (American Civil War/ Mid-Victorian)

Getting into this hobby as a broke high school student, and again as a broke grad student (and now continuing as a broke un/underemployed former student), I've spent a fair amount of time hunting for free patterns and resources on-line.  What follows is a mixture of modern instructions from very generous, reputable persons and original patterns from the 19th century (these are not always easy to work with, especially for a beginner).  Since I mostly do 1855-1865 women's clothing...most of the links are for women's clothing of the 1850s and 1860s.

Useful for New Reenactors

The VERY FIRST Thing to Read Before Making/Buying Women's Clothing:
Your Best Bet Wardrobe by Elizabeth Stewart Clark

General Advice on All Things (but especially non-military clothing for men, women and children)
The Compendium The Sewing Academy Forums
Atlantic Guard Soldiers' Aid Society Links (Go for the first person worksheets, stay for the widespread advice)


Patterns & Instructions (& Some Advice) 

Hats and Bonnets
Cost-effective Headwear for All Seasons (advice thread)
Original Soft Bonnet/Hood Patterns On-Line (with my commentary)
Romantic History Hood Pattern (printable, modern instructions)
1861 Knit Hood (Original pattern with modern commentary)

Hair-styling
My Hair Tutorials
Video: Basic Hair (with some alterations to the side-styling, this will get you through much of the 1850s and early 1860s)
Hair Advice (Thread)
Later Victorian Hairdressing (Beautiful step-by-step pictures, but about 15 years post-ACW)
Video: Rag Curls

Chemise Patterns
Mrs. Clark's Chemise Pattern
1860 Chemise Pattern

Drawers Patterns
Draft Your Own Drawers
1863 Drawers Diagram

Corset Patterns
Stays in The Workwoman's Guide (1838/40) [page 80-81, diagram page 327]
"Practical Instructions in Say-Making" in Godey's (1857) [diagram and instructions pages 165-6]
1868 Corset Diagram (Patent)
1869 Corset Pattern

Skirt Support Instructions
A Covered Cage
Cage Crinoline
Another Cage Crinoline (Thread)
Corded Petticoat (Thread)

Petticoat Instructions (Do not wear a hoop without a petticoat--it will look bad)
A Petticoat

Note on skirt supports: Hoops appear in European high society in 1856, and spread quickly--by 1857-8 they're already on the westward trails & America's Pacific coast.  By the early '60's hoops are ubiquitous.  If you're doing pre-'56 events (or are doing 1856, but aren't the Empress Eugenie), use a corded petticoat.  If you're in the 1860s, use a hoop, or select a non-hoop impression (nurse, servant, cook).  Keep hoops away from open fires.

Dress (Bodice) Patterns
Original 1859 Bodice Patterns
Bodice with 3-Piece Back and Coat Sleeves ('60's)
Mrs. Clark's Fitting Instructions
1857 Bodice

Dress (Skirt) Instructions
Gauging a Skirt (No Pattern Needed)

Undersleeves
Undersleeve Instructions

Collars & Cuffs
Draft a Simple Collar (Thread)

Outerwear & Warm Layers
Easy Shawl Instructions
Original Mantle & Cloak Patterns
Original Jacket & Mantle Patterns
1855 Mantle
A Knitted Sontag (and more knitted items for keeping warm)
1859 Winter Cloak

Accessories
Swiss Waist (patterned from an original)
A Basic Apron
1850 Crochet Reticule
Analysis & Dscriptions of Period Hair-Nets

Shoes
Yes.  There are period sources for home-made shoes (ie Every Lady Her Own Shoemaker 1856), but you'll want to buy this item.  See Robert Land Historic Shoes and Fugawee to train your eye, then either save up for the good stuff, or search e-bay & second-hand shops for something passable.  I've heard paddock boots are a possible alternative, depending on your situation.  Things to look for in 'period-passable' shoes: leather upper, low/no heel, fastens with side or front laces or side elastic panel ("congress gaitor"), and square or rounded toe (not pointy).  Speed laces should be removed if possible.
1850 Lady's Slipper (All the fancy work slipper patterns I've seen either have a two-piece upper like this one--a trapezoidal toe-piece with a straight band around the heal, or else a single-piece upper shaped like a bottom-heavy V).

Nightclothes
1859 Nightcap
1859 Nightgown Drawings

Baggage
Pouche Pompadour (elegant travelling bag)
Travelling Bag
Re: Period Baskets (read this before buying a basket; Mrs. Mescher's other articles are as interesting as they are diverse
Toilette Sachets


Looking for something to work on at events?  Antique Pattern Library

New period seamstresses looking for an easier start should buy The Dressmaker's Guide.  I've heard good things about the Truly Victorian patterns, and Past Patterns.  Kayfig patterns are meticulously researched; I've made up their wrapper pattern and found it charming (also, the instructions are a comb-bound book, the first half of which is an illustrated tutorial of period construction techniques). If you pick up Simplicity patterns during the $2 sales, look for the Martha McCain or Kay Gnagley ones--the shapes are good, but the scaling is weird and the instructions aren't always period-appropriate.  I've used several simplicity patterns, but I wouldn't recommend them for a first dress unless you have good spacial sense & really can't afford a more straightforward pattern.

Good luck, and always make a test muslin!

Wednesday, June 4, 2014

Link-Dump: 19th Century Original Items On-Line

Looking at originals items (whether clothing, housewares, or what have you) is really useful for developing a period 'eye'.  Here are a few sites that I find useful to look through when researching the 'look' of a particular item, or deciding if a reproduction is accurate enough for me to feel comfortable using it.  I originally found many of these sites through The Sewing Academy.*


Original Clothing:
Museum of Fine Arts Boston- Searching the museum collections can be...interesting.  There's a lot of material, so tweaking searches to produce the desired results can some practice.
Met Online Collections- Both the Met and MFA have gorgeous bonnets and dresses.
The John Bright Collection
Los Angeles County Museum
Victoria Albert Museum
UK National Trust
Wisconsin Historical Museum Online Collections
The Henry Ford Museum: Collections Access
Budapest Museum of Applied Art
The Graceful Lady- Pictures of original garments, fashion plates and CDVs.
Barrington House- CDVs
Originals by Kay (Research Corner)- Short articles illustrated with original fashion plates and pictures; also, the research behind Simplicity #2881 and #2887.
La Couturiere Parisienne- Fashion Plates & CDVs, original patterns from the 1850s.
Demode Couture- Extensive list of pictures of original garments, from the 17th-20th centuries
The Fashionable Past- A few original items c. 1820-1910, but with lots of good close-ups showing the construction details.

Original Material Culture:
Steamboat Arabia PicturesMore PicturesEven More Pictures and the Virtual Tour- A favorite resource for period housewares.
Steamboat Bertrand (official site)- Fewer pictures, but some good close-ups.
Historic New England- Has wide variety of housewares, clothing, and furnishings (like bandboxes).

Pinterest Boards:
Anna Bauersmith- She literally wrote the book on sewing cases and straw bonnets.
Betsy Conolly- Repinned by the Empress herself
Duchess Martin- Note the fabric swatch books and buttons
Jenny Jones-  Original garments; examples of good reproductions for new reenactors


*I end up linking to the SA in every post.  This isn't coincidental, it's just that awesome of a place.

Monday, June 2, 2014

Historical Food Fortnightly, challenge #1


The inaugural challenge--make a food (from a period recipe) which is referenced in a piece of literature.  I considered making some of the tea dainties from "elegantly economical" Cranford... until I happened upon this 1841 reference and realized I needed to make more gingerbread.  Using a math book as "literature" amused me too much to do anything else.

The receipt is Mrs. Beeton's (1861) white gingerbread.  I've made up the "thick gingerbread" before, but hadn't tried this version.  In a happy coincidence, I've recently learned to use the iron stove at Ft. Nisqually, and so decided to try out this receipt* in the period kitchen.

The results:
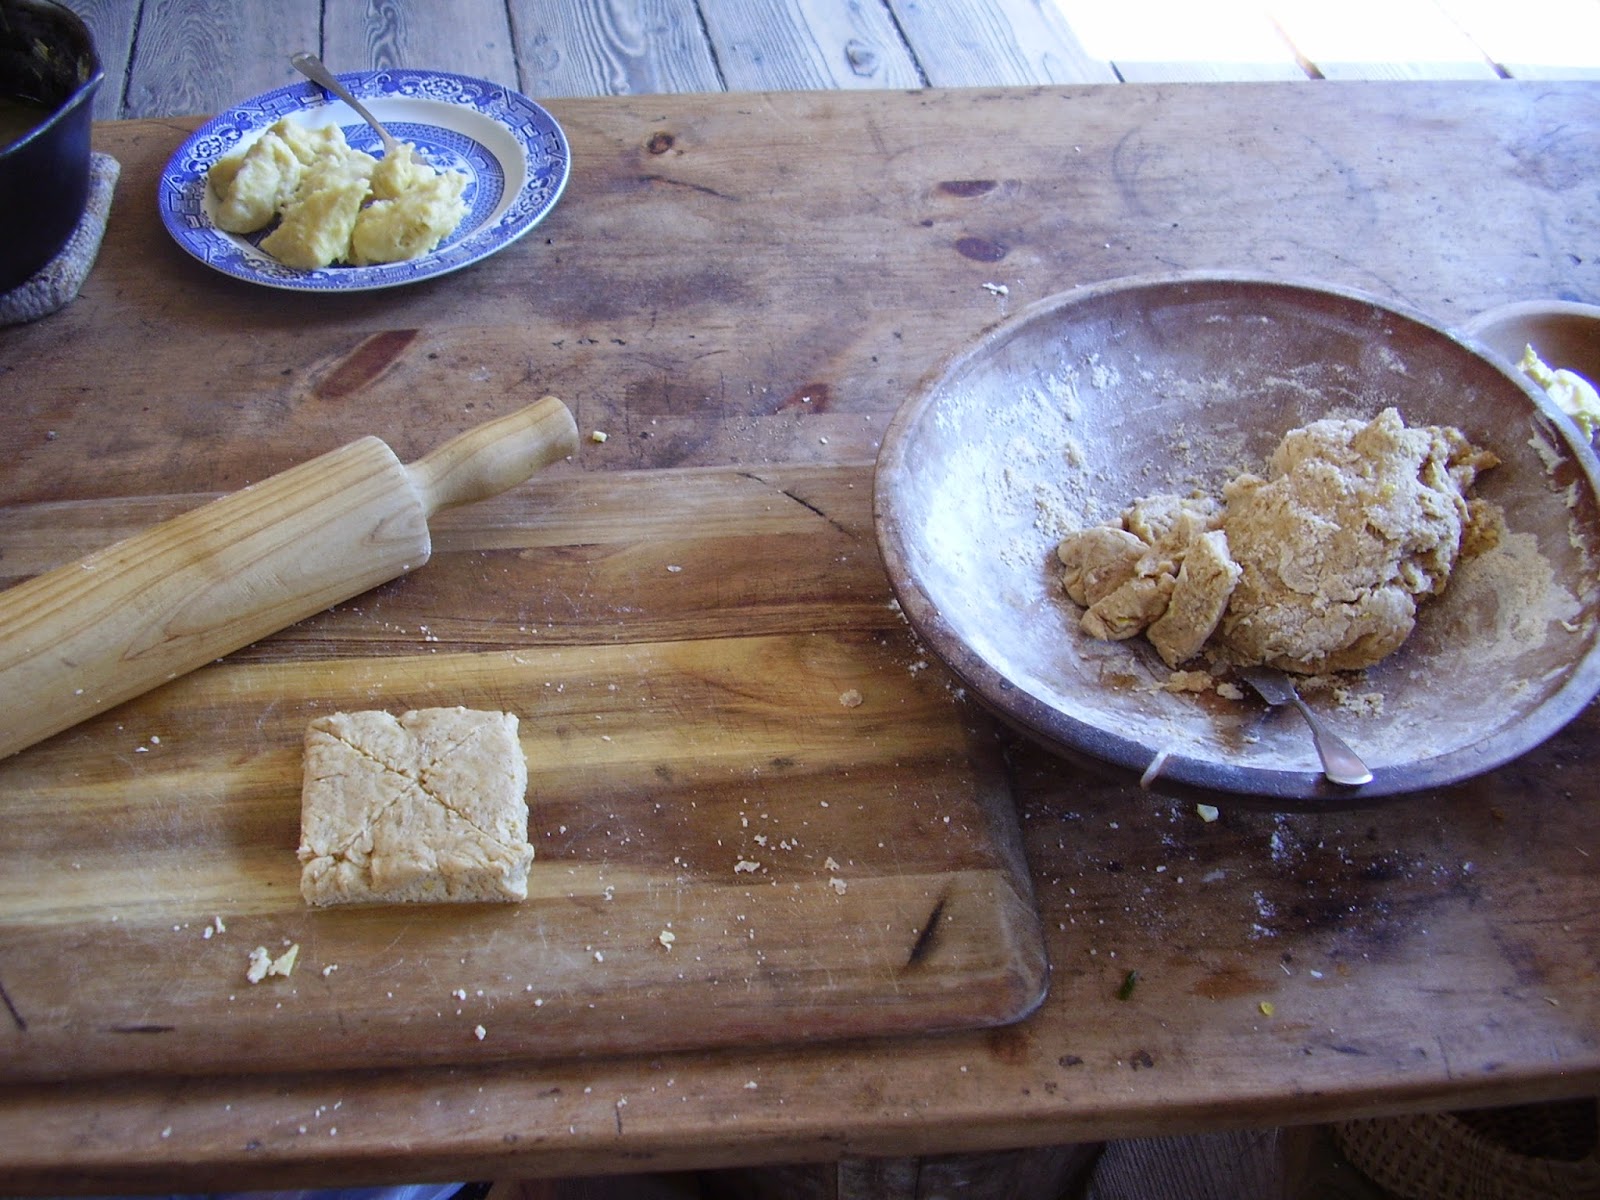
Gingerbread dough and rolling pin.
Dough and rolled sheet
White gingerbread from Mrs. Beeton's, 1861.
Baked Gingerbread
Wood-burning cook-stove, 1850s, at Fort Nisqually.
1854 Stove
Leek stew and dumplings.
Staff lunch: leek stew & dumplings


With no kitchen scales, I had to 'convert' the masses into cup measures (used the conversion tables from "Civil War Recipes" by Lily May and John Spaulding).  Rubbed the butter into the flour, added the ginger, sugar, nutmeg, and lemon; dissolved the soda in warm milk (held it near the stove briefly to warm), then added the liquid to the dry ingredients, and worked it all into a paste.  It was still a bit crumbly, so I added some of the lemon's juice (being out of milk), and the consistency improved nicely.

What I liked about this receipt was that several of the ingredients needed processing-- peeling the lemon and mincing the peel, grating the nutmeg, and so forth.  It meant that I was actually doing activities for the fort visitors to see, instead of waiting while the cake baked or the stew stewed.  (Actually, I was waiting on the stew while working on the gingerbread-- multitasking!).

Besides the lemon juice, my other deviation was in regards the 'pounded loaf sugar'.  I did get out the mortar and pestle and start working on the some of the cone sugar that was available.  After less than a quarter of the needed amount, I surrendered, and switched to the 'crash sugar'.  Much less obnoxious.

The gingerbread baked very nicely in the oven, either because I finally worked out the right rate of adding wood to the fire, or because the thin sheets are better suited to it--when I tried "thick gingerbread" in this oven it scorched badly without the center ever cooking.  The shortbread, however, turned out well, so that was the size I aimed for in making the gingerbread (this also ensured that it fit into the available baking tins).

With the oven going anyway, I decided to make lunch for the hard-working staff members.  The garden had a plentiful supply of leeks just now, so I did a leek & potato stew (improvised, with carrots and onion, and herbs from the garden) and served it with egg dumplings (from "Civil War Recipes", attributed to Godey's, 1869).

Challenge Summary:
The Challenge: A Literary Dish
The Recipe: White Gingerbread, Mrs. Beeton's Book of Household Management
The Date/Year and Region: Recipe is English, published 1861
How Did You Make It: Rub butter into flour, add other dry ingredients; convert into a paste with liquid ingredients, roll out and cut into cakes, bake in a moderate oven 15-20 minutes.  
Time to Complete: Uncertain (no clock in period kitchen, probably 20-ish minutes to prepare and another 20 to bake each pan)
Total Cost: Unknown (I had the spices, the lemon and the gill, ie half cup, of milk on hand); flour and sugar are provided by the fort.
How Successful Was It?: Tasted nice and spicy.  The lemon/nutmeg combination went well with the ginger, even if you aren't expecting lemon peel in gingerbread (or expecting gingerbread to be so pale).  I was mostly relieved that it cooked through without burning on the outsides (though the first pan had a few edges need to be cut off); it all got eaten, so I take it the product was acceptable.  
How Accurate Is It?: Used cups instead of weighing ingredients, substituted crash sugar for loaf sugar, used pre-ground ginger, added lemon juice for more liquid.  

*One of the period 'advice' books I've read (Miss Leslie's, I believe) has a short tirade on 'recipe' referring to pharmaceutical preparations and 'receipt' to food products.

Tuesday, May 27, 2014

Work Basket in Silk and Berlin-work, part 2

"The bottom, which is circular, should be twelve inches in diameter, and covered with light-blue silk.  The side should be five-inches high...This side should be sewed to pasteboard, and lined with silk.  The bag is to be made of light-blue silk; the handles to be cord.  Where the bag is sewed on to the side, there should be a quilling of blue ribbon."

Though good with color, material, and dimension, the instructions are somewhat lacking in method.  I suppose it's time to 'make in the usual fashion'.  What follows is my best attempt to make the pieces look like the picture.

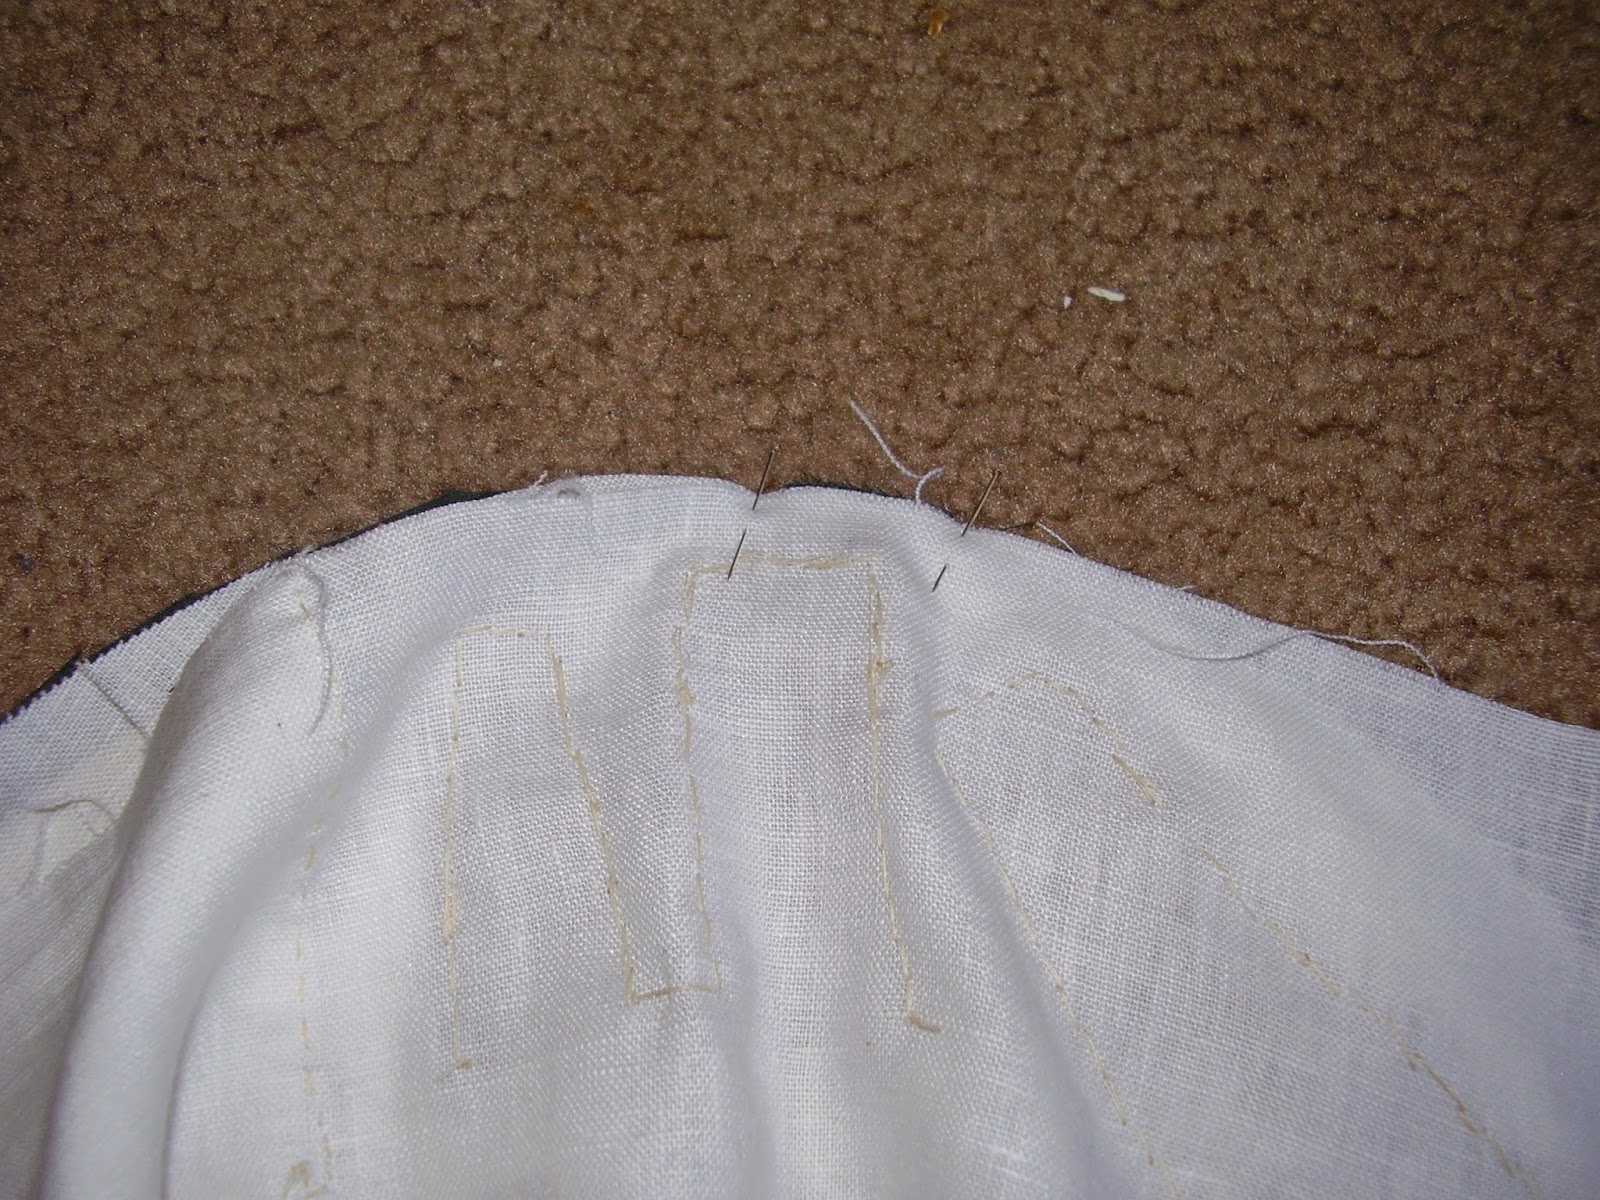
First off, I cut out a lining piece to back the embroidery.  Dividing workbaskets seems to be a common practice (based on Miss Leslie's & Miss Beecher's opinions, along with others I don't recall by name), so I attached pockets to the right side of the lining.  Being short of silk, I decided to do the interior in white linen.  The scissor pockets are in leather, with a loop of silk ribbon to hold a thimble.
Lining with scissor pockets and thimble loop; Berlin work exterior.Sheers, buttonhole scissors, and embroidery scissors with leather pockets.Pockets in workbasket lining.


(The angle of the largest scissor pocket was altered after this picture was taken; when arranged vertically, the angled pocket didn't suit).

I measured the worked side and divided by pi to get a bottom diameter of 11 1/8", which I then cut out of pasteboard.  The instructions didn't specify a pasteboard bottom, just sides, but I thought the added structure and stability would be useful.  Using this a as template, but adding seam allowances, I cut the silk and linen lining.  I also cut a rectangular piece of pasteboard for the sides, using the worked area of the canvas as a guide.
All fabric cut fabric for workbasket.


With those six pieces to hand, I started actually constructing the basket.

First, the bottom was assembled; right sides out, I attached the bottom silk and lining to the pasteboard circle, using a small amount of bookbinding glue* to keep them in place.
Base of workbasket: silk, pasteboard, linen.
Next, I pinned the linen side lining to the bottom circle (right sides of the two lining pieces together):
Lining pinned to bottom of work basket. 

The worked canvas went on next, with the right side of it to the right side of the silk.  I then proceeded to back stitch along the edge of the Berlin-work, catching all four layers of fabric (canvas, silk, bottom linen, side linen), while stitching as close to the pasteboard as possible. 
Canvas pinned to bottom of work basket.Stitching canvas to work basket bottom.

I started at the center and worked towards the side-seam (not yet made), so that any sizing discrepancies could be adjusted at the seam.  Happily, this only involved the linen lining being a hair too large, and was easily fixed by taking a larger seam allowance on the side seam.

Once the side pieces were closed and fully attached to the bottom, I turned the canvas sides up, forming the basket:
Inside-out work basket.Right-side-out workbasket.
Next, I checked the size of the pasteboard side, and trimmed it for a better fit.  I then glued it into a circular shape (using strips of paper with more bookbinding glue), and allowed it to dry overnight.  The pasteboard was then placed between the side and lining, and the fabric pinned tight over it.
Interior of work basket.
Now the top needs to be added.  From the magazine picture, the silk "bag" portion doubles the height of the 'sides', indicating that it should extend some 5" above the bag.  With seam allowances and a channel for the ribbon-drawstring, I decided to cut the silk 7" wide (length= bag circumference, 35" around + seam allowances).  I cut it in two piece, to fit on the fabric available, and to make the drawstring opening easier, and finished one long side of each piece with a 1/2" channel.

Work basket base with handles, silk upper pieces.


These were then joined (run & fell) at the sides, into a tube; the piece was then back-stitched to the canvas side. The cord handles  were basted to the canvas before the silk was joined, concealing the ends in the seam.  I meant to finish the inside edge by folding over the linen lining, but discovered after attaching it that I neglected to add a turning allowance.  Cotton twill tape was applied over the inside join instead (as this necessitated an additional 36" of concealed hand sewing on a 3D object, I would definitely use the 'turn-over' method if I ever repeat this project).

The cord handle was made using 3/2 perl cotton, following the instructions in Tassel Making for Beginners by Enid Taylor.  From the illustration, I figured on a cord 12" long for each handle.  After some experimentation, I ended up cutting 6 1-yard lengths of cotton to make each cord, which ended up closer to 14" each.
Handmade cord handles for work basket.


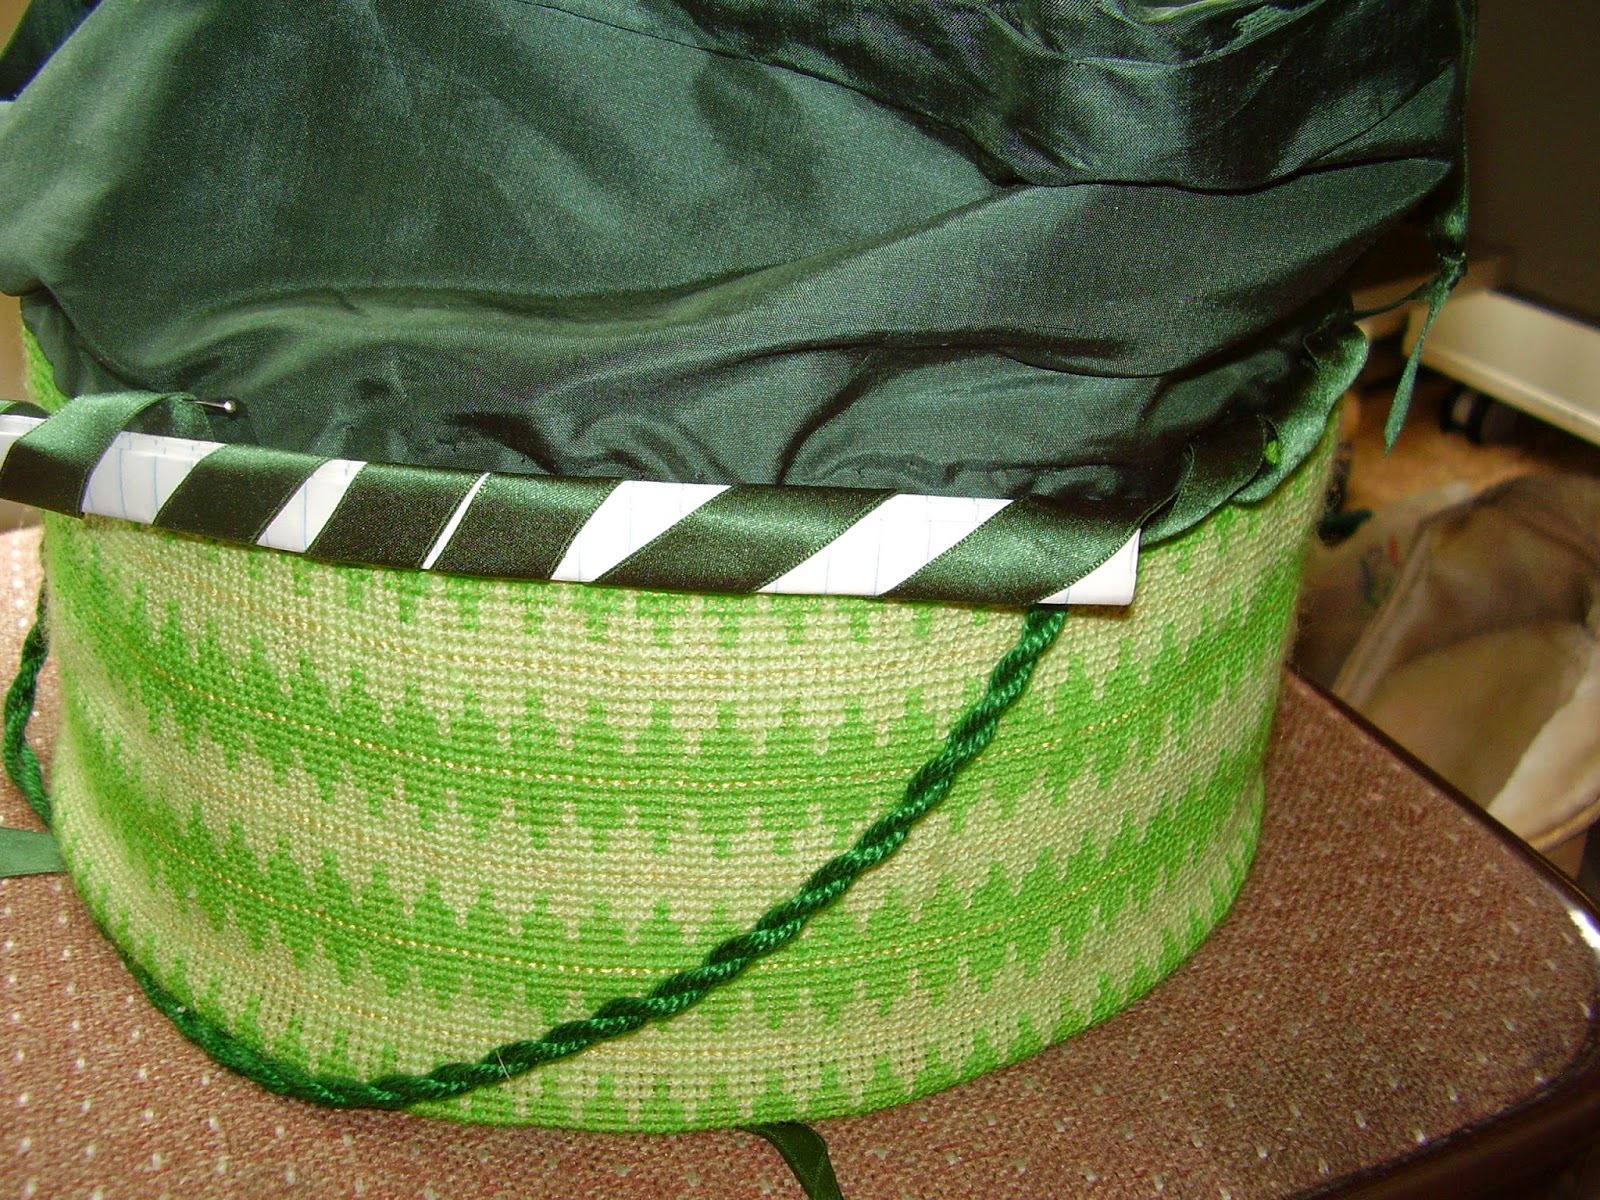
The last piece is the decorative ribbon at the basket/bag join.  I used a running stitch to gather ('quill') 2 yards of 1/2" wide silk satin ribbon (using a very fine needle, because satin snags easily).  This was then tacked down on the outside of the basket, following the join.  Unfortunately, I didn't like the effect, and so removed the gathered ribbon, ironed it flat, and attempted to knife pleat it instead.  At this point, I re-discovered that--unlike taffeta or lace--satin doesn't hold a fold nicely.  So, I took that off, and attempted a rouleau, following Miss Leslie's instructions in the Lady's House Book (1850).  The ribbon is wrapped around a piece of paper in a spiral shape, and then tacked down to the surface.  The paper is removed, leaving a roll of ribbon.
Silk ribbon rouleau on side join of work basket.


It's not the neatest job, but it's neater than the other attempts, and it eases the otherwise-abrupt transition between the Berlin-work and the dark silk.  To conceal the ends of the rouleau, I added a small constructed bow done in the same ribbon (for balance, a second bow was placed at the opposite end of the basket):
Pieces for constructed silk ribbon bow.
Bow on work basket.


Voila:

Completed 1861 pattern work basket.

Finished work basket from 1861 Peterson's instructions.

Interior, with my 'period' sewing supplies for living history:

Work basket stocked with period tools.

Thimble, scissors and pin cushion.


Supply notes: Green embroidery in DMC "medici" wool, colors 8567 and 8904; yellow silk is soie crystal brand; worked over 10-count Penelope cloth, all from Nordic Needle.

Green satin ribbon from Nancy's Sewing Basket, in two widths (1/4" for the drawstring, 1" for the decoration).  The green silk for the upper portion originally came from S.R. Harris, aka the Disneyland of Fabric stores.  White linen from Our Fabric Stash; leather recycled from a thrift store jacket.

Perl cotton for the cords came from The Weaving Works (left over from a weaving project, as it happens).

*Other types of glue would probably work; this is just what I had, and it convenient is meant for attaching fabric to cardboard without showing through.