There are certainly variations in how each step is done (consider the many different kinds of looms available), but the general process is this: measure out the warp, mount the warp on the loom, weave the fabric, take the fabric off the loom and finish the fabric. I'll be using my 4-harness table loom throughout to demonstrate.
The first part of the first step is math. Without going into too much detail, you need to figure out how many threads are needed in each direction and how long each of these needs to be. For the best results, one weaves a small sample using the estimated sett or ends per inch (the number of warp threads per inch of woven cloth) and picks per inch (passes of the weft per inch of woven cloth) to see that the desired effect is reached, and to figure out how much extra yardage is needed for draw-in (width reduction under pressure) and loom waste (additional warp length that goes onto the loom but can't be incorporated into the finished product). The sample is also then available to test laundering and finishing methods.
Once the calculations have been made and the yarn/thread has been procured, the warp will need to be measured and cut.
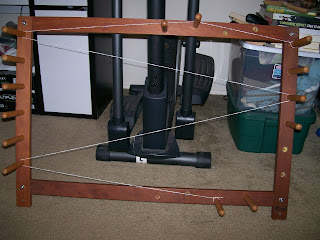
Take the total length needed for a single warp thread (finished length + loom waste + any planned fringe + space between pieces if more than one is being woven) and cut a guide thread equal to this length. Tie it onto the warping board, where it measures out a path equal to the desired warp length.
Now, the actual warp threads are run along this path, forward and back, until the right number of ends are reached. The board keeps the threads from crossing and tangling, as well as ensuring constant length.
The "X" at the start makes it easier to count the number of warp threads measured, as you're dealing with exactly half of them. When transferring the warp to the loom, this "X" will help keep the threads aligned and not tangled together. It'll also help keep your threads uncrossed in future steps.
When the desired number of warp threads are measured, they are tied off at intervals with contrasting string, and the excess is chained together like a massive crochet project (to keep it from knotting up). The free end near the X is cut, so that you have individual warps instead of continuous yardage.
Next up: getting this on the loom.


No comments:
Post a Comment
Thanks for commenting!