Tuesday, April 30, 2024

April Mending

One of three sock darns, and evidence my corset is finally re-bound.

 Some sewing that I did get done this month: I darned my pale blue stockings in three places (and fairly neatly, if I don't say so myself), and finally put the binding back on my mid-century corset. I'd forgotten how comfortable it is to not have half the bones escape every time I put it on, though I fear the last several months of misuse have ingrained permanent wrinkles in the coutil. I ended up removing all the bones to give it a good press (after accidentally discovering that some of the bones' tip-coating reacts at high temperature), which got most of the wrinkles out at least, though a few tenacious ones are hanging on. 

Monday, April 29, 2024

Early 19th Century Pocket

   
Now every outfit has pockets.

Mea culpa for falling behind on posts. Again. I finally made up my long-planned late 18th/early 19th century dettached pocket last month, and then proceeded to not photograph it for some seven weeks.

Anyway, the patchwork is based on this early 19th century pocket from the Met. It uses larger square patches for the bottom of the pocket, and smaller squares and rectangles where the pocket narrows around the opening. As the Met has not kindly provided useful dimensions in their catalog, I used the measurements from a c.1840 pocket in the Old Sturbridge Village collection. I was able to draw a trapezoid from the height and two widths given, round the corners, and add a slit of the specified length. Very handy. I thought that particular example would suit this project, since it incorporates prints c.1790-1835, and mine mixes scraps from my Williamsburg haul with leftovers from a Regency dress (and chintz from a closer-to-mid-century quilting project). I lined the front and cut the back from a cotton ticking; the binding is narrower strips of chintz cut on the straight. Per both originals, I did not bind the outside edges.

I'm quite content with the capacity of this pocket, and have already used that to humorous effect in two museum programs. No one seems to expect me to pull a miniature sword out of my pocket (following the undersleeves, kerchief, hairbrush, sewing kit, knitting project, card case, pocket book, toothbrush, folding parasol, &c. This pocket can hold a lot). I do think I'll switch out the 1/4" cotton tape for a stouter article; it just digs in too much when worn without a corset, and I keep thinking the tape is going to break under the weight of items-that-fit-in-this-pocket.


Monday, April 1, 2024

Original: Net Cap, c1840


Cap, c.1840, in LACMA.

I really like how the texture of the different materials come through in this cap. But my count there's at least four different materials--scalloped lace, spotted net, striped ribbon, and a diagonal-striped fabric (bias strip?)--all in the same soft cream color. I think this adds a lot of visual interest to the cap, while keeping the overall effect light, airy, and subtle.

Thursday, March 28, 2024

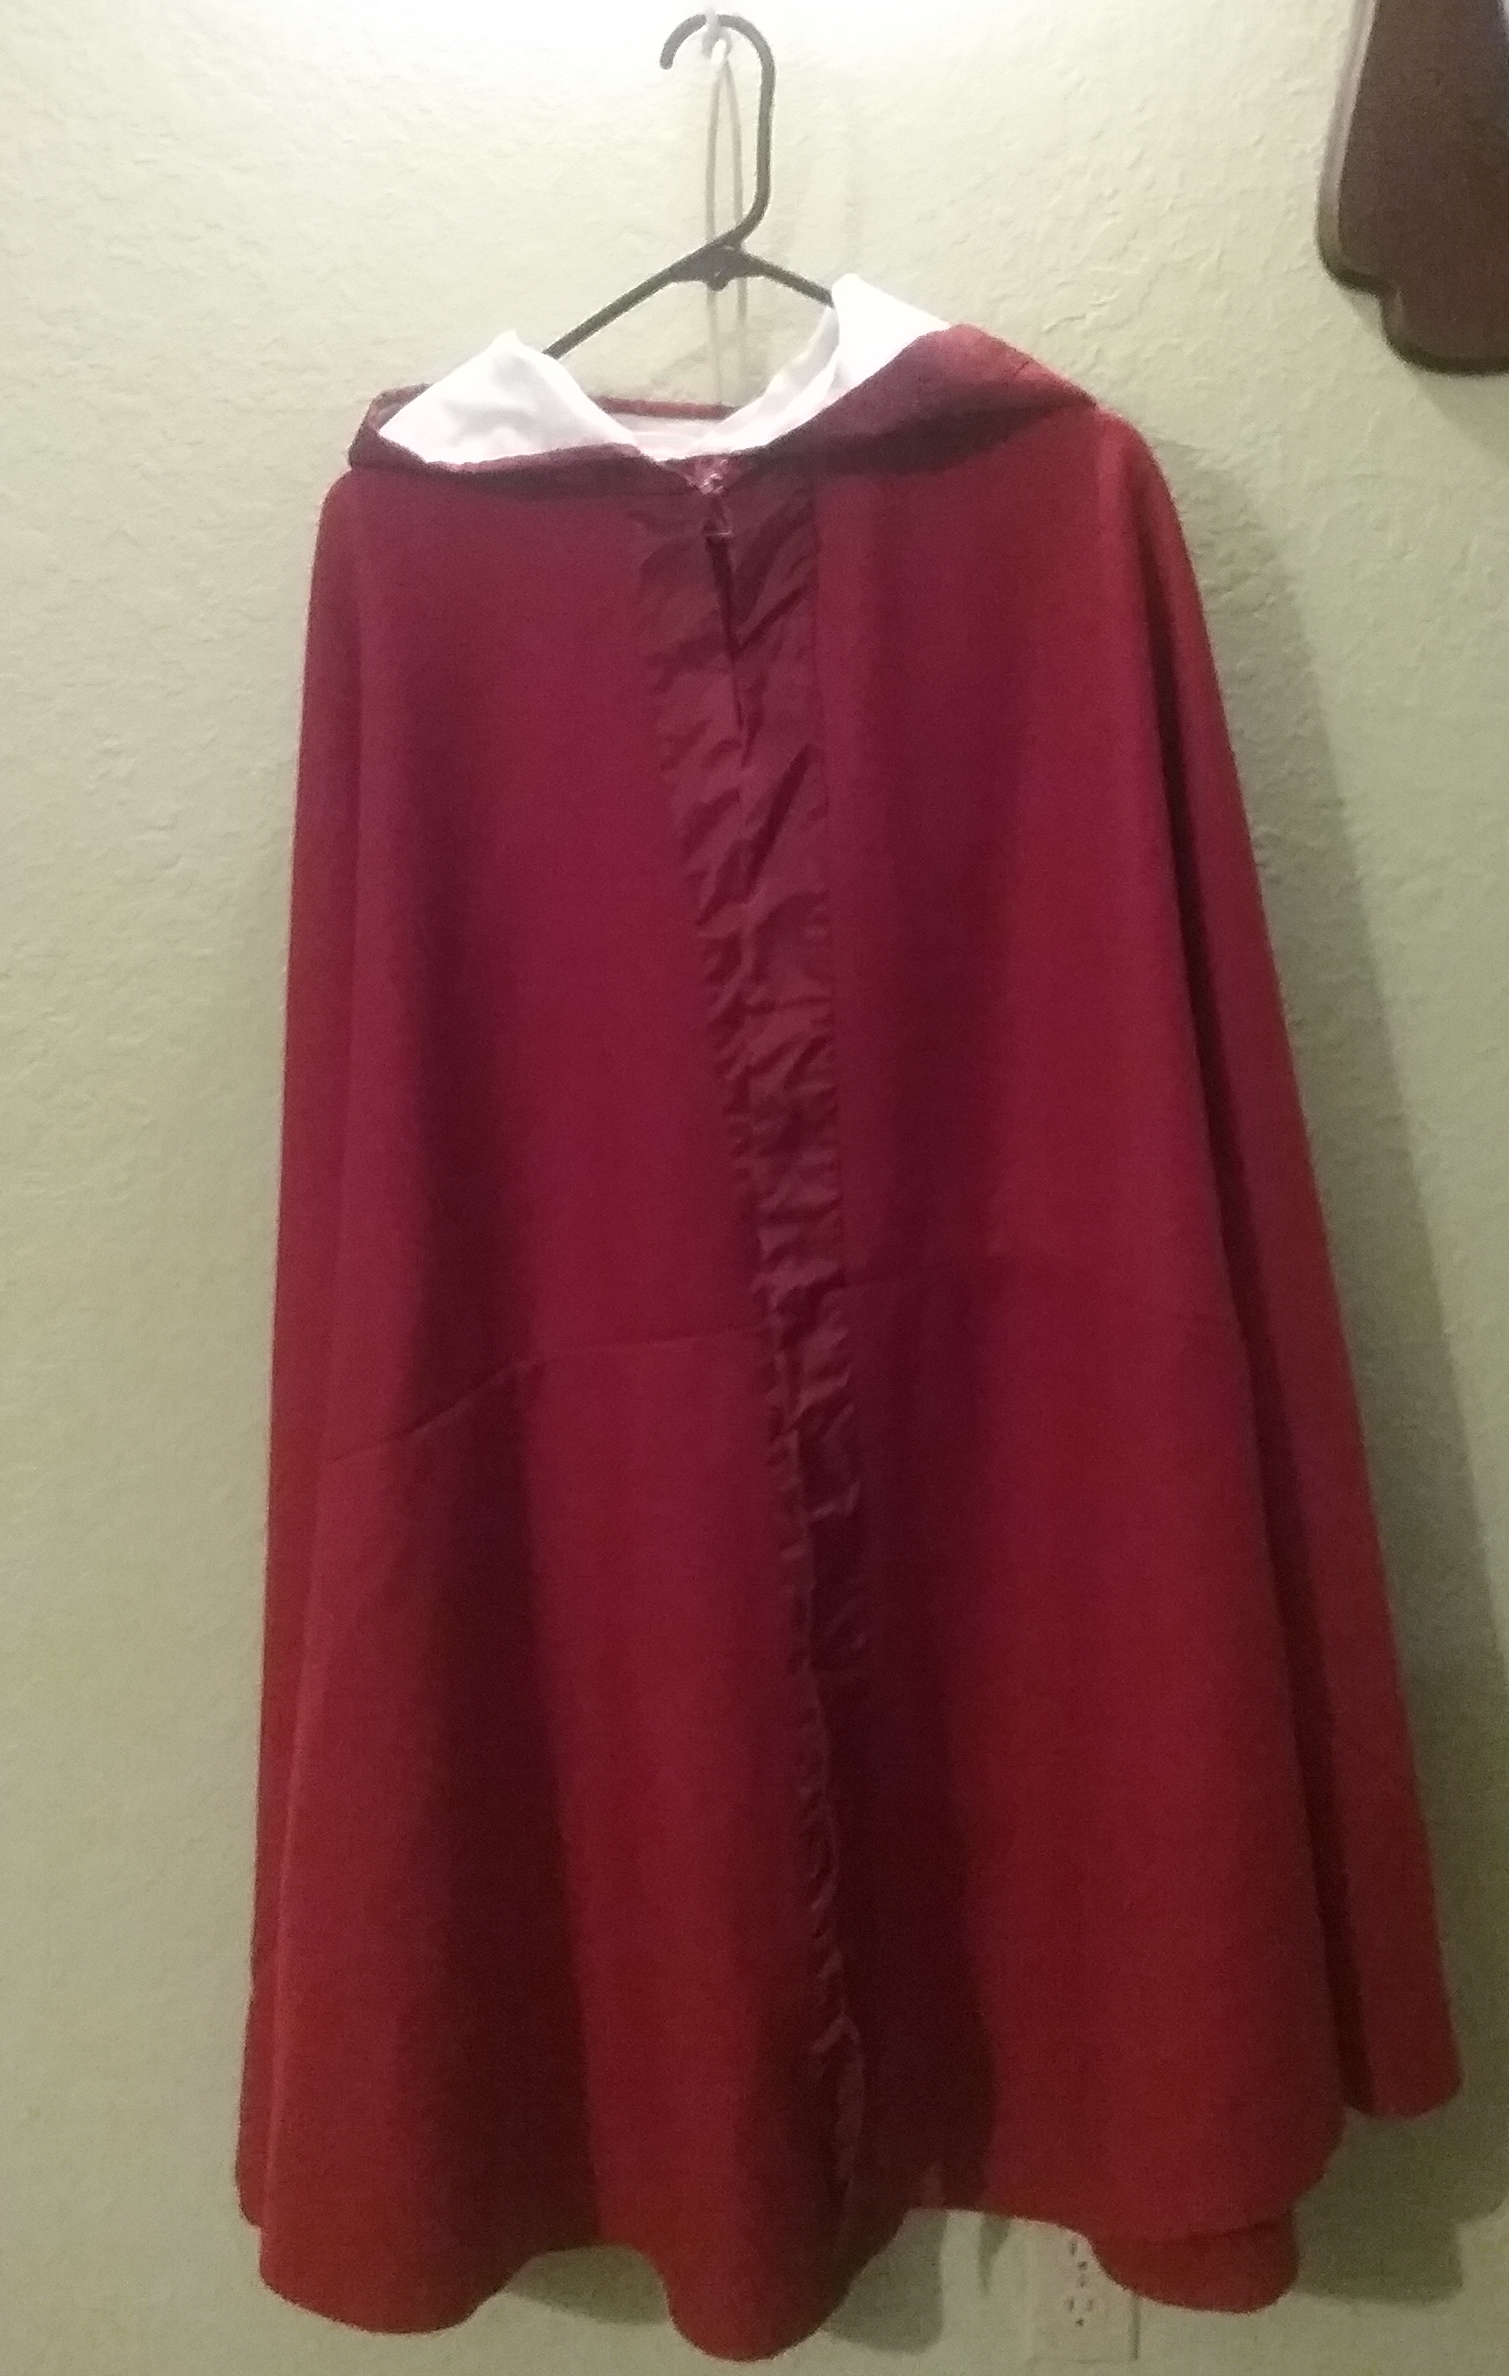
Red Wool Cloak, 18th Century


Cloak!

Based on an 18th century woman's cloak featured in Costume Close-Up. The original garment is in the collection of Colonial Williamsburg. As the garment was later altered, I used this similarly-dated (and similarly-constructed) cloak, also in the Williamsburg collection, for the facing width (2"), placement (on the outside, not the interior) and fastening information (ribbons).

I used 2 3/4 yards red broadcloth, per the original, though I didn't actually have to piece the hood (and the original was comprised of so many little strips that calculating out the sizes would have been more of a headache than actually sewing them together). The facing and hood lining are scrap silk from my collection. Due to the difficulties in finding silk ribbon of sufficient strength, I opted to use a stout replica hook-and-eye clasp on my cloak.

Overall, I'm pretty satisfied with the construction and fit of the cloak--all except the exterior silk facing, which looks rumbled no matter how much I iron it. And it was ironed at every stage of the process: after cutting, after the initial pass of sewing, and then as it was tacked down. I cut it along a pulled thread, so I know the silk's on-grain; at this point I'm pretty sure the problem is that I pulled the wool too tight relative to the silk as I was sewing the first seam. Alas.

Friday, March 1, 2024

Original: Embroidered Pocket, 18th Century

Pocket, English, mid-18th century. LACMA.
 

I've been reading a lot of Laurel Thatcher Ulrich's Good Wives, and selected this month's antique beauty in honor of this passage at the end of chapter 1:

"Much better than a spinning wheel, this homely object [the pocket] symbolizes the obscurity, the versatility, the personal nature of the housekeeping role. A woman sat at her wheel, but she carried her pocket with her from room to room, from house to yard, from yard to street...Whether it contained cellar keys or a paper of pins, a packet of seeds or a baby's bib, a hank of yarn or a Testament, it characterized the social complexity as well as the demanding diversity of women's work."
Also, I really like the embroidery.

Thursday, February 29, 2024

HFF 6.26: Party Time!

Detail from an 1850s painting with a woman's hands gesturing over a table of food.

The Challenge: Party Time! Celebrate completing the challenge year by making a dish suitable for a party.

The Recipe: Lemon peel, to candy from The Cook's Own Book

Take some lemon peels, and clean them well from the pulp, and let them lay two days in salt and water; then scald and drain them dry; then boil them in a thin sirup till they look quite clear. After which take them out and have ready a thick sirup made with fine loaf sugar; put them into it and simmer them till the sugar-candies about the pan and peels. Then lay them separately on a hair sieve to drain strew sifted sugar over them and set them to dry in a slow oven.

[My favorite winter cakes all call for candied peel, so I'm counting it as a party recipe.]

The Date/Year and Region: 1832, Boston
 
How Did You Make It: I peeled four oranges and four small lemons; I don't remember the specific varieties, but the lemons were a thin-peel type, which wasn't ideal. Being somewhat pressed for time, I only soaked them in salt water for 24 hours; although the instructions don't say to keep the peels cool, I soaked them in a basin in the refrigerator, just to be on the safe side. The next day, I brought the salt water and peels to a boil, poured off the brine, and put the peel in a syrup of  (IIRC) 1 cup sugar to 2 cup water and boiled it again. After removing the peels, I made another syrup, in a proportion of 2 cups sugar to 1 cup water (ratio based on the 'sirup, to clarify' instructions in the same book), and boiled the peel for a third time. When it started getting thick and tacky, I fished out individual pieces of peel, rolled them in more sugar, and spread them on parchment paper on a baking sheet to cool/dry.
 
Time to Complete: A very long evening, and a few minutes prep the day before (really 2 days before).
 
Total Cost: About $5 for the fruit.
 
How Successful Was It?: The the orange peel tastes exactly like those orange-wedge jelly candies, down to the texture. It's uncanny, but also as far as I can tell, the way this is supposed to go. I only scorched a few pieces of peel in the process, so I'm calling it a win.

How Accurate Is It? Better than most of my early attempts where I was zesting the peel, and getting really hard, thin pieces as a result. I ended up guessing a bit on the sugar:water proportions in the syrup (and lost my notes from when I made this back in January before the official challenge window), so I'm not certain about the proportions on the thin syrup, other than that I know it was less than the 1 water : 2 sugar in the thick. Rolling the pieces in loose sugar isn't in the instructions, exactly, but I've found it helpful for keeping the peel from sticking to the parchment paper (or whatever you're drying it on).


Yes, I didn't delete the photo on accident. Like I did with my first write-up.

Wednesday, February 28, 2024

HFF 6.25: Looking Back


Detail from an 1850s painting with a woman's hands gesturing over a table of food.

The Challenge: Looking Back. Revisit a dish you've made before, whether to correct a mistake, try an alternative variation, or just enjoy it again.

The Recipe: Dessert Biscuits from Beeton's Book of Household Management

I selected this receipt because, despite it being one of my first and most often repeated recipes, I've never written it up fully. Unfortunately, I can't find the photos this time around.

DESSERT BISCUITS, which may be flavoured with Ground Ginger, Cinnamon, &c &c INGREDIENTS--1 lb of flour, 1/2 lb of butter, 1/2 lb of sifted sugar, the yolks of 6 eggs, flavouring to taste. Mode--Put the butter into a basin, warm it but do not allow it to oil, then with the hand beat it to a cream. Add the flour by degrees, then the sugar and flavouring, and moisten the whole with the yolks of the eggs, which should previously be well-beaten. When all the ingredients are thoroughly incorporated, drop the mixture from a spoon on to a buttered paper, leaving a distance between each cake as they spread as soon as they begin to get warm. Bake in rather a slow oven from 12 to 18 minutes and do not let the biscuits acquire too much colour. In making the above quantity half may be flavoured with ground ginger and the other half with essence of lemon or currants to make a variety. With whatever the preparation is flavoured so are the biscuits called, and an endless variety may be made in this manner. Time--12 to 18 minutes or rather longer in a very slow oven. Average cost 1s 6d. Sufficient to make from 3 to 4 dozen cakes. Seasonable at any time.

The Date/Year and Region: 1861, London
 
How Did You Make It: As given (I needed a lot for an event, and so I did a whole batch). I beat 6 eggs in a separate bowl, creamed 8 oz of butter and 8 oz granulated sugar, then added the pound of flour and the eggs. I divided the dough in half, flavoring half with cinnamon and the rest with a handful of currants. I then baked them about 12 minutes per pan at 350F; I ended up with three pans of the biscuits, making a round six dozen.
 
Time to Complete: In the modern kitchen, about an hour (pre-heating the oven while mixing the fough).
 
Total Cost: Pantry stables, so I don't have the numbers ready to hand.
 
How Successful Was It?: Tasty. As usual, these biscuits are a bit denser than most modern cookies but they go very well with tea. The biscuits keep very well, though they can get a little rubbery after a few days in a damp climate. The receipt is easy to remember and lends itself well to improvising flavors. This receipt also once got me a mock marriage proposal from an Abe Lincoln impersonator. 

How Accurate Is It? Revisiting the receipt again, I can see that I'm making my biscuits a little smaller than they are meant to be (almost half the size), but that's also just the size I like them. While I've made them before on a fire, all mixed by hand, this time I used my stand mixer and electric oven. It's easier, but not materially different in outcome--more important was probably the fact that I was working in a climate-controlled room; having made these biscuits in an unheated replica building during the winter, I will say that it is a lot harder to mix the dough when the butter won't warm up.