Wednesday, June 17, 2015

A Plain Cap, early 1860s

Plain cotton cap for 1860s wear.

Recently completed: a plain cap for a female ACW nurse.  Research here.  The material is white cotton batiste left over from another project.  The shape is taken from an 1859 night cap pattern (#3 on the research post); the idea for the cord through the brim comes from Liz Clark's infant cap pattern (SA-100), though a center back drawstring also appears on pattern #1 of the research post, as well as the c. 1850 woman's cap featured therein.  As per the descriptions of nurses' caps being "plain" and "unbecoming", this cap is made without trim or ornament, save for three 1/4" tucks, which add some body to the brim. 

I opted not to include ties under the chin, as I rarely use the ties on my own morning cap, and the period illustrations show a mixture of caps with and without ties.  I will add some later, if needed.

Monday, June 15, 2015

My Weekend

Happened to involve a lot of time sewing at the Fort.  I got to try out some of the other sizes and style variants on the Historic Moments Patterns/ Sewing Academy 250 pattern.

Infant bodice dress with smooth sleeves, Sewing Academy 250.
Infant-style bodice (smooth fit) with narrow sleeves

Close up of smooth infant bodice on girl's dress.
Bodice close-up.

Smooth bodice girls' dress with bishop sleeves; SA/HMP-250
Smooth fit bodice with jewel neckline, bishop sleeves.

Smooth gathered bodice, bishop sleeves, and sleeve caps on girl's 1850s dress.
I adapted the smooth short sleeve piece to make sleeve caps.

Tuesday, June 9, 2015

Plain Cap, early 1860s, research

Working on a cap for a friend who does an ACW nurse impression.  She needs something to cover a a hair 'transition', but also lightweight to avoid heat problems.

A cap, white and plain, seem to be synonymous with "nurse".  Both in fiction and non, descriptions of nurses frequently refer to their white caps (and aprons, and collars and cuffs), and plain dresses.

"While linen collars--white aprons--and a plain white cap--compose their very homely but convenient attire." - The Southern Literary Messenger, 1864 (description of Roman Catholic lay volunteer nurses)

"... she should wear a common dress and linen cap, and be no way remarkable to the eye of the patient..." -Sowing and Reaping, 1867

"Their dress is simple, black, with white collars and undersleeves, and, when in full dress, a Swiss muslin cap."-The Employment of Women, 1863

"She put on the coarsest clothes to be bought for money, a light cap... and went into the largest hospital in Washington as a nurse..." -"The Stolen Bond" in Peterson's Magazine, 1866

"I shall go as a volunteer nurse. In Baltimore the nurses have a uniform, -- a black or brown merino dress, tight sleeves, no hoops, tiny linen collar and cuffs, and a white tarleton cap." Anecdotes, Poetry, and Incidents of the War, 1866

German Protestant "deaconesses" who work as nurses wear "...a gown of blue and a white collar and cap."

"Her dress was plain black from throat to heel, with a skull cap of white, like a Moravian sister." -The Fortnightly Review, 1867

"For her to be a soldier's nurse meant something very different from wearing a white apron, a white cap, sitting by a moaning soldier's bed, looking pretty." -Women's Work in the Civil War, 1867

"He rejoins the army, while she follows as a nurse to 'St. Marc's, a military hospital, and dons a muslin cap and other unbecoming articles of attire, and devotes herself to the saintly work of alleviating human suffering." -The Knickerbocker, 1864

The only color given is white; the materials include linen and fine cottons ("muslin", "tarletan"); the caps are "plain", or even "unbecoming".  Such a ubiquitous but non-decorative article must serve some sort of practical purpose--keeping the hair clean, out of the way, or concealed.  The white cotton/linen ensures easy washing.

A plain linen child's cap, 19th century, in The Met.
Cap, British, 19th century
This linen cap is the plainest original I've found; from the size, however, it's a child's cap.
1850s plain, white cap in The Met.
Cap, American, c. 1850
Of course, searching for cap patterns in the magazine of the '60's can get very trying.  There are plenty of mentions of caps, descriptions of them, and occasionally even an engraving.  Patterns?  Between 1855-1865, I've found three, all night-caps.  The best source I know of for cap patterns is the 1840 Workwoman's Guide, which has pages upon pages of the things, for all possible occasions.  Unfortunately, twenty years have elapsed between the publication of that book and the outbreak of the war, including radical changes in hair-dressing and cap-wearing.

My usual go-to in such cases is the The Ladies' Self-Instructor in Millinery and Mantua-Making (1853).  Though less comprehensive than the WWG, it's closer to my target dates.  Unfortunately, all is has to say about caps is that there are many different styles and you should pick one which suits you.

If pictures are being provided, but not diagrams, then the magazines of the early 1860s are assuming that ladies either already know how to make up caps (and thus only need inspiration) or are hiring someone who does.  The only dissemination of such information that I can find is in earlier sources like the WWG, and an adult woman of the early '60s would be familiar with the styles/techniques therein from childhood...but it's still a bit of a stretch for me. 

One thing that the WWG does mention, though, is that certain patterns might be used to make nightcaps, or day caps for servants/poor persons.  If this holds true to the '60s--and as far as I can tell night caps, servant's day caps, and nurses' caps are functional head-coverings meant to shield/conceal the hair more than adorn it--than those three night-cap pattern are probably my best bet.
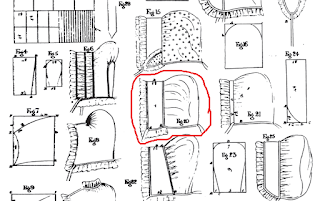
Plate 20 from The Workwoman's Guide, showing cap varieties.
(No. 20): "This shape is particularly suitable for day-caps for young
servants, or night-caps for any age or station."
From The Workwoman's Guide. Plate 9; instructions on page 66.
Option 1: Peterson's Magazine, 1859.  A night-cap from their series on home-sewing:
Night cap from Peterson's Magazine, March 1859. Pre-Civil War.
Night-cap. Peterson's, March 1859. Page 242.

Night cap diagram from Peterson's Magazine, March 1859. Pre-Civil War.
Diagram of Night-cap.

Number 2: There's another night cap from Peterson's ('61) that's a bit more "novel" in it's design:
Nightcap from Peterson's Magazine, 1861.

Number 3: An 1859 pattern from the The Young Lady's Book. This one is also made up in two pieces, with a straight front piece (brim) and mailbox-shaped crown.
1859 Nightcap from The Young Lady's Book.
Of the three, I prefer the definition of the first and last pattern; made up plain, I don't think the round crown will look as becoming as it would trimmed.  The batiste remnants available for the project make number three look like the best bet, as it doesn't need to be cut in a single piece. 

Sunday, June 7, 2015

Hair Dressing: 1855

"After a few experiments, a lady may very easily decide what mode of dressing her hair, and what head-dress, renders her face most attractive."

So, how were women wearing their hair in 1855?

Empress Eugenie, 1855, Winterhalter
The Empress EugĂ©nie Surrounded by her Ladies in Waiting (1855) by F. X. Winterhalter
"The Last of England" (1855) by Ford Brown
The Last of England (1855) by Ford M. Brown
"Harvester with Sickle" (1850-1855) by Corot
Harvester with Sickle, by J.-B.-C. Corot, c. 1850-5 

Magazine illustration, 1855
So, whether looking at the Empress or the agricultural worker, we have some consist styling. There's the basic T-part (center front to back, and then perpendicular behind the ears) with the back hair arranged up--likely in a chignon or coil.  The two major treatments of the side hair are ringlets, or brushed out over the ears to look as wide as possible.

An 1854 article in Arthur's Home Magazine notes that:
"For ordinary wear, plain bands on each side the temple, drawn out wide where the size and shape of the head admit of it, are principally seen. The back hair is formed into a French twist flat to the head, around which the rest is disposed in a close circle, either twisted, roped or braided, leaving the smooth twist displayed in the centre."
Incidentally, this "wide over the ears" look persists into the later '50s:
Six hair styles, from "How to Arrange the Hair" (1857)
From "How to Arrange the Hair", 1857
To do it, we'll start with the T-part and low braided bun from "Basics" post.

T-parted hair with back bun, basic 1850s-1860s hairstyle.
Starting point: back hair braided and coiled at
back of the head, side hair loose.
Even with my long and rather thick hair, some sort of structure is required to get the proper side-on fullness. Enter the rats.

Rats or frizettes for 1850s hairstyling.
Hello, rats!
The "rat" is a small bundle of hair--typically gleaned from the brush over a few weeks--which is held together by an invisible net.  I've also seen them made up with stretchy fabric (like old nylons) over hair or other padding, but my p.c. citations so far are for hair or silk (not that I've found an image or description of the latter).
China hair receiver, date unknown, from the author's collection.
It is not at all weird that I store hair on my dresser.
Anyway, after brush out my side hair, I separate it horizontally (about 75% above 25% below), and pin the rat underneath the bulk of the hair.  Small combs or wig clips stitched to the rat are preferred by some people--including Dana, the awesome lady who taught me how to do this properly.

Dividing the side hair.

Pining the rat into place.

Next, I smooth the hair over the rat, and adjust the positioning until I'm happy with it.  I then twist the hair behind/below the rat slightly, to help hold it in place.

Smoothing the hair over the rat, and twisting the excess.


Further fiddling occurs.  Once I'm satisfied with the look, I pin the twisted portion of the hair to the existing back bun.  I keep twisting the remaining hair and coiling it around, tucking in the ends once it's complete.

Finished 1850s wide side bands with rats or frizettes for volume.


Now, the tricky bit is to repeat the process on the other side, trying to get the rats in the same position, so the hair style is symmetrical.

Wide 1850s hair, top front view.

Once all my hair is pinned in place, I get a little pomade on my hands and rub it in over the top.  This help give a smooth, tidy period appearance--note the sheen in the period images.  I used to apply the pomade before styling, but it made my hair too slippery and the pins tended to slide out.

If desired, an invisible net can be added to help contain fly-aways.

Finally, the comb or other decorations are added.

1855 hairstyle: wide side bands with back braided bun.

Saturday, June 6, 2015

1855-1865 Hair Dressing: 'The Look' and A Basic Tutorial

Frontispiece from "How to Arrange the Hair", 1857
Artist's Rendering of the Process
"A lady can never be said to be well dressed, unless her hair be tastefully arranged, and in a style perfectly in keeping with the other portions of her costume. "
Lady's Home Magazine, 1858

Costumers and reenactors take note, the public does notice when you neglect tonsorial adornment. Fortunately, help is at hand!

No matter your current modern style, there is something you can do to approximate, if not reproduce, a typical mid-Victorian hairstyle--and if all else fails, there's always a nice, covering sunbonnet.

First, what is the style we're trying to emulate?  The details will, of course, vary with year, location, age, and your persona's personal fashion.  Let's look at some of the options c. 1855-65.

Detail of two women's hair, "The Young Wife: First Stew" (1854)
Detail from The Young Wife: First Stew by Lilly Martin Spencer, 1854
Note the stylish side hair of the wife (very wide, covering the ears), and the simpler, tight rolls used by the maid-servant.  Both have a center part, with the hair contained at the back of the head.

Opera coiffure of ringlets and chignon, from Godey's, 1858
Godey's 1858: Opera coiffure with 
side hair in tidy ringlets, back hair in a coil
Wreath over dressed hair, Peterson's 1859
Peterson's 1859: wreath over dressed hair;
shows the 'Y' or 'T' part from the back
"New Style for Dressing the Hair" in Peterson's, 1862.
Peterson's 1862: crimped and braided side hair with an "S" twist at the back
Detail of woman's and girl's hair, from "The Lesson" (1861) by Jules Trayer
Detail from The Lesson by Jules Trayer, 1861
The woman wears modest side rolls, with a decorative comb over a braided back bun.
Hair detail from an 1862 colored fashion plate in Peterson's Magazine.
Peterson's, 1862: rolls or waves at the side,
contained at the back with a net over it
Ball Head-Dress from Peterson's, 1865
Ball Coiffure, 1865: a "waterfall" back
with braids and many ornamnents
New Fashion of Dressing the Hair, Peterson's, 1865
Peterson's,1865: high side rolls with
the back hair woven into three faux-braids
While the side hair may be rolled, braided, curled, crimped, or smoothed out over 'rats' (small pads of hair), some principles underlie most 1850s to mid-1860s women's hairstyles.
  • Center part--looking at hundreds of period images, I've seen 1 side part* and a few slightly-off-center parts. Earlier in the '50s, you'll occasionally see a V-shaped part, with two parts converging at the forehead, but the center line is most common.
  • A second part, orthogonal to the center, divides the side hair from the back; this makes a "T" with the center part, or the second one may be angled back behind the ears into a "Y" shape.
  • The bulk of the hair is confined at the back of the head, typically low
  • Excepting ringlets, the side hair usually moves out (away from the face) and back (incorporated into the back hair)
  • Short hair is rare on mature women, but popular for younger teens and girls; I've never seen a period image with bangs in the 1850s or 1860s.
  • Decorations (combs, nets, wreaths, caps) are added to or over dressed hair, they do not substitute for it.
  • As a general trend, stylish side hair goes "out" from the head at ear level in the early 50s, streamlines/collapses around 1860, and then starts creeping up to the temples in the mid-60s (much as the bonnets sit low and round about the face in the mid-50s, then start narrowing at the cheeks and rising over the forehead into the early 60s)
Detail of a girl's Hair from Solomon's "Second Class- The Parting" (1855)
Detail from A. Solomon's
"Second Class- The Parting", 1855
Detail from a study for Solomon's "Second Class", c. 1854
A Study for "Second Class" by A. Solomon, c. 1854


This painting and study by Abraham Solomon shows the side part to great effect.  I'll be using its simple side twist in the "basic hairstyle" of this post.  It's a nice, conservative treatment of the side-hair, which is fast, requires little extra equipment, and won't look drastically out of place in the year span we're looking at.  More stylish options will be forthcoming.

Step 1: Part your hair down the middle of the head.

A center part.
Don't make your part sloppy like this.

Step 2: Make a second part behind the ears, perpendicular to the first; together these parts make a "T" shape from above.

A second, "T-shaped", part.


Step 3: Braid the back hair (or skip to step 4).  Some people feel more confident if they make a ponytail and then braid it; others think this destabilizes the structure.  I prefer it without the ponytail.

1850s or 1860s hair, step three: braiding the back hair


Step 4: Wind the braid around itself, making a coil at the back of the head.  Pin it in pace. If your hair is long enough to wrap around more that once, it will help to stick at least one pin in round.  To keep it in place, try to catch on each pin some of the braided hair and some of the hair underneath the bun. If using straight steel pins, 'weaving' the pin back and forth when putting it in with help it stay put.

Coiling the back hair into a twist (bun).

Step 5: Tuck the tail of the braid under the bun, and secure with a pin.

Step 6: Grasp the left side hair in your left hand, and raise it so it's straight out.  Smooth this hair out with a brush, then twist the hair by rotating your wrist clockwise.  You can make the twist as tight or as loose as you like.  If you have long-ish bangs, you can try to incorporate them into this twist (a bit of pomade can help).
Brushing the side hair out for an 1850s/1860s hairstyle.

Twisting the side hair.


Step 7: Wrap tail of the twisted hair around the back bun, pinning it in place as you go.  Tuck the ends and pin into place.

Step 8: Repeat with the right side hair.

Basic 1850s/1860s hairdo, side view.


Step 9: Apply a small amount of pomade (I like beeswax-based ones), or oil to your hair and smooth it over the hair to help contain fly-aways and get a sleek Victorian look.  I used to work in the pomade before styling, which may have been the reason my hair kept managing to slide out of place...

Step 10: Wear as is, or add a decorative comb, hair net**, cap, or other embellishment of choice.  Don't forget your bonnet when going outdoors!

1850s or 1860s hairdo, back view with comb.


Miscellaneous tips to mid-Victorian hair styling (with thanks to Betsy, Liz, and Dana, who have all given me useful advice and help on this topic):
  • Freshly washed hair is difficult to style in this manner; if possible, give the hair a day or two to get 'tacky' before you need to dress it.
  • Too much pomade can make the hair very slippery. Use sparingly
  • Pin placement takes a bit of practice.  Bobby pins are meant for bobs (short hair), and aren't ideal for this sort of hair styling.  When wearing a back comb, I prefer to concentrate my pins at the 3 o'clock and 9 o'clock regions of the bun, so I'm not sliding a comb over pins.
  • If you need to use modern elastics, try small ones which match your hair color.
Coming Soon: Stylish variants of this basic 'do for the 1850s and the 1860s, and working around modern hair cuts.

*These instructions from 1861 (London) state that side parts should directly line up with the center of the eyebrow, either left or right.  It also goes on to explain the center parts are universally flattering, and my perusal of period images suggests that most women agreed with this pronouncement.

**Before selecting a net, I would recommend reading Anna Bauersmith's article To Net or Not to Net and looking at her compilation of original images.  Elizabeth Stewart Clark's Getting Snoody is also a good (and cheeky) read.

Thursday, June 4, 2015

Recent Project/Pattern Review SA-250

Girl's yoked dress from Sewing Academy (Historic Moments) pattern.

Yoked bodice 1850s/1860s girl's dress from HMP/SA-250 pattern.

Recently completed project: a girl's dress for the Fort Nisqually wardrobe.  It's a black/white windowpane cotton, fully lined.

I used the Historic Moments Patterns/ Sewing Academy - 250 "Girls' Dresses 1850-1865" pattern for this garment.  Specifically, I used the yoked bodice pattern, with the boat/batteau neckline and waistband options, and the short puffed sleeves. The skirt has three tucks, which may be let out for future re-sizing.

Thoughts on the pattern:

It's very comprehensive pattern, with a 40-odd page booklet covering period sewing techniques and offering different finishing details for your dresses.  This is a great pattern for site costumers or large families, as the many different variations prevent "cookie-cutter" issues.

The available design elements include a yoked or a smooth bodice, with high ("jewel") or low ("boat") necklines and piped edges or waistbands, and four sleeve variations (short smooth or puffed sleeves, long bishop or coat sleeves).  Some of the variations include further customization options: for instance, the bishop sleeves may be made with closed cuffs or with plackets.  These elements, including the four "set in" sleeve patterns, are all interchangeable.  There's also a third "infant-style" bodice which comes with yet another sleeve; in this case, the sleeves/shoulder are cut as one piece (like on an old-fashioned baseball shirt), so it can't interchanged with the other pieces.  However, the infant bodice still has options to customize: varied fullness, fixed or adjustable necklines, waistbands or piping, and the sleeve may be made up smooth, loose, or puffed. Skirt instructions include plain and tucked options.  The author also has advice for making a dress with hidden "growth room", which can be let out as needed.

To see if you like the author's style, I'd recommend reading some of her free patterns (such as this pinafore).  If you can follow it easily, you shouldn't have trouble with HMP/SA-250 (and if you do, there's a support forum available).

The main drawback to this pattern is it's scope: it's very easy to become intimidated by the many different options included in it; with so much ground to cover, there's lots of "continue on page 17 for option X or page 20 for option Y".  For the rectangular pieces (skirt panels, waistbands, cuffs), the instructions call for measuring the child and cutting custom pieces, which may also be strange for one used to modern commercial patterns.  There were one or two typos which caused temporary confusion, but I was working from an older version of this pattern, so these may have been corrected already.

One thing I would change about this pattern is suggesting skirt widths to go with each of the four bodice sizes; period lengths are discussed, and overall width ranges, but as someone without experience sewing for children, I was sort of flying blind on decided how wide to make the skirts. Another potential issue with this pattern is the way the pieces are laid together, particularly the set-in sleeve.  All four sleeve styles and sizes are overlaid, which I enjoyed (it shows how the different styles relate to each other, as well as saving paper), but it does make for a lot of crossing lines which require some concentration to follow.

What You Get:
  • Pattern booklet
  • 3 pages of full-sized bodice and sleeve pieces, on printer-weight paper
Pattern Score: 4.5-5 Stars

Difficulty: Beginner and up.  There's a tutorial of period sewing techniques in the pattern booklet which should be useful to new sewers, or those unfamiliar with period techniques.

Accuracy: High.  No original images are included with the pattern instructions, but many examples are available at the designer's website.

General Impression: This is a very versatile pattern, and provides the shapes needed to make many permutations of girl's dress in the 1850-65.

Wednesday, June 3, 2015

HFF: Bonus Breakfast Challenge (#27)

Historic Food Fortnightly "I Did It" Emblem.

Bonus Challenge: Make a breakfast-food & document it! 

According to Mrs. Beeton:

BREAKFASTS.
2144. It will not be necessary to give here a long bill of fare of cold joints, &c., which may be placed on the side-board, and do duty at the breakfast-table. Suffice it to say, that any cold meat the larder may furnish, should be nicely garnished, and be placed on the buffet. Collared and potted meats or fish, cold game or poultry, veal-and-ham pies, game-and-Rump-steak pies, are all suitable dishes for the breakfast-table; as also cold ham, tongue, &c. &c.

2145. The following list of hot dishes may perhaps assist our readers in knowing what to provide for the comfortable meal called breakfast. Broiled fish, such as mackerel, whiting, herrings, dried haddocks, &c.; mutton chops and rump-steaks, broiled sheep’s kidneys, kidneys la matre d’htel, sausages, plain rashers of bacon, bacon and poached eggs, ham and poached eggs, omelets, plain boiled eggs, oeufs-au-plat, poached eggs on toast, muffins, toast, marmalade, butter, &c. &c.

2146. In the summer, and when they are obtainable, always have a vase of freshly-gathered flowers on the breakfast-table, and, when convenient, a nicely-arranged dish of fruit: when strawberries are in season, these are particularly refreshing; as also grapes, or even currants.

The Receipt: A Jam Omelet

OMELETTE AUX CONFITURES, or JAM OMELET.

1460. INGREDIENTS – 6 eggs, 4 oz. of butter, 3 tablespoonfuls of apricot, strawberry, or any jam that may be preferred.

Mode.—Make the omelet by recipe No. 1459, only instead of doubling it over, leave it flat in the pan. When quite firm, and nicely brown on one side, turn it carefully on to a hot dish, spread over the middle of it the jam, and fold the omelet over on each side; sprinkle sifted sugar over, and serve very quickly. A pretty dish of small omelets may be made by dividing the batter into 3 or 4 portions, and frying them separately; they should then be spread each one with a different kind of preserve, and the omelets rolled over. Always sprinkle sweet omelets with sifted sugar before being sent to table.

For reference, No. 1459:
TO MAKE A PLAIN SWEET OMELET.
1459. INGREDIENTS – 6 eggs, 4 oz. of butter, 2 oz. of sifted sugar.

Mode.—Break the eggs into a basin, omitting the whites of 3; whisk them well, adding the sugar and 2 oz. of the butter, which should be broken into small pieces, and stir all these ingredients well together. Make the remainder of the butter quite hot in a small frying-pan, and when it commences to bubble, pour in the eggs, &c. Keep stirring them until they begin to set; then turn the edges of the omelet over, to make it an oval shape, and finish cooking it. To brown the top, hold the pan before the fire, or use a salamander, and turn it carefully on to a very hot dish: sprinkle sifted sugar over, and serve.

Date/Region: 1861, English

How did you make it: I first needed to decide if there was a typo, and 1460 was intended to have sugar in it as 1459 does.  I opted to try it as written this time, reserving the right to try it the other way in the future.  As the original receipt claims to serve 4 persons, I opted to make it on 1/3 scale; I was also not optimistic about the taste.  Jam and sugar on eggs?

Whisked together two egg yokes and one egg white, added about 2 tsp of butter (cut small).  Melted another 2 tsp of butter on the frying pan, and cooked eggs-butter mixture until firm.  Moved to a plate, added a large a spoonful of blackberry jam, turned over the edges, and sprinkled with sugar.

Time: Less than 10 minutes.

Cost: All ingredients were on hand.

How successful was it? More so that I thought it would be--it still tasted like eggs with jam on them, but it wasn't too bad.

How accurate was it? Very.  I didn't have a 'salamander' or open fire to brown the top, but the omelet still cooked through thoroughly.


Jam Omelet, from Mrs. Beeton's, 1861
Jam Omelet for the Bonus Breakfast Challenge
And that's Year 1 of the Historic Food Fortnightly!  I hear the next round of challenges will be starting in September.