Tuesday, June 2, 2015

1850s-1860s Hair Dressing: Tools & Embellishments

Period-accurate hair styles can really make or break an impression. I'm working on some picture tutorials for making different styles c. 1855-1865; here's my research thus far on accurate accouterments for dressing the hair.

Plain, straight steel pins are one option for holding the hair in place.
19th Century hairpin from Historic New England
Hairpin, 19th century, from Historic New England
Hairpins and other items recovered from the Steamboat Arabia (sunk 1856).
Straight metal hair pins, among other items from the Arabia (1856)
credit: Colette Clark
Similar modern designs: Amish steel hair pins, which most closely follow the shape of period pins, but require some practice to use effectively; Bunheads Hair Pins have a slightly modified shape, but hold really well.

These metal pins can also apparently  be used for decoration:
Decorative (coral?) hairpins, 1850s, from Historic New England.
Hair Pins, c. 1850-1860, from Historic New England
Decorative (pearl) hairpins, 1850s, from the Victoria and Albert Museum.
Hair ornaments on gilt pins, 1850-1855, VAM
Another option with modern analogue is the tortoise-shell pin; it has the same overall narrow-U shape, but with wavy legs instead of straight ones.
Tortoisesheel wavy hair pins, 1870s or later, Historic New England.
Tortoise Hairpins, c. 1870-1920, from Historic New England
Magic-Grip Pins, in 'faux tortoise' plastic, have the same shape, but with straight bar along the waves. I find them initially easier to use than the Amish Steels, but not as easy as the Bunheads. They are readily available at Sally Beauty Supply and similar stores.

Brass hairpins, 19th century, from The Met.
Spanish brass hairpins, about 4" long, 19th century
I've not found a modern reproduction of these brass hairpins.

And those new helical hairpins may not be completely inappropriate...
Spiral or helix tortoiseshell hairpins, 19th century, Historic New England.
Tortoiseshell spiral pins, c. 1870-1920, from Historic New England
Jumping back to the decorative side of things, ornaments on straight pins are also an option.

19th Century silver hair pin from the Victoria and Albert Museum.
Silver Italian hair pin, c. 1835-63, VAM


Some Back Combs:
1851 Vulcanite hair comb, from The Met.
Vulcanite Hair Comb c. 1851
1851 Vulcanite hair comb, from Historic New England.
Vulcanite Hair Comb, c. 1851
1850s Coral hair comb, from Historic New England.
Comb, c. 1850-60
1860s Ivory hair comb, from Historic New England.
Ivory Comb, c. 1860-1870
1820-1850 tortoiseshell hair comb, from Historic New England
Tortoiseshell Comb, c. 1820-1850
1830-1860 tortoiseshell hair comb, from Historic New England
Tortoiseshell Comb c. 1830-1860
1860-1870 hinged hair comb, from Historic New England
Hinged Comb, c. 1860-1870


Back combs are worn tucked into the back hair--they're decorative, rather than functional.  During the late 1850s and early 1860s, this back hair is dressed low on the head/neck, making the back combs primarily visible from behind (they don't stick up over the head as they will earlier and later in the century). Examples:

Dress hair with back comb, 1859, from The Lady's Friend.
The Lady's Friend, 1859
Back comb in hair, 1862, from Peterson's Magazine.
Peterson's, 1862
Hair comb over waterfall, 1865, from Peterson's Magazine.
Peterson's, 1865


Set of tortoiseshell side combs, c. 1860-1880, Historic New England
Set of Three Tortoiseshell Side Combs, c. 1860-1880


Tiaras, diadems, and wreaths also appear in fancy coiffures, particularly for special evening events like balls and formal dinners.

1850s Coral tiara, Victoria and Albert Museum
Coral Tiara, c. 1850-60, VAM
Diamond tiara c. 1850, from the Victoria and Albert Museum
Diamond tiara, c. 1850

Brushes and combs may also be of interest to those demonstrating hair-dressing, or participating in immersion events.

19th century hairbrush, from the UK National Trust Collections.
Ivory Hairbrush, 19th century, British
19th century hair combs, from the UK National Trust Collections.
Ivory Comb, 19th century
19th century silver and horn hair comb, from the UK National Trust Collections.
Horn/Silver Comb, 19th century

Hardware thus dispensed with, on to the software.  Oils and pomades (for imparting softness and sheen on the hair) are discussed in Perfumery, Its Manufacture and Use (1853); How to Arrange the Hair (1857) recommends that pure vegetable oils be used to keep the hair neat--olive oil is apparently used in Southern Europe, while English hair-dressers favor bear, beef, or pork fat; An Encyclopedia of Domestic Economy (1852) contains the most concise treatment of this subject.

Curls may be effected by the use of curling-paper, curling-fluid, and tongs or irons.  I haven't yet found a period reference to rag-curlers (though the method is nearly identical to period crimping techniques).

"Ladies who curl the hair should use for purpose soft paper or silk, which will prevent the hair cracking, and other injuries that result from hard papillottes. Those who wear the hair in bands or braids, ought to or fold it very loosely at night, when retiring rest. It should then always be liberated forced constraints and plaits. It must be combed and thoroughly brushed every morning, and afterwards nicely smoothed with the palm of the hand, which gives it a high gloss, after oil has been applied. In order to add to its length and strength, the ends should be tipped at least once a month, to prevent the hair splitting. "
-Arthur's Illustrated Home Magazine, March 1860

Ad for hair dye and curling fluid, in The Atheneum, 1858
Advertisement for Curling Fluid, from The Atheneum, 1858
It "saves the trouble of using curl papers or irons."
Waves are popular in the early 1860s; commercial crimpers are available, or one may 'make waves' by braiding the hair while wet, or wrapping it through hair pins:
Technique for waving hair, 1864, from The Lady's Friend.
From The Lady's Friend, April 1864
Ad for hair crimpers and curling clasps, 1862, from Godey's
Ad for Hair Crimpers, Godey's, 1862
Braids/plaits for little girls are to be tied with ribbon (in preference to thread).  I have not found a reference to how lady's plaits are fastened, but whatever material is used manages to be concealed in the finished style.

Frizettes or 'rats' are cushions of hair (or, apparently, of silk) that are placed underneath the hair to give it volume and to shape it.  They may be made of 'combings' (gleamed from one's own hair brush), or from cut hair.  "Wigs and frizettes, and bands, and top pieces, and curls" were available for purchase from hair dressers (more detailed description here).
Illustration of waterfall hair piece, 1867, from The Self-Instructor in the Art of Hair Work.
From the Self-Instructor in the Art of Hair Work (1867):
a hair cushion (#1), and two elements which may be built over it
Rats or frizzettes, for building 19th century hair styles.
Modern "rats" made of hair encased in invisible nets.
China hair receiver with painted flower design.
Hair Receiver, date unknown, from the author's collection.
Loose hair from brushes and combs are stored in the hair
receiver until needed for 'frizettes'.

Tuesday, May 19, 2015

Research Post: Regency Shoe Roses

"...the very shoe-roses for Netherfield were got by proxy." --Pride and Prejudice

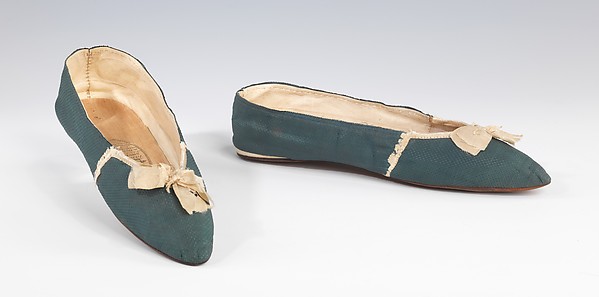
I started compiling shoe and shoe-rose research few months back when working on ball clothes, but didn't have time to post it. So now, without further ado: early nineteenth century shoes with rosettes and bows.  Unless otherwise labelled, they're from the Victoria and Albert Museum (click date under the picture for full listings).
White slippers with matching rosettes, c. 1830-1840, from the Victorian and Albert Museum.

Three slippers with self-fabric or contrast bows to roses, c. 1820, from the VAM.

Low-heeled slipper with rose in accent color, c. 178--1800, from the VAM.

Slipper with self-fabric petal shoe rose, c. 1830-1850, Victoria Albert Museum.

Black slippers with matching bows, c. 1800-1824, Victoria and Albert Museum.

Pale blue slippers, no bows, c. 1800 from Victoria and Albert Museum.

Green slippers with self-fabric bows, c. 1810-1829, at The Met.
c, 1810-1829, from The Met
Slippers with contrast bows, c. 1815-1820, at The Met.
c. 1815-1820, from The Met
Slippers with contrast bows and laces, 1812, at The Met.
1812, from The Met

Observations: All of the shoes appear to be made on straight lasts (no obvious right and left); excepting the earliest pair with its low heels, the shoes are all flats.  Most have open tops, similar to a "ballet flat"; the earliest two pairs from the V & A (and all three from The Met) have shallow pointed or rounded toes; the four later V & A pairs have square toe boxes.  Excepting the earliest (patterned) example, the shoes tend to be solid colored. From the descriptions, these are primarily silk uppers, with leather soles and linen linings.

The "roses" take different shapes: bows, coiled 'rosettes', layered fabric 'petals', and what appears to be a fringe rosette around a button.  For the most part, the decorations tend to be the same color as the shoe itself; of the three with contrasting decorations, two have white bows on colored shoes.  Where used, the laces/ribbons also match the shoe color, save for the 1812 pair in which the ribbons match the contrasting rosette. 

So, to imitate a Regency or Georgian dancing slipper with modern shoes, I'd look for a plain, solid-colored, fabric upper with an open top; no heel; rounded (1800-1820s) or square (1820s+) toes; and minimal right-left emphasis.  The "look" can be further enhanced by adding color-coordinated rosettes or bows, and possibly ribbon laces.  In an ideal world, of course, I'd have snagged a pair of Robert Land's regency slippers before he retired.  Now, I'm thinking I'll just have to learn how to make shoes.  

Monday, May 18, 2015

HFF #26: Working-Class Dinner

FINAL CHALLENGE COMPLETE!

Historical Food Fortnightly Icon
The Challenge: Make a dish of the common folk.

The Receipt: Irish Stew from A Plain Cookery Book for the Working Classes by Charles Elme Francatelli

No. 117. Irish Stew.
Inferior parts of any kind of meat make a good Irish stew. Let the meat be cut in pieces the size of an egg, well rubbed all over with pepper and salt, and placed in a good-sized pot or saucepan; add peeled onions in the proportion of six to the pound of meat, and enough water just to cover in the whole. Next, set the stew on the fire to boil very gently for an hour and a-half, then add such quantity of peeled and split potatoes as you may think will suffice for the number of persons about to dine off the stew, and put the whole back on the fire to boil briskly until the potatoes are thoroughly done soft; the Irish stew will then be ready to eat.
Date/Region: 1852, London

How did you make it: Procured 1/2 lb of the cheapest chicken available, cut it into egg-sized chunks, rolled in salt & ground pepper, and placed in the pot.  Sliced 2 large yellow onions (should have been three, but it was a lot of onion with just the two) and added it to the chicken, along with water enough to cover (est. 2-3 cups).  Set on medium heat for 90 minutes.  Peeled and cut 3 medium russet potatoes, and added to the stew (along with another 1.5-2 cups of water, so that the potatoes were mostly covered).  Continued heating for another half hour, until the potatoes were also soft.

Time:  10 minutes prep, 2 hours cooking

Cost: $2.50 for the meat, vegetables were on hand

How successful was it? Simple, but tasty: it's hard to go wrong with onions, salt, and pepper. I was surprised at how much the onions cooked down--even coarsely sliced, they had basically vanished.

How accurate was it? Slightly reduced number of onions (noted above), and the extra water added with the potatoes.  I expect "cheap cut of meat" also changes it's definition when one is slaughtering one's own animals, or at least procuring it from a real butcher (ie, not Trader Joe's).

Stewing meat with onion.
Meat & onions, after 1 1/2 hours stewing
Irish Stew, from an 1852 recipe.
Irish Stew

Friday, May 15, 2015

Plaid Work Petticoat

Reproduction plaid work petticoat, 1850s or 1860s.

Finished just in time for Fort Nisqually's fashion show!  The patterned work petticoat (possibly made-over from an old dress) helps protect one's dress during dirty chores.  I'll be using it in the fashion show tomorrow to demonstrate how accessories can change an outfit.

In both cases, I'll be wearing my green shirting-plaid dress.  To "dress it down":
  • Neck-kerchief at the throat 
  • Sleeves rolled up
  • Skirt pinned up over the plaid petticoat 
  • Print apron with bib
  • Sunbonnet
Note that all of the accessories or modifications serve to keep the dress clean in some way: shielding it from grime (sleeves, apron, petticoat), sweat (kerchief), or sun discoloration (bonnet).
To "dress it up":
  • Collar and brooch at throat
  • White cuffs on sleeves
  • White petticoats for fashionable loft (not seen)
  • Belt
  • Gloves
  • Fashionable white crepe bonnet
Edited to add: check out this original madras plaid!
Madras plaid handkerchief, c. 1855, from the Victoria and Albert Museum.
Plaid handkerchief c. 1855, VAM

Wednesday, May 13, 2015

HFF #25: Orange You Glad...

Very punny, Betsy & Melissa.  Also, the 100th post on this blog!

The Challenge: Orange-flavored, orange-colored... anything "orange."

The Receipt:  Orange Custard from The Cook's Own Book and Housekeeper's Register by Mrs.  N. K. M. Lee

ORANGE CUSTARD. Having boiled the rind of a Seville orange very tender, beat it in a mortar to a fine paste; put to it the juice of a Seville orange, a spoonful of the best brandy, four ounces of loaf sugar, and the yolks of four eggs; beat them all well together ten minutes, then pour in by degrees a pint of boiling cream; keep beating it till cold; put it into custard glasses. Set them in an earthen dish of hot water; let them stand till they are set, then stick preserved orange, or orange chips, on the top.  It may be served hot or cold.

Year/Region: 1842, American (Boston)

How Did You Make It: Boiled the rind of 1 navel orange (change from original receipt) for c. 30 min, topping off the water as needed.  Ground the peel into a paste with the mortar & pestle, then mixed it up with the juice of the orange, 1 Tbsp brandy, just under 4 oz of granulated sugar, and 4 egg yolks.  Continued beating with the mixer while bringing 1 pint of cream to boil, and continued mixing while adding the cream, and allowing the mixture to cool.  Poured into glasses and place in a pan of warm water to set.

(It didn't actually set during the first hour, so I moved one of the cups into the refrigerator; none have set as of 7 hours later--usually, this means I didn't boil something long enough).

Time to Complete: About half an hour to soften the peel, and a little under another half hour to mix up the ingredients.  Setting time unknown, as it didn't actually set.

Total Cost: $4.50-ish, with sugar and brandy on hand.

How Successful Was It?: Tasted fine--a light orange flavor, rich with cream and rather sweet (but not overwhelmingly so).  The only problem was that it's still liquid rather than custard.  Might try freezing it.

How Accurate Is It?: I used granulated sugar for loaf sugar, as usual.  More pertinently, Seville oranges apparently aren't in season at the moment, so I used a navel orange instead.  According to the internet, Seville oranges are notably tart--even to the point of being compared to lemons--so I skimped slightly on the 4 oz of sugar to make up for the sweeter orange.  Not having custard glasses (which seem to be stemmed glasses with handles), I substituted breakfast glasses and champagne coupes.

Juicing an orange and mashing the peel.
Step 1 went all right: juicing an orange and mashing the peel.
Orange custard from an 1842 recipe (didn't set).
Custard tasted yummy, but didn't reach the desired consistency.


Monday, May 11, 2015

Lincoln Funeral 150th Anniversary

Trip picture time! This was my first time travelling for an event, and my mom's first event ever. While there were some frustrating logistic issues, the other reenactors were delightful; the coordinators for the Ursuline Hill (progressive civilian) section were particularly praiseworthy.  Springfield was very nice, too.  I'm now horribly jealous of the Edwards House (has provenance for a ton of its furniture, and got to reproduce its actual wallpaper in the restoration), am ready to move into Lincoln's neighborhood.

Springfield was a ridiculously lovely little town to visit. The residents were uniformly polite and welcoming, even when beset on all sides by strangely attired visitors. And they really dove into things: not only were the historic houses draped in crepe, but even modern business in downtown, and private houses along the procession got involved.

Sites definitely worth visiting:

The Abraham Lincoln Presidential Library and Museum. The museum is much more tourist-friendly of the two, and has some very impressive technology going into its theatrical presentations. The most amusing exhibit, in my opinion, was the modern network news treatment of the 1860 Presidential Election—and definitely read the crawl script.

The Lincoln House is gorgeous. Some of the furnishings are original; the front rooms are decorated to match the engravings made of them for Frank Leslie's in 1860 (a reprint of which, incidentally, is available in the gift shop).

Lincoln House in Springfield, April 2015; black bunting for 150th anniversary of Abraham Lincoln's funeral.
Lincoln House, draped in mourning, April 2015
The neighborhood around the house, for one block in each direction, has been restored to its c. 1860 appearance. Two of the houses are open to visitors, with displays on the rehabilitation project. The surviving buildings all have modern interiors, and restored historic facades (excepting one house which is still in progress) with explanatory placards noting the 1860s residents and their relationship to the Lincolns.
8th Street, Springfield, Lincoln neighborhood.
8th Street, looking north
8th Street, Springfield, Lincoln neighborhood.
8th Street, south of Jackson
The Old State Capitol was also quite lovely; it has a rebuilt interior c. 1860 (originally in use 1839-1876), and guides to walk you through it.
Old State Capitol in Springfield, Ill.
The Old Statehouse in Springfield
Interior of Old State Capitol in Springfield, Ill.
Second floor stairs
Representatives' Chamber, Old Statehouse, Springfield, Ill.
The Representatives' Chamber
Right across the street, stands one of Abraham Lincoln's legal premises (unfortunately not open at present).
Lincoln-Herndown Law Offices in Springfield, Ill.
There's a neat statue of Abe, Mary, and the younger boys just outside
Edwards Place, once of the home of Benjamin Stephenson Edwards (Mary Todd Lincoln's sister Elizabeth was married to Ben's brother Ninian), houses the Springfield Art Association. The ground floor has been restored to its mid nineteenth-century appearance, including reproduced wallpaper (printed from surviving scraps), appropriate china and glassware based on excavated shards, some original furniture, and supplemental period-appropriate pieces from other Springfield homes. There's also a modern gallery attached.
Re-constructed blue transferware pitcher from the Edwards House, Springfield, IL.
Reconstructed pitcher (from shards found in privy)
1840s sofa, Edwards House, Springfield, IL.
1840's (?) sofa and loud carpet
Original and reproduction wallpaper, Edwards House, Springfield, IL.
Original and reproduced wallpaper
Oak Ridge Cemetery, of course, contains the Lincoln family's very impressive tomb. The original entrance and receiving vault were restored for the 150th anniversary exercises.
Historic entrance to Oakridge Cemetery, Springfield, IL.
Restored historic entrance
Lincoln tomb, Oakridge Cemetery, Springfield, IL.
Lincoln Tomb
Sculptures on Lincoln tomb, Oakridge Cemetery, Springfield, IL.
Sculpture Details

Historic receiving vault, Oakridge Cemetery, Springfield, IL.
Restored Receiving Vault
I've few pictures of the Funeral events themselves, on account of my camera being distinctly un-period-correct. There was a very well-attended symposium at U. Illinois-Springfield Thursday evening. On Friday, Mom and I took Nanci Gasiel's class on making mourning badges.

Reproduced Lincoln mourning badge or cockade.
Mourning badge, based on an original
 The class was held in the lovely Brinkerhoff mansion, on the grounds of Benedictine University. The University also which also housed some of the reenactment camping, as well as the civilian-centered sutlers, including Victorian Needle, P. Palmer, and the Dressmaker's Shop. On Saturday afternoon, the proprietresses (and certain other civilians) gave half-hour lectures on their particular topics of interest—we caught all or part of talks on jewelry, straw bonnet manufacture, misconceptions about underwear, laundry, and the different styles/shapes of men's hats.
Brinkerhoff Mansion, Benedictine University, Springfield, Ill.
Brinkerfhoff Mansion
Saturday morning had the short procession, in which the replica coffin was removed from its special rail car, and transported to the Statehouse. The hearse was accompanied by dignitaries in carriages, military columns, and a crowd of citizens. As part of that crowd, I didn't get any pictures.

For the longer procession (Statehouse to Oak Ridge) on Sunday, however, I got some pictures from the sidelines before joining the march.
Replica hearse used in 150th Anniversary Lincoln Funeral Procession.
Reproduced hearse, pulled by 6 horses
Reenactor soldiers marching in 150th Anniversary Lincoln Funeral Procession.
Soldiers marching in the procession
Musicians in 150th Anniversary Lincoln Funeral Procession.
Musicians in the procession

Columns of infantry in 150th Anniversary Lincoln Funeral Procession.
Military units precede the hearse