Monday, March 31, 2025

March Mending

March was an even busier month for mending. I started with a full inventory of my reenacting closet, removing everything from the hangers and drawers, and sorting through it.

How it started.

Garments that were whole and ready to wear went back up in the closet immediately. This was mostly my cloaks, mantles, and shawls. Items that needed only minor repair went onto the mending basket; this included the bulk of my 1850s clothing, which is fair since it sees the most wear. My third category, items that likely need some major re-fitting or alteration, went back up in the closet, in a segregated area (and marked with yarn tied to the hangers as a reminder.) Things I can't or won't wear again went into one of two boxes: if I like the material and think there's enough of it to recycle, it'll be picked apart and remade. The other box is items to sell at the upcoming reenactor swap meet.

I managed to get through my main garments, underthings, and shoes, though I still have to sort through my bonnets, stockings, and accessories, which live in the smaller totes.

How it continued.

My first round of mending included my corded and quilted petticoats (replacing seams below the plackets), fastening down escaped pleats on my 1870s print skirt and my 1860s sage wool skirt (and some darning on the latter), restraining an escaped bone on my 1820s long stays, and many small repairs to my blue wrapper (sleeve seam, neck binding, and a small section of gauging on the skirt).

My knitting apron, following an adverse tea incident, got the silk ribbons removed so that it could the hand-washed. The ribbons also received a badly-needed pressing before being sewn back on. I was worried about how to iron the apron itself, with its extensive gathers and decorative ruching, but after air-drying it, it actually looks as good as new.

Before (R) and after (L) ironing the ribbons.

I then started to pick apart some of the garments that will need more extensive remodelling, starting with the canary-yellow sheer. Most of these are still in the to-do basket.

Later in the month, I re-seamed the legs on a pair of drawers, and also patched 4 modern pairs of jeans (which all conveniently decided to wear through at the same time).


Wednesday, March 26, 2025

1840s Shoes

My last two pairs of 1850s shoes are both in need of new soles, and as none of the vendors currently have my size in stock, it became necessary to try making another pair.

The end result has much rounder toes than expected.
 
This time went better than before, notably because I now have some lasts, and was able to follow the general process in Nicole Rudolph's "How to Make Regency & Victorian Shoes" video instead of just relying on Every Lady Her Own Shoemaker alone. Nicole recommends making a low shoe rather than a boot in her video, so my options were rather limited. The inspiration shoes are a pair of 1840s cotton shoes from the Met. I chose them because the foxing and lacing effects look similar to the popular gaiters of the 1850s, and they were one of only two pairs of women's non-slipper shoes from the mid-19th-century I could find in my searching. While slippers appear to have been used for daily wear earlier in the century, by the 1850s they really seem relegated to formal dress for adults. 
 
The original shoes have a figured cotton upper, which is cut in two pieces (left and right) and seamed at the center front and center back. For mine, I used a wool twill "lasting" from Burley & Trowbridge, with scrap leather for the foxing, and white pimatex cotton for the lining. 
 
No interior images are available, but bit of the little the center back lining seam that's visible has no raw edges; I chose to interpret this by making the lining and outside upper separately, then joining them at the binding with all the raw edges sandwiched between the layers. The shoes have six whip-stitched eyelets in their center lacings; on the originals this closes the shoe, and no tongues are visible (though they could be present and hidden under the ties, I see no evidence of this).

I originally enlarged the historic shoe image to match my shoe length, then took a series of proportions off of it (foxing should extend 1/2 way up the ~4.75" center front seam, then 1/6 of that length is a plain seam, then the final 1/3 the open placket). I'm not satisfied with how these compare in the final product to the original, but I did repeat this process for the sides of the foxing, the heel foxing, and the height of the shoe, and when taking the pattern on the last, it looked a lot closer to the original.
 
For the uppers, I mostly followed the process from Every Lady Her Own Shoemaker, along with what I could reason from the historic picture. After seaming the wool layer of the upper, I bound the foxing pieces with the twill tape, then laid them over the wool and topstitched into place. Close-up view of the original show 2 close rows of lockstitch or backstitch going over the tape on the foxing. After this, I lined up the lining and outer layer, a joined them by binding their upper edges. I did this by hand in order to avoid turning sharp corners on the sewing machine. I couldn't find a seam in the binding on the original, and interpreted this by putting it at the front inside corner, where the bows conceal it. It's definitely not at the center front opening, though it could have been at the center back, where the binding almost entirely worn away on both originals. The six eyelets are worked in whip stitch in a black silk buttonhole twist.
 
I followed Nicole's video to cut the soles and insoles, attach the upper to the last, and put everything together. She mentions in the video that using rubber cement instead of stitching the soles wouldn't become popular until 40-50 years after the Regency shoes she is making, which was nicely reassuring for me trying to make shoes from that later period.

Better than my previous pairs, but I have much to learn.

I wore the shoes to cook at Fort Nisqually last Sunday. It poured rain all day, but I contrived to stay indoors most of the time. I did end up crossing the yard ~3 times, and found these adequate. They only felt a little damp on the second two excursions, and dried out very quickly (in fairness, I was keeping to the paths and trying to avoid puddles and wet grass). The shoes were a little looser than I feared/expected, though nowhere near as floppy as the plaid gaiters I made before. There is room for my insoles, which made them much more comfortable than most of my other period shoes, though they feel lighter and flimsier than my purchased shoes.
 
Appearance-wise, I have a laundry list of problems, from the very rounded appearance of the toe (the last actually has a square toe, albeit with more of a curve along the outside edge than I'd like) to the crooked foxing, to the two places where I shaved of the turned leather too close to the edge of the sole. Despite edging and burnishing, the soles are a bit rougher around the edges than I'd like. The sole-upper-insole layers were rough and clumsy-looking despite my attempts to even things out, but somehow this didn't end up making the shoes uncomfortable.
 
In the end, I'd call this "serviceable" and "the most accurate shoe option currently available to me," but I'm also going to try getting my Balmoral boots and/or walking shoes re-soled for outdoor use. These lighter shoes I'll keep for indoor and summer events (where the light uppers should be very comfortable). 

Tuesday, March 25, 2025

A Bachelor's Bread Pudding (1855)

And a final receipt from Sunday at the Fort.

A Bachelor's Bread Pudding

The Recipe: A Bachelor's Bread Pudding from The Practical Housekeeper and Young Woman's Friend

A Bachelor's Bread Pudding--Four oz of grated bread, the same of currants and apple, two oz of sugar, three eggs, a little essence of lemon and ground cinnamon. Boil it three hours. 

The Date/Year and Region: 1855, Toledo, OH
 
How Did You Make It: As the receipt gives no instructions, I basically winged this one. I started by grating about half a loaf of sour dough bread (not quite as stale as expected), which readily got me to 4oz. I cored and diced one apple (also 4 oz), and mixed all this together with the 4oz of currants, 2 oz granulated sugar, several dashes of ground cinnamon, and a splash of lemon extract. I beat 3 eggs and mixed them into the dry ingredients, then put all of this mixture into my smaller melon mold. This went into a pot of water on the stovetop, and remained there about three hours

Time to Complete: A half hour to prepare, 3 hours to boil.
 
Total Cost: About $3.50 at the current price of eggs and the currants (bread was left-over, apples and the rest on hand).
 
How Successful Was It?: Very well received. The flavor was nice and interesting, but not overwhelming (one of the interpreters compared it to applesauce), and several complimented the texture. One friend even took some home for a spouse who likes boiled puddings. Suggestions were made of adding a custard, whipped cream, or whiskey sauce over it. 
 
I was worried about the apples, since I've seen apple pudding receipts ranging from 'boil the apples down entirely before mixing with breadcrumbs' to 'core but don't otherwise peel or cut the apple.' Dicing them small, without peeling, was my compromise idea (and a lazy one, since I had no peeler but also don't like solid chunks of apple in my bread puddings), and it seemed to work fine.
 
How Accurate Is It? The ingredient list is all I have to go on, so I'd say this is as close as I can get, baring a more detailed set of instructions, particularly dealing with the apples. From the proportion of the ingredients, I assumed that laying the fruit nicely and then filling in the mold wouldn't be practical, thus mixing everything together. Finding heirloom apples (not the pink lady apples I got at the store) and drying real currants (not the zante currants I can purchase) are the only two changes I can think of at this time that make this more accurately.

Monday, March 24, 2025

Carrots au Beurre or Buttered Carrots (1854)

 Another receipt from Sunday at the Fort.

Carrots au Beurre or Buttered Carrots.


The Recipe: Carrots au Beurre or Buttered Carrots from Eliza Acton's Modern Cookery

The Date/Year and Region: 1854, England
 
How Did You Make It: I cut the last of my winter carrots into sticks about 1/4" wide, and set them to boil on the stovetop. Once soft, I strained the carrots, then melted ~3oz of butter on the stovetop, with a handful of minced parsley, and a dash of salt and of pepper. As I couldn't find the cayenne, I substituted black pepper. Once the butter was melted, I added the carrots back in, stirred about a minute, and then served it.
 
Time to Complete: About half an hour, including boiling the carrots. Estimate because no clock in the kitchen, etc.
 
Total Cost: About $1 for the butter. Carrots from my garden and parsley from the Fort's.
 
How Successful Was It?: Tasty enough. It was a bit overshadowed by the other fare, but the carrots were cooked through, the butter-and-parsley sauce suited them well. I don't often have the opportunity to serve hot vegetable side-dishes at period events, but this is a very pleasant way to serve them.

How Accurate Is It? I used heirloom carrots, and cooked everything on a wood-burning stove, so it's about as close as I can get. I would use the correct pepper next time, but that's the only obvious thing I can think to make it more accurate. I might be wrong about "dissolve" meaning "melt", but as no mention was made of water or another solvent in the sauce, I think my interpretation was correct.

Sunday, March 23, 2025

Sausage Rolls (1853)

It's not a Historic Food Fortnightly challenge, but I was back at the Fort kitchen (and working solo for the first time in a while), so I decided it was time to write up some new receipts.


Sausage Rolls

The Recipe: Sausage Rolls from Household Hints to Young Housewives

SAUSAGE ROLLS. Sausage meat rolled in crust and cut in lengths about 2 inches. the outside brushed with yolk of egg . 

The Date/Year and Region: 1853, London
 
How Did You Make It: I made a paste from the receipt in this same book (half scale 1 lb flour, 1/2 lb suet, 1/2 tsp salt, water as needed), substituting butter for the suet, as I did not have any. This half scale was ample for the 1 lb of pork sausage meat, to which I added about 12 narrow sage leaves (chopped) and salt and pepper, based on various similar receipts. For future reference, the receipts which go into further detail indicate that the sausage meat should be 2/3 lean pork and 1/3 fat.
 
I rolled out the paste into 4" wide pieces, set on the ground pork, and wrapped the paste around, then cut into 1-1.5" long pieces, and treated the tops with beaten egg. I baked the rolls in the wood-fired oven; it was to be a 'quick oven', but didn't achieve the requisite temperature until Elise took charge of the fire. The rolls were cooked until the pastry started browning and the meat was cooked through.  

About 1/4 of the paste was in excess, so I tossed some sugar and cinnamon on it, and baked it as puits d'amour.
 
Time to Complete: About 20 minutes to prepare, less than an hour to bake (no clock in the period kitchen).
 
Total Cost: About $6.50 for butter and meat.
 
How Successful Was It?: Tasty. Most of the interpreters took two. I'm not sure they were a good as Quin's, but they were quite nice hot out of the oven. I tried not to overwork the pastry crust this time, and it wasn't particularly tough, but it also wasn't as flaky as I would have liked (though some of that might have been the oven temperature).
 
How Accurate Is It? I used pre-ground pork, but most versions of this receipt assume you'll purchase it from a butcher, which is functionally what I did. I based on the flavoring (sage leaves, salt, pepper) on similar receipts, and again feel pretty good about that. The use of butter for suet was an intentional deviation, but that would provide one way to get closer to the original.

Thursday, March 20, 2025

Book Review: The Domestic Revolution

The Domestic Revolution by Ruth Goodman
 

I have a new favorite Ruth Goodman book. Embarrassingly enough, I ordered The Domestic Revolution: How the Introduction of Coal into Our Homes Changed Everything when it first came out in 2020, read it three times, but somehow never actually finished this post. The book is a bit of a departure from the author's previous titles, spanning the 16th to 19th centuries instead of focusing on a single century/reign, and it really delves the changes over that period rather than giving a snapshot of a particular time. As the subtitle suggests, this book explores the causes and effects of adopting coal as the primary domestic fuel in England. 

The book is 302 pages (excluding the bibliography), divided into nine chapters. The first of these discusses the various fuels that were used before the widespread adoption of coal; later chapters explore the factors which led to coal replacing wood as Britain's main fuel coal, the evidence for how/where coal use spread through the island, and the resulting the changes in land-use patterns, cooking methods, house fixtures, and cleaning practices that arose from domestic coal use. The primary sources are eclectic, including wills/inventories, charitable bequests, household manuals, cookbooks, surviving buildings, advertisements, patents; I find their use persuasive and the conclusions drawn from them plausible. The author also describes her own historical experiments where relevant (particularly concerning cooking and the idiosyncrasies of using different fuels) which I think adds a unique practical dimension to the discussion.

This is a fairly text-heavy book. The images, averaging just over six per chapter, are often copied from period sources. There are no color illustrations, and the modern images are mostly simple illustrations or diagrams (including grates, coppices, peat cooking fires, the reconstructed Mary Rose galley.) There were times when I wished I was standing next to a reconstructed oven with the author pointing out the relevant features, but overall the text carries the message and the book doesn't really suffer from having few illustrations. As always, the writing is approachable, and reads like a friend telling you all about their latest historic research project. The text does not use numbered citations, but the bibliography is divided by chapter.

Overall, I found the book enjoyable, and thought-provoking. I particularly like how the author ties the different subtopic to eachother: how land-use affects the availability of different fuels, how those fuels affect cooking styles and oven design; tracing the changes to English cuisine as coal replaced slower fuels; and even the different cleaning methods needed in a coal-burning versus wood-burning households.

*In addition to wood, the first chapter explores the practical aspects of other domestic fuels used in Britain prior to and aside from coal, including peat/turves, heather, gorse/ling, furze, and animal dung.

Score: Five Stars.

Accuracy: High.

Strongest Impression: An interesting synthesis of Ruth's many areas of expertise, this book caused me to seriously rethink the interconnected-ness of housework, energy, land-use, and foodways, as well as offering insight into how fuel choice shapes cooking (and many other things.)

Sunday, March 16, 2025

Chemise Embroidery Designs, 1856-1860

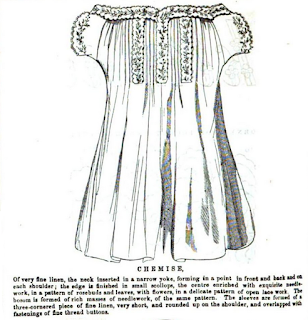
 Looking through some old notes, I found these embroidery patterns for chemises (bands, yokes, and sleeves) from the late 1850s. I don't recall planning an embroidered chemise at that time, though it is certainly nice to dream.


Chemise Band embroidery from Peterson's, June 1859.

And yokes from the February and August 1859 issues of Peterson's:
And September of '57:

Many chemise band, yoke, and/or sleeve embroidery patterns from Godey's 1856-1857:


A nice simple embroidery design from The Hesperian, May 1859

Arthur's Home Magazine (1860) has three designs for chemises with embroidered components in their (with the embroidery described, though no patterns are not given). I'm including these because they give some interesting ways the embroidered segments can be used (aside from the obvious 'band or yoke across the top, sleeves at the sides').
 

Wednesday, March 12, 2025

Foods in Season: March 1861

As I ramp up my gardening activities, it's time to see what Beeton's Book of Household Management has to say about foods that are in season for March.

Fish- Barbel, brill, carp, crabs, crayfish, dace, eels, flounders, haddocks, herrings, lampreys, lobsters, mussels, oysters, perch, pike, plaice, prawns, shrimps, skate, smelts, soles, sprats, sturgeon, tench, thornback, turbot, whiting.

Meat- Beef, house lamb, mutton, pork, veal.

Poultry- Capons, chickens, ducklings, tame and wild pigeons, pullets with eggs, turkeys, wild-fowl, though now not in full season.

Game- Grouse, hares, partridges, pheasants, snipes, woodcock.

Vegetables-Beetroot, broccoli (purple and white), Brussels sprouts, cabbages, carrots, celery, chervil, cresses, cucumbers (forced), endive, kidney-beans, lettuces, parsnips, potatoes, savoys, sea-kale, spinach, turnips, -various herbs

Fruit- Apples (golden and Dutch pippins), grapes, medlars, nuts, oranges, pears (Bon Chrétien), walnuts, dried fruits (foreign), such as almonds and raisins; French and Spanish plums; prunes, figs, dates, crystallized preserves.

Cod is off the menu! Not that I usually cook with it. No changes to the meat or fruit lists. Fowls are now out of both the poultry and game categories. Sea-kale has been added to the vegetable category (the only new addition this month). So, all told, March is looking very similar to February. And January. While this is a much larger variety of foods than one might fear, I'm starting to get a better appreciation for how boring late winter and early spring cooking can get prior to long-distance refrigerated transit.


Friday, March 7, 2025

Chicken (Standing) Pie, 1854

The pie, prior to baking.

Last dish from the camera roll. To add some variety the table last candlelight, I finally made a standing meat pie in my pie molds. 

I based the filling on a chicken pie receipt in Mrs. Williamson's Practice of Cookery and Pastry (1854), layering pieces of chicken and boiled egg inside a crust, the whole flavored with salt, pepper, nutmeg, and gravy. I miscalculated (read: used it all up on the croquettes) and had to omit the slices of ham, while the gravy was a thickened vegetable stock, since I had no giblets to boil down. The instructions are a bit vague about de-boning the chicken, and the reference to using whole birds rather than joints they are small, I assume the bones are meant to be left in. I intentionally changed this, using chicken breasts and thighs, with all the bone, skin, etc., removed. I think this was the right decision, both for my own eating preferences, and to avoid unpleasant surprises for various other reenactors.

While the above receipt calls for puff paste, I used a hot-water crust to ensure that it had the structural integrity to handle the 'standing pie mold' situation. The Complete Confectioner, Pastry-Cook, and Baker (1864) gave a raised pie crust, which nicely filled my mold when scaled down to 2 lbs flour (the original assumes 7 lbs flour). I did end up having to use lard in place of the suet, which likely cost me some strength, though the pie held up. I used cookie-cutters and Quin's edging-mold to make the ornaments for the top.


Thursday, March 6, 2025

Belated 12th Night Cake

Revisited the 1857 Godey's receipt-in-verse for Twelfth Cake again this year. The changes this time were:

  • I finally found candied citron, and thus was able to include all of the fruit and nuts in their proper proportions.
  • I made a half-receipt worth of cake.
  • I made a cake with gluten-free flour.
  • I tried freezing the cake.
  • I decorated the cake using piped icing. 

By way of explanation, I had two 12th Night events planned, one period and one modern, and so made two quarter-receipt-sized cakes. For the modern one, I again used a 1-to-1 gluten-free flour substitute, while I used regular flour for the period one. The period event then got postponed, so I stuck the extra cake in the freezer.

Period cake in the hoop, modern in the springform pan.

My first takeaway of the experience is that the candied citron mostly gets lost in the mass of other fruit (and some spice) flavors. There just isn't that much citron, so it's only every few bites that I'd get a flash of citron flavor among the currants and almonds. That being said, it was strong enough to be picked out, and it worked with the other flavors. I'm glad to have the chance to try it, and would use it again in the future, but I also think the cake doesn't suffer from missing it when the citron isn't available.

Since I used different flours, I was really making two quarter-batches rather than one half-batch. In the process, I observed that my modern springform pans are not large enough for even a half-receipt of the cake (the period cake hoop could probably manage a half batch, though not a whole), and it's doubtful that my mixer would be up to the half-batch either. I didn't notice any difference in taste or texture between the two cakes (both being functionally a mass of dried fruit held together with minimal batter), making it one of my most successful gluten-free baking experiments to date. Freezing the one cake worked beautifully:  as soon as it was cool, I wrapped it tightly with the parchment paper I had baked it in, then covered that with tin foil. It was in the freezer for a month, then I let it thaw for a day before frosting and serving it.

The icing was still my modern buttercream frosting, though I have since received a tip about adapting period royal icing which I will try next time (apparently meringue powder allows one to avoid the 'uncooked egg whites' issue).  I opted for piped decorations this time, since I came across detailed period instructions for piping icing onto Twelfth Cakes (also Wedding Cakes), though I failed to save the link for once. Will update when I find it again.


Modern cake. The period one had white-on-white frosting.


Wednesday, March 5, 2025

Comparative Cheese & Also Custard Puddings (1845-1855)

While I'm going through my old pictures: last week's cheese experiments at Fort Nisqually. All three receipts are variations on "melted cheese adjacent to bread" from The Carolina Housewife (1855).

Boiled Cheese.

 We used Quin's homemade sourdough and a mild cheddar cheese for all three receipts, in order to compare them. The boiled cheese involved melting the cheese on the stovetop with milk, butter, and egg. It was served with sippets of toasted bread (made in bulk on the skillet on the stovetop, since toasting it on the forks one at a time would have been prohibitive). The stewed cheese called for cream, butter, cheese, and a salamander to cook it from above. Both ended up tasting like delicious melted cheese, and tended to solidify quickly once taken off the heat. The stewed cheese was a little less intensely cheddar-flavored, but they were very similar in general.

To Stew Cheese.

The toasted cheese again called for grated cheese mixed with cream and butter, but also had salt, pepper, mustard, and breadcrumbs, which worked into a paste with the consistency of play-dough. This was spread over slices of bread and baked in the oven until the cheese started to brown. The flavor was quite good (after eating so much cheese, the slight kick of the mustard made a nice variation), though the texture of the cheese paste was a little too similar to the bread in my opinion. It was however, much easier and neater to eat than the first two receipts. All three receipts went together quickly, and would be easy to make around other receipts (say, for the cook's lunch while demonstrating other dishes).

To Toast Cheese.

For dessert, we made two different versions of a custard pudding. Again, for good comparison, both were flavored with almond [there was a mishap with the lemon flavoring] and served with homemade preserves. One was a common custard pudding from Eliza Acton's Modern Cookery (1845), the other from Cookery Rational, Practical, and Economical (1855). 

Common custard pudding. (Boiled)

The first was boiled, and the second baked, but the only other difference was the exact proportion of eggs, milk, and flavoring. The baked pudding did have an option to substitute flour for some of the eggs, but we decided not to do this. Both receipts produced a nice molded dessert with the texture of a flan and a notable, but not overwhelming, almond flavor. There was a small mishap with the boiled pudding turning sideways enough to have water leak into the mold, but the pudding still held together when turned out. I did end up draining excess water off the plate after it had set a few minutes. I noticed little difference between the two, but Quin preferred the baked pudding (the water leak apparently making the boiled one too moist).

Custard pudding. (Baked.)

All in all, it was a tasty day. Except for the bread being baked in advance in a modern home kitchen, everything was prepared in the Fort's historic kitchen, using the wood-burning stove. All of our ingredients were as close to period as possible, and most can be documented to the place as well.

Tuesday, March 4, 2025

Updated Coconut Macaroons (1845)

Close up of a blue transferware plate on a white tablecloth, the plate covered in small white cookies.
Coconut Macaroons.


Revisited the Very Fine Coconut Macaroons from Eliza Acton's Modern Cookery (1845) for Fort Steilacoom on Sunday. It's a simple receipt that scales easily (1 white beaten stiff, 2 oz sugar, 1oz dry shredded coconut; bake on low until firm). I did 2 eggs worth again, which neatly filled 1.5 pans. Despite beating the egg whites to stiff peaks, the mixture liquefied as soon as I added the other ingredients, so I didn't get to shape the macaroons by rolling the dough into balls. This is probably why they turned out a bit flat, but they tasted fine anyway. I'm mostly posting this update so that I can note the cooking temperature: the macaroons were mostly done after 30 minutes at 180F, but the bottoms were still sticky and tended to come apart. I put them back in for another 10 minutes (40 minutes at 180F in total), and then let them sit in the cooling oven overnight. They ended up cooked all the way through, without changing color.

Saturday, March 1, 2025

Original: Silk Ankle Boots, c.1855-1865

 I never did get my new mid-19th century boots started last summer, but with my size out of stock at my last supplier, it is a project I need to get busy with. So, time for some more inspiration.


Girl's Boots, made from silk and patent leather, c.1855-1865. LACMA.