Picking up from
last year, I'm finally making up the 1820s stays from
Period Costumes for Stage and Screen. According to the notes, the original on which the pattern is based was made of double layers of cotton and linen. It was also, very frustratingly, in almost my exact dimensions--but the schematic had been slightly sized-down for the book. :(
Step 1: Resize the book diagram. The length, underbust circumference, and waist measurement are close enough to leave as is (for the first draft), but I definitely needed more space in the hip and bust. As a rough approximation, I took the difference between my measurements and the pattern pieces, divided by 4 (there being 2 gores per side at both bust and hip), and increased each individual gore by the resulting value. To increase the gore, I slashed it down the middle, and pivoted the two edges out until the additional space was accommodated.
 |
| Front, Side, and Back Pieces (with wooden busk). Not pictured: triangular gores and shoulder strap. |
 |
| Slashed gore on right, expanded version on left |
Step 2: Make the muslin. This was made in 1 layer, except for the front (which needed two layers to form the front busk pocket). Since I often need extra length over the bust, I used two different sized gores on the initial fitting: both were expanded to the width I expected would be necessary, but on one side, I lengthened the gores by an inch. Featherweight boning was basted along the boning lines, where double layers weren't available to make channels, and eyelet tapes was basted along the back for trial fitting.
 |
| Exhibit A: In which I remember why I don't use eyelet tape. |
Step 2A: Fiddle with the fit.
This got very frustrating, very fast. (Lacing up a corset from behind, while wearing it, is enough to put anyone in a sour mood--I'll look into longer laces to expedite the process in the future). The obvious first problem was that the back hip wasn't full enough, while the front/side was a little too full. So, I pinched out the excess in the side gore and slit the lower part of the back panel. In draft 2.0, this new, third gusset was shifted to the side-back seam, as I prefer sewing gussets between panels.
The bust was a whole 'nother mess. The main problem, I discovered (thanks to some help from the
Oregon Regency Society's stays fitting advice) is that I was trying to adjust the bust before determining the strap length. Need to reverse the order there. In any case, even the lengthen gores were still 1/2" too short--and they also needed to taper slightly towards the top for a close fit. Also, they were too far forward: all the extra room was going to the front, with none to handle side fullness. Frustrated with the re-drafting, I finally draped the needed cup-shape (lower half only) and expanded the triangular front panel so that the side seam falls to the outside of the bust (instead of awkwardly over it). This was accomplished by measuring from the center front to the side bust along the underbust line, and then re-sloping the front panel through that point. To get a better gore shape, I superimposed the draped 'cup' over half of the new front piece, and pinched out fabric until it lay flat within the boundary of the front piece. I traced along the pinched out portion to get two darts (the difference between the needed amount of fabric and the portion supplied by the main body piece).
 |
| New, expanded front panel, with marks for busk placement, trapunto corded quilting, and bust gores. |
 |
| Draped "cup" and resulting gores. The remainder of the "cup" material will be provided by the sloped front piece. |
Adding seam allowances to the new bust gores, I cut out new front and back sections (the side piece was alright), added the back hip gore (starting with the basic shape used on the other two), took in the side hip gores by the amount pinched out, and set in the new bust gores. Most importantly, I fastened the straps, using string to make the front adjustable for fitting.
 |
| Mock-up 2.0, front |
 |
| Mock-up 2.0, side |
Fitting Success! Selfie not included.
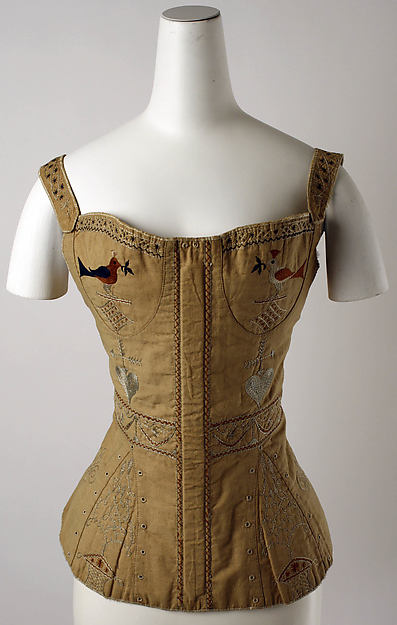
And for some uplifting inspiration, here's a
beautifully embroidered corset, circa 1820-1839 from the Met. Next time, I just may have to try using single bust gores. With embroidered birds.


No comments:
Post a Comment
Thanks for commenting!