Tuesday, January 27, 2015

HFF #18: Descriptive Foods

The Challenge: Prepare a food that has an evocative name.

The RecipeTipsy Cake from Mrs. Beeton. [Ok, I confess that I made this up a couple days early, ie. on Thursday, because I was having a party and wanted to share it with guests.  Birthday prerogative.]

Date and Region: 1861, British

How Did You Make It: Day 1: Prepared #1782 Savoy Cake.  Separate 7 eggs; beat the whites until fluffy.  In another bowl, mix the egg yokes with 8.5 oz (weight of 4 eggs) powdered sugar and 1 tsp almond extract--the flavor was a little strong; would try 1/2 - 3/4 tsp next time.   Mix in egg whites, slowly add 15 oz. (weight of 7 eggs) flour, and beat a further ten minutes. Baked for about 50 minutes at 350 F in two small, buttered tins--I used two, so that resulting cakes are small enough to fit into the available serving plates.

Day 2: Let the cake age.  Receipt called for a 3-4 day old cake.

Day 3: Poured 1 bottle wine and 6 Tbsp brandy over cakes and allow to sit for about 2 hours. Prepared #1423 Boiled Custard: warmed 1 pint skim milk, 3 oz. granulated sugar, and 1 tsp. vanilla extract in a saucepan; mixture was brought to a boil, then strained and allowed to cool. Beat eight eggs and stirred into the cooled/cooling milk mixture.  Put it all into a hot water bath on the stove, stirring until thick (about 40 minutes...possibly this was not quite enough), without allowing the mixture to boil, Removed from heat and stirred in 1 tsp. brandy.  Drained excess liquor from cakes, sprinkled blanched, slivered almonds over them, and poured the custard over all.  Grated some nutmeg over the custard.

Time to Complete: Three days.

Total Cost: Mostly based on the cost of eggs.  There's 15 of them, after all.

How Successful Was It: Not. The cake needed longer to soak, and would have benefited from a deeper dish.  Also, I think I'd try a sweeter wine next time (not a generic white).  All of the excess liquor needs to be poured off or permitted to absorb into the cake, else the custard will have...problems.  I'd also be tempted to try the alternate presentation in which the ingredients are layered with cream as a 'trifle'.

How Accurate Was It: Fairly good in ingredients.  Specific tins/pans could be more helpful.

Savoy cake, from an 1861 recipe.
Mmm, cake.
Savoy cakes soaked in wine and brandy.
Boozy Cake
Tipsy cake from Mrs. Beeton's Book of Household Management, 1861.
With custard; narrower, deeper dishes would be helpful.


Saturday, January 24, 2015

HFF #17: Revolutionary Food


The Challenge: Prepare a food that is revolutionary in some way, or dates from a revolutionary time.

The Recipe: Ginger sprigs from The lady's assistant for regulating and supplying her table by Mrs. Charlotte Mason (page 379)

Date and Region: British, 1777 (I believe there was some rather revolutionary activity going on some of the British colonies at that time...)

How Did You Make It: With precious little assistance from the instructions...

"To make Ginger Sprigs after the West Indian Manner. TAKE three eggs, a pound of sugar, a pound of flower, a little ginger, two spoonsuls of rose water mix them to a paste "

Presumably, one then bakes this paste.  I took this as a sort of biscuit/cookie, and went for 350F about 12-13 minutes. (I used 1 Tbsp of ginger and 2 Tbsp of rose water.)

Time to Complete: About 75 minutes to mix up and bake 4 pans.

Total Cost: Ingredients were all to hand.

How Successful Was It: Successful.  Tasty enough, rather dense.  The rosewater flavor predominated, so I'd want to experiment with using a little more ginger.  The two flavors worked together surprisingly well.

How Accurate Was It: Having no description, shaping, or baking instructions, it's hard to say.  I couldn't find any other references to "sprigs" in other sources, so I just make them as drop cookies.

Ginger sprig cookies from a 1777 British recipe.

Wednesday, January 21, 2015

Red's Regency Dress, #2

Continuing from part I: the actual dress construction.

Custom-fitted bodice pattern for Regency dress.
Start: Fitted and/or Draped Pattern Pieces 

To make the bodice, I cut out the front and back pieces in the lining and fashion fabric.  Sleeves are unlined.  The sleeves were sewn along the underarm seam, then the (lower edge) hem was pressed and hand sewn.  I experimented with adding decorative tucks parallel to this seam, but decided it made the sleeve too visually "heavy". For the front piece, I cut the fashion fabric with extra space in the center front, and then folded out the excess in six knife pleats (or four knife pleats with a center box pleat), and stitched the pleats down by hand.  They are completely flat, but add subtle visual interest to the body.
Decorative tucks on front of Regency dress bodice.
Bodice Pleating
Hand-sewn tucks.
Hand sewing on the tucks
The back lining was darted out, for use as a guide.  On the back fashion fabric, I opted for a faux "three piece" (well, "four piece", as it's back-opening) effect, by making a small diagonal tuck running from the shoulder seam to the waist.  On the originals examined in part one, I noticed that these don't have to be as curved as on an 1850s or 1860s-style dress; some of the 1810s dresses have very straight side-back seams, making the back itself diamond-shaped.  This faux seam took up additional material towards the waist, acting as a dart.
Back bodice lining.
Plain dart on back lining
Dart concealed in faux-seam.
Dart concealed in faux seam
The front and back pieces were then joined at the shoulder and side seams; the lining was treated likewise.  The fashion fabric and lining were then placed right-sides-together, and joined along the center backs and neckline.  The fabric was turned right-sides-out, pressed, and the sleeves were set into armholes.  Hooks and eyes were added along the center back.

To make the skirt, 2.5 panels (of the fabric width, 44") were cut, and made up in the usual manner with the placket at the center back. [Usual manner: sew panels into a tube, fell the seams, press hem and stitch, narrow-hem the placket opening].  Three 1" tucks were made  near the hem, again adding subtle decoration and a bit of weight to the bottom of the skirt--the fashion plates I was looking at tend to favor trim around the bottom of the skirt, especially in the later 1810s into the 1820s.  I did the tucks by machine, as the matching thread made the stitching blend in, and my wrist was already protesting the hand-sewn hem.
Tucks in skirt of Regency dress.
Skirt tucks
The raw upper edge was gathering with two rows of running stitch, and then were machine stitched to the raw lower edge of the bodice.  As with the bodiced petticoat, the back gathers were set close and the front gathers were spread out (half of the skirt width over the back quarter of the bodice, the other half over the front/side three quarters).

Voila:
Completed Regency/Empire/Neoclassical dress.


Sunday, January 18, 2015

Regency Stays, Part II

Finally satisfied with the fitted mock-up, it's time to start on the real stays.

Using the mock-up pieces as a pattern, I cut all of the pieces out of linen.  Gores are being worked as single layers, straps and "body" pieces as double layers.

To conceal the seams between layers, I'll be working from the front to the back (more on that in part III). The first point of business is to mark the busk pocket, under-bust quilting, and gores.  After stitching through both layers to form the busk pocket, it's time to add the bust gores.

I've found Alysaundre's Perfectly Pointed Gore Tutorial very useful when it comes to setting gores by machine.  Those tacking stitches really help.  I tried two methods of finishing the gore seams on my mock-up: in the first, I use my normal felling method for a single layer: the two "body" layers are treated as one, the seam allowances on the body pieces are trimmed close to the gore seam, and the gore's seam allowance is folded over the raw edges and top-stitched.  In the second method, I attached the gore only to one layer only, pressed the seam allowances flat, then folded the raw edges of the 'lining' layer to the inside, top-stitching over the lot.  Working with two layers, I found this approach slightly neater and easier.
Basting the pointed gores.
Basting the gore points
Gores stitched into outer layer of stays.
Gores attached to one layer only, before ironing the seam allowances
Lining of stays attached around gores.
Fold raw edges of lining to the inside
Front panel of Regency stays with finished gores.
Finished gores
With the gores completed, it was time to start in on the trapunto.  I found this tutorial particularly useful in figuring out how to approach it.  Inspired by several beautiful original corded stays, I decided to cord the under-bust area in a diamond-pattern.

I marked the diamond pattern in pencil on the reverse side (my fabric marker appears to be hiding). Intending to minimize the extraneous lines, I only marked one stitching line per row, and used the presser foot to make parallel lines at 1/8" and 1/4" to the marked line.  The area to be quilted was 3.5" tall (3" inside the horizontal border), with 1" between each 'line' (double row of cords, set in 1/8" channels).  The diamond pattern was measured from the center front, with the initial lines measured at a 45 degree angle to the busk casing.  I practiced stitching and cording this pattern on the second fitting mock-up, to make sure that it worked.
Trapunto quilting/cording on stays mock-up.
Mock up: corded trapunto quilting on the left, marked lines on the right
The cord is a cotton crochet yarn, ala sugar'n'creme, as I usually use in my corded petticoats and sunbonnets.  Not having a trapunto needle to hand, I substituted a blunt-end tapestry needle to run the cords through the sewn channels.  This worked sufficiently well, even sliding between the stitches where one channel crosses another (I tested this on the first draft to see if crossing lines would work or not).  The short length of the needle would prove severely detrimental over a larger area, but worked fine on this project.
Quilting the stays for the trapunto work.
Quilting the first lines.  The thread ends were tied on the back and clipped close.
Running cords in the stays.
Running the cords
Quilting on stays.
One side quilted!
Front panel of stays with one side quilted, and the other quilted and corded.
Contrast of layers: right side quilted, left side quilted and corded.
Detail: quilted versus quilted and corded.
Close view: corded versus quilted.
With the trapunto finished, the last thing is to add the two short bones (1/4" spring steel) along the lower, pointed sides.  To accommodate the many things going on at the top of this piece, the bones along the upper portion of the side seam will be encased in between the layers of the side panels.

Completed front panel of 1820s stays, with gores, trapunto work, busk, and bones.
Completed Front Panel


Saturday, January 17, 2015

Red's Regency Dress, #1

I've a floral print material for Red's dress.  It's about a shirting weight cotton--lighter than quilting calico, but more opaque than a semi-sheer.  She's interested in clean lines and minimal trim.

Regency or Empire style dress, 1809-1810, in The Met.
Cotton dress, American, 1809-10, in The Met.
One of the pieces I'm looking to for inspiration.

Some period inspiration:
Cotton evening dress c. 1809 This one has the longer "short" sleeves preferred by my sister.  It fastens down the back with four dorset (thread-covered) buttons.  The side-back and shoulder seams appear to be corded, or to have small tucks of some sort.  The sheer material lends itself to some beautiful texture/shading effects, with horizontal tucks on the bodice and a diagonal tuck design on the sleeve. The right sleeve appears to have a draw-string 'cuff'.  The waist and neckline may also have drawstrings (or cording).  If I had sheer-er material, I would be very tempted to reproduce this.

Another cotton evening dress c. 1809-10 Very similar to the above.  The design is very plain, showing off the embroidered material.  Interesting 'gathering' on the center back.

Another embroidered muslin c. 1800
Cotton evening gown c. 1804
Cotton and Silk, c.1810 Gathered front bodice.  Fun sleeve decorations.
Silk, long-sleeved dress c. 1815-1820 Neck and waist drawstrings gather the back.  Still appears to have the 'four piece' back happening.
Silk Dress with contrast piping at the neck and arm.  It also appears to have a two-piece back (gathered front and back).  Self-fabric sash edged in contrasting silk.

For construction details, I consulted Janet Arnold's Patterns of Fashion I.  The half-dozen dresses dated c. 1795-mid 1820s included rectangular, gored, and hybrid skirts.  Gathering was the more common treatment, though some used pleats.  The narrowest skirt was around 96", the largest 128"; most were 100"-108."  If bodice piping is mentioned, I've missed it.

Lucy Johnson's Nineteenth-Century Fashion in Detail shows several bodices in the period 1800-1820, all of which seem to have either plain or bound seams (I see no cording, even at the arms).  The later 1820s and 1830s dresses show extensive cording at the seams, including contrasting cording and decorative effects. There was also a very intriguing sketch of a long-short sleeved dress, c.1800, with what appears to be seven tucks along the lower portion of each sleeve (unfortunately, the close-up photograph of that dress is on the skirt embroidery--fortunately, the VAM on-line collection has more pictures, though none of them features the sleeve prominently).

Short plan: Make a darted bodice dress (gathering seems more common on the cottons, but she prefers the darted look), with a faux-three/four piece back.  Back fastening with hooks and eyes, as I don't have any good period buttons for a dress. Closely-set "long short" sleeves.  Rectangular skirt of 2.5 44" panels (108" after seams) gathered to the waist, with the fullness concentrated behind, as discussed for the petticoat bodice.  Decorative tucks and self-fabric cording TBD; I'm currently thinking three 1" tucks on the skirt, three smaller tucks on the lower sleeve, and a few vertical tucks at the center front of the bodice, to add some subtle visual interest.

For the pattern, I'll be using the custom-fitted toile mentioned in the petticoat bodice post.  I draped a basic short sleeve, as well.  The skirt needs no pattern.

Friday, January 16, 2015

Regency Bodiced Petticoat

Getting ready to attend a Regency ball with a certain dear sister.  I've already made my chemise and have a corset in the works.  To save time (in construction and dressing), I'm attempting an all-in-one boned-bodice petticoat for Sis.  Then it's on to the frocks...

The bodice pattern used is a modified version of the Simplicity 4055 bodice (view A).  I converted the 4-piece back into a 2-piece by joining the back and side-back pieces, and taking up the excess material at the waist with a dart; the neckline was also raised to suit the style preference of the intended wearer, and the front darts, side seams, and shoulder seams were all custom-fitted.

Following the bodiced petticoat instructions on sensibility.com, I cut out a version of the bodice with the neckline 1" lower, an expanded center front (1" added at the top, by angling the front bodice piece on the center front fold before cutting), and an extra 2.5" length.

Drafting a bodiced petticoat from a Regency bodice toile.
Fitted bodice toile and longer petticoat bodice
Here's where my method diverged.  Instead of using bias tape to make a casing for the front drawstring, I decided to make a channel between the lining and outer layers.  To do this, I joined the front and back pieces at the side seams for each of the two layers.  After pressing the seams to the back, I joined the lining and outer layers along the neck, center back and under-arm edges (leaving the shoulder seams and waist open). Pressed, and then top-stitched along the front neckline, 1/2" from the edge to form the channel.

Assembling the petticoat bodice.
Joined side seams
At the center front, two eyelets were made in the channel, and the twill tape fed through.  The ends were secured at the open shoulder.  The back shoulder seam allowances were pressed in, and the front and back joined with top-stitching.


Petticoat bodice upper drawstring.
Threading the drawstring
Drawstring casing along upper bodice.
Drawstring in casing, shoulder to center front.
Petticoat bodice shoulder seam.
Shoulder Seam
The darts were then stitched through both layers, and pressed to the outside.
Bodice for petticoat.
Almost-completed bodice
For the skirt of the petticoat, I cut a 42" by 84" rectangle of cotton, joined it into a tube (leaving a 10" placket at the top) and put a 2" hem at the bottom.  I finished the raw edge of the placket opening, and gathered the upper edge with a running stitch. Per the originals dresses and petticoats I've seen, I decided to concentrate the gathers towards the back of the skirt.  In this case, I put the back half of the gathered skirt into the back quarter of the waistband. The raw top edge was encased in a waistband, the top of which was left open (it will eventually enclose the raw lower edge of the bodice).
Skirt for Regency bodiced petticoat.
Skirt on outer layer of waistband.
At this point, I basted the waistband to the lower edge of the bodice and had Sis try it on.  As hoped, things fit pretty well, especially with the drawstring to snug up the neckline.  I increased the overlap at back closure slightly (less than 1/2") to ensure a close fit.  With the added bodice length, the waistband fell a bit low, so I decided to move it up, and marked the desired lower-bound on the bodice.  The distribution of the skirt gathers were a good call: there's plenty of room for movement, and the line is very elegant.  I'll probably use a similar proportion on the dresses' skirts.

Fitting accomplished, I removed the basting stitches, and re-attached the waistband along the new marked lower bodice boundary, and trimmed the excess bodice length; the back waistband "lining" was then folded over the the raw edges of the bodice, concealing it within the waistband.  I then added 3 buttons to secure the back.  Featherlight boning was basted over the front darts.
Trimming the bodice.
Trimming the excess bodice length.
Bodiced petticoat waistband.
Final waistband placement.
Finishing the bodice placket.
Waistband lining pinned in place, raw edge of bodice overlap folded to inside.
Buttons down the back of the petticoat bodice.
Back buttons
Boning on front of bodiced petticoat.
Front bodice with applied boning.
Regency or Empire style boned bodice petticoat.
Finished petticoat.

Thursday, January 15, 2015

Regency/Empire Stays, Part I

Picking up from last year, I'm finally making up the 1820s stays from Period Costumes for Stage and Screen. According to the notes, the original on which the pattern is based was made of double layers of cotton and linen.  It was also, very frustratingly, in almost my exact dimensions--but the schematic had been slightly sized-down for the book. :(

Step 1: Resize the book diagram.  The length, underbust circumference, and waist measurement are close enough to leave as is (for the first draft), but I definitely needed more space in the hip and bust. As a rough approximation, I took the difference between my measurements and the pattern pieces, divided by 4 (there being 2 gores per side at both bust and hip), and increased each individual gore by the resulting value.  To increase the gore, I slashed it down the middle, and pivoted the two edges out until the additional space was accommodated.
Pattern pieces and wooden busk for 1820s stays.
Front, Side, and Back Pieces (with wooden busk).  Not pictured: triangular gores and shoulder strap.

Slashed and expanded gores for corset.
Slashed gore on right, expanded version on left

Step 2: Make the muslin.  This was made in 1 layer, except for the front (which needed two layers to form the front busk pocket).  Since I often need extra length over the bust, I used two different sized gores on the initial fitting: both were expanded to the width I expected would be necessary, but on one side, I lengthened the gores by an inch.  Featherweight boning was basted along the boning lines, where double layers weren't available to make channels, and eyelet tapes was basted along the back for trial fitting.
Eyelet tape damaged after lacing corset mock-up.
Exhibit A: In which I remember why I don't use eyelet tape.

Step 2A: Fiddle with the fit.

This got very frustrating, very fast.  (Lacing up a corset from behind, while wearing it, is enough to put anyone in a sour mood--I'll look into longer laces to expedite the process in the future). The obvious first problem was that the back hip wasn't full enough, while the front/side was a little too full.  So, I pinched out the excess in the side gore and slit the lower part of the back panel.  In draft 2.0, this new, third gusset was shifted to the side-back seam, as I prefer sewing gussets between panels.

The bust was a whole 'nother mess.  The main problem, I discovered (thanks to some help from the Oregon Regency Society's stays fitting advice) is that I was trying to adjust the bust before determining the strap length.  Need to reverse the order there.  In any case, even the lengthen gores were still 1/2" too short--and they also needed to taper slightly towards the top for a close fit.  Also, they were too far forward: all the extra room was going to the front, with none to handle side fullness. Frustrated with the re-drafting, I finally draped the needed cup-shape (lower half only) and expanded the triangular front panel so that the side seam falls to the outside of the bust (instead of awkwardly over it).  This was accomplished by measuring from the center front to the side bust along the underbust line, and then re-sloping the front panel through that point.  To get a better gore shape, I superimposed the draped 'cup' over half of the new front piece, and pinched out fabric until it lay flat within the boundary of the front piece.  I traced along the pinched out portion to get two darts (the difference between the needed amount of fabric and the portion supplied by the main body piece).
Revised front panel for 1820s stays, with stitching lines marked.
New, expanded front panel, with marks for busk placement, trapunto corded quilting, and bust gores.
Cup and gore sizing.
Draped "cup" and resulting gores.  The remainder of the "cup" material will be provided by the sloped front piece.
Adding seam allowances to the new bust gores, I cut out new front and back sections (the side piece was alright), added the back hip gore (starting with the basic shape used on the other two), took in the side hip gores by the amount pinched out, and set in the new bust gores.  Most importantly, I fastened the straps, using string to make the front adjustable  for fitting.
Front of Regency stays mock-up.
Mock-up 2.0, front
Side view of early 19th century stays (mock-up).
Mock-up 2.0, side
Fitting Success!  Selfie not included.

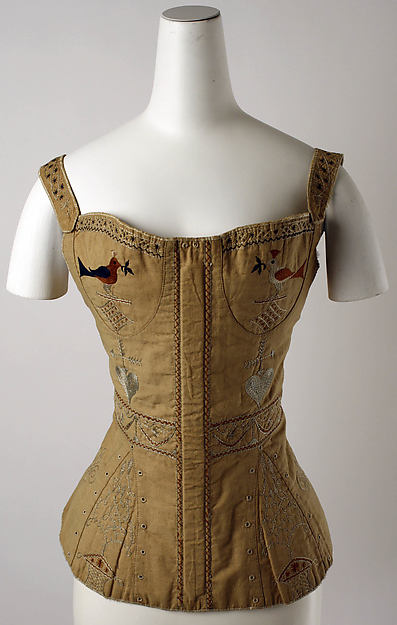
And for some uplifting inspiration, here's a beautifully embroidered corset, circa 1820-1839 from the Met.  Next time, I just may have to try using single bust gores.  With embroidered birds.
Embroidered 1820s/1830s stays from The Met.


Wednesday, January 14, 2015

Corded Petticoat for a Doll

Doll-sized 1850s corded petticoat.
Corded petticoat for a 15" cloth doll.

This one's of my own devising, based on my preferred method for making human-sized corded petticoats.  The petticoat is 1" shorter in length than the standard for this doll (since it's to be the lowest layer), and at 2/3 the usual width.  The material was cut three inches longer than the finished length, allowing for 2" of cording in the turn-up (and a 1/2" fold under the hem).  All machine sewn, except for the gathers and waistband.  Closes with a hook and thread bar.

Cording petticoat on sewing machine with zipper foot.
Cording with a zipper foot.  I prefer this to threading the cord through a pre-sewn channel.

Detail of cords set in petticoat hem.
Close-up of cords and hem.

Saturday, January 10, 2015

Music and Literature Resources for Victorian Reenactors

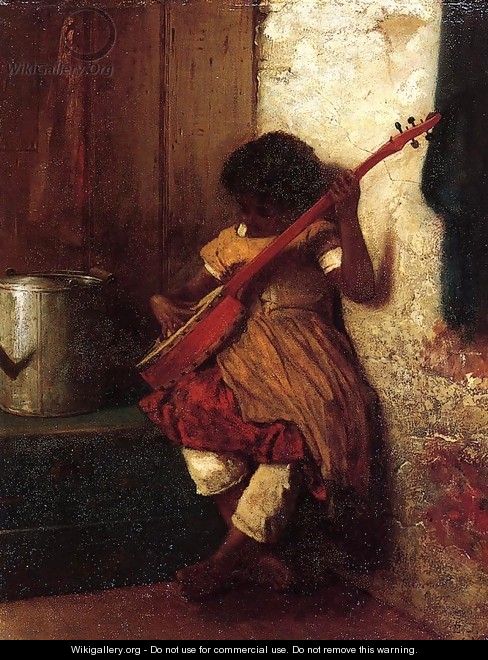
Musical Instinct (1860-69) by Eastman Johnson


 Another resource round-up.  Music makes a fun addition to activities, and doesn't necessarily require lots of extra equipment to incorporate into your impression.  Dance and literature are other favorite recreations of mine (and thus, of my main 19th century persona).  Tons of information survives from the period: these are just a few places to start.

Sheet Music
On-line Sheet Music Collections from the University of Michigan
Library of Congress's Historic Sheet Music Collection
(including 19th Century Song Sheets and Civil War Sheet Music collections)
Johns Hopkins University Levy Sheet Music Collection (custom search allows you to pick your year range, instrument, and topic)

Dance Resources
Dance Instruction Manuals, Library of Congress
Fashionable Dancing by Cellarius (1847)
The Ball-Room Companion (1868)
Diprose's Ball Room Guide (1861)
Brookes on Modern Dancing (1867)

Periodicals and Newspapers
Godey's Lady's Book (some years are also available on Google Books)
Peterson's Magazine (ditto)
Harper's Weekly (also on Internet Archives and Google Books)
Der Bazar (also at the University of Duesseldorf) German language periodical
La Mode Illustree French language periodical, known for its fashion information

Popular Literature
LOC "Books That Shaped America" 1800-1850 1850-1900
Goodreads.com lists popular books by decade: 1840s1850s1860s
Uncle Tom's Cabin by Harriet Beecher Stowe (1852)
Les Miserables by Victor Hugo (first English translation published 1862)
Eizabeth Gaskell: North and South (1855), Mary Barton (1848)
Charles Dickens: Bleak House (originally published 1852-3), David Copperfield (1849-50), Great Expectations (1860-1) and more
Alexandre Dumas: The Three Musketeers (1844), Twenty Years After (1845), and other titles

Dime Literature
Beadle's Dime Book of Verses
Beadle's Dime Humorous Speaker
Beadle's Dime Song Book
Beadle's Dime American Speaker
The Quakeress Spy (a dime novel)

Some reprints are also available for living history use.  Ragged Soldier Sutlery has a diverse selection. Sullivan Press carries paperbacks, as well as reproduction documents, labels and writing supplies.  Amazon carried reprinted Harper's Weekly newspapers.