Tuesday, March 10, 2015

Corded Petticoat (human-sized)

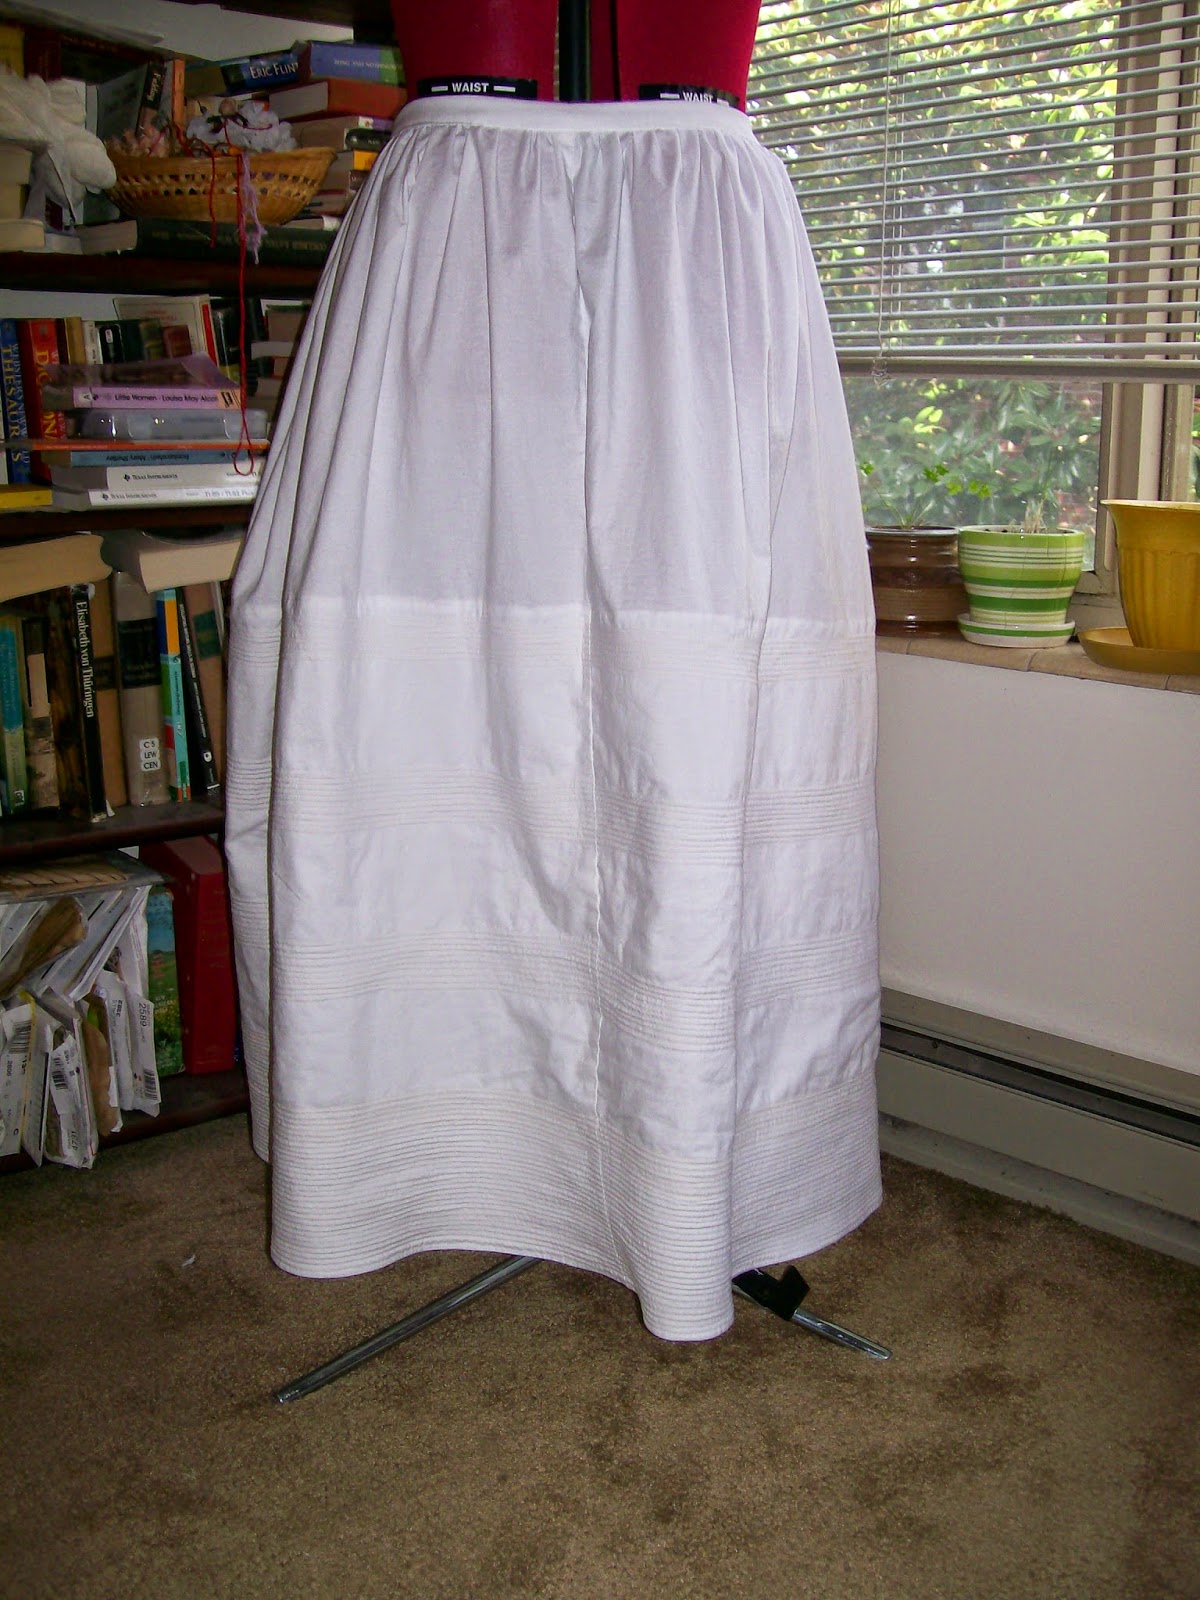
Recently finished project (now happily winging it's way to a certain deserving lady in MN):
Corded petticoat for 1850s wear.

Detail of cording in white cotton petticoat, pre- Civil War.

Vital stats: 90.5" circumference at the hem; finished length 35" at CF, 37" at CB; 20.5" self-fabric facing, containing 58 rows of cotton cording, or approximately 145 yards; fastens at center back with two bone buttons; total weight 1 lb 6 oz.

Saturday, March 7, 2015

HFF #20: A Notable Event in History


Inspired by Jeannette's reference on the Facebook page, I looked up the menu for Lincoln's Second Inaugural Ball, and decided to try my hand at some 1865 fruit ices.

The Challenge: Make a dish served at a famous event in history.

The Receipt: "Orange Water Ice", from The Art of Confectionery (1865), to fulfill the entry for "Ices: Orange" on the Bill of Fare for the ball at Lincoln's Second Inauguration (1865).  As the syrup instructions were a bit dense, I also consulted Mrs. Beeton's.

Page 260: "ORANGE WATER ICE Ingredients the juice of 12 oranges, the juice of 2 lemons, the thin rind of 3 oranges infused in the warm syrup for an hour, and afterwards strained to the juice, 1 pt of syrup. Freeze the composition in the usual way* and set up the ice in its mould."

Pages 257-258: "FRUIT WATER ICE In preparing water ices the chief rule is to be careful of the amount of flavoring and sweetening used. The tendency of the freezing process is to destroy the flavor or at least to extract it so that in sweetening the mixture it is best to make it rather sweeter than necessary for use without freezing in the following receipts for preparing fruit ices directions are generally given to strain the mixture so as to exclude particles of fruit or pulp some however prefer it to be retained with the pieces of fruit congealed here and there among the ice of course every one can decide this question according to his own taste either way being very palatable. The use of syrup of different degrees of strength is recommended, as the best and simplest method for amalgamation with and giving body to the other ingredients composing the ices in many cases; however it will be quite sufficient to use the refined powdered sugar with out any previous preparation. In moulding fruit ices souffles and other small preparations it is often necessary to have the benefit of a freezing temperature without its being either proper or practicable to plunge the articles into the bed of salted ice. For this purpose a contrivance known as an ice cave has been provided. They are usually of copper or tin either round or square and may be of from twelve to twenty four inches in diameter with a depth nearly as great and a tightly fitting lid made with sides so as to admit of ice being placed on top of the cave. A very good substitute however can be improvised with a tin kettle of sufficient depth and good lid. When this cave is buried in the ice tub filled. With powdered ice and salt its contents will become nicely frozen and can be kept hardened for any required time."

Region/Date: American, 1865

How did you make it: Dissolved 4 lbs of sugar (mixture of granulated and powdered, as ran out of the former) in 1 pint of water; added the white of 1 egg and brought to a boil, stirring occasionally; added 6 fl oz cold water and allowed to boil again. Extinguished ensuing fire when mixture boiled over. Moved to a second burner, and continuing boiling for 5 minutes, scraping off the 'scum'. Placed peels of 3 oranges in the syrup and set aside for 1 hour. Juiced 6 'juice oranges', and a dozen 'cutie' mandarins, yielding 1.5 cups juice (probably should have had 2 cups). Added juice of 2 lemons. Strained the syrup and added 1 pint to the fruit juices (a bit over 1 pint remained, set aside for future use). Placed whole mixture in the freezer, stirring periodically.

Mixture was visibly thickening after 2.5 hours in the freezer; continued stirring at half-hour intervals for 5 total hours [as an alternative to having a proper ice-cream freezer; I think I picked up this trick from Mr. Cusick].  When mixture was approximately the consistency of apple sauce, I poured it into two pint-sized molds, and allowed it to freeze overnight.

Time: About half an hour of active work in the kitchen, five hours to initially freeze the mixture, 12 hours frozen in the mold, and a ton of time cleaning the stove afterwards. Would make again.

Cost: Price of oranges and sugar.  About $5?

How successful was it: It froze! Victory!  And I managed to remove them from the molds intact, too. Also tasted fairly nice; transportation had made the ices a bit soft, and the one which had more time to re-solidify before serving proved more successful, though both were eaten.

How accurate was it: Instructions were a bit vague, but I think they intended an ice-cream freezer (salt-water bath+inner container) to set the fruit ice before molding, at which point the described "ice cave" would be used--while the normal freezer sufficed for the latter, I was definitely taking liberties with the former.  Using two types of sugar wouldn't have been my first choice, either, but the syrup receipt did allow for three different types to be used, with varying amounts of egg white needed to clarify each.    

*Take a drink...

Orange peel in clarified sugar syrup for making fruit ices.
Clarified syrup with peel
Freezing the fruit ice.
Freezing the mixture
Orange water ice, from an 1865 recipe, like those served at Lincoln's Second Inaugural Ball.
One ice
1865 Fruit Water Ice, Lincoln Inaugural Ball.
Two Ice


Tuesday, February 24, 2015

New Wrapper

Returning to the KayFig Wrapper Pattern with a new addition to the Ft. Nisqually dress-up station. Detachable collar from Simplicity 7212.

Paisley wrapper from Kayfig pattern.

Front top portion of Kayfig wrapper.

Friday, February 20, 2015

HFF #19: Something Borrowed, Something Blue

The Challenge: Make a dish that features a borrowed ingredient and/or a dish which is blue.

The Receipt: Batter Pudding (with blueberries) from Sarah Josepha Hale's The New Household Receipt-Book, page 531.

"Batter Pudding.-- Take six ounces of fine flour, a little salt, and three eggs; beat it up well with a little milk, added by degrees till the batter is quite smooth: make it the thickness of cream: put it into a buttered pie dish, and bake three quarters of an hour; or, in a buttered and floured basin, tied over tight with a cloth: boil one hour and a half or two hours.

Any kind of ripe fruit that you like may be added to the batter--only you must make the batter a little stiffer. Blue berries, or finely chopped apple, are most usually liked."

Region/Year: English, 1854

How Did You Make It: Beat 6 oz. flour, 1/8 tsp salt and 3 eggs together, added (about 1/4-1/2 cup) skim milk to desired consistency, stirred in blue berries (about 3 oz). Baked 350F for 45 min in a buttered pie tin.

Time to Complete: Less than an hour, including 45 min baking time.

Total Cost: $4 for blueberries (out of season); other ingredients to hand

How Successful Was It: Yes? It baked very nicely all through, winding up like a thick pancake or less-dense sponge cake. What's weird is the lack of sweetness; also, with so few ingredients, the egg flavor comes through a bit. I can't imagine making this without the optional fruit, and next time I would perhaps add extra for additional flavor and sweetness.

How Accurate Was It: Followed to a nicety, but did use an electric mixer.

Blueberry batter pudding from 1854 recipe.


Wednesday, February 11, 2015

More blogging!

I'm now also blogging about the 4th US: sharing resources and information about American Civil War reenacting in the Pacific Northwest.
Dancers in Repose, from The Fashionable Dancer's Casket 1856

Regency/Empire Stays, part III

With the front panel complete, it's time to assemble the rest of the stays.1

Working from front to back, I "sandwiched" the completed section between each two new layers.  So, for the first in-seam gusset (cut in two layers to permit the sandwich), the outer layer of the gusset is laid right-sides-together with the outer front panel, and the lining layer is set right-sides-together on the front lining.  I then stitched the seam through all four layers (gusset shell/front shell+lining combo/gusset lining), and pressed the gusset out.  The front+gusset is now the completed section and is treated as one.  To add the side section, the side shell is laid right-to-right over the front+gusset, the lining is treated the same, and the process is repeated.  The hip gusset in the side piece was made in a single layer, and treated as the bust gussets in the front panel.  Boning channels were stitched between the shell and lining after the two were attached and pressed flat.

To make the back section, I joined the shoulder straps to the back pieces (L shell to L shell, R shell to R shell, R lining to R lining, L lining to L lining), and then joined each back piece to its lining, along the center back opening.  I did this to make a clean center back, without binding (leaving more space for the bones and eyelets).  Pressed the back pieces flat and stitched the back boning channels (butted into the CB seam, and another 1/4" away, leaving space for the eyelets in between.  Made the eyelet holes with an awl and applied 2-piece metal eyelets (size 00) with a setting anvil.  Following the method in Period Costumes for Stage and Screen, the eyelets are paired, but with an extra off-set at the eyelet at top and bottom for internal spiral lacing.  [My initial attempts to don the garment with spiral lacing were unsuccessful, so it's displayed below with cross-lacing.]

Made remaining back-boning channels as before.  I then joined the back and side+gusset pieces by sewing the shell only (usual right-to-right and open method).  The lining was folded over (to cover the raw edges) and topstitched.

The straighter boning channels (short slanted bones on the front, center back pairs, side hip) received 1/4" straight steel bones.  Curvier sections, particularly along the panel joins, used 1/4" spring steel.
(To see the difference, I've put up explanations of the different steels here).

Prepared bias edging of tightly-woven cotton (also used for some of the lining pieces), and attached it along the top edge--including both straps--and the bottom, encasing all remaining raw edges.  Added 8 thread eyelets to fasten straps (two per strap, and two at each side of the bust).


Completed Regency/Empire Stays.
Finished stays, front

Side back view of 1820s Stays from Period Costumes for Stage and Screen.
Finished Stays, side back

Front side view of early 19th century-style stays.
Finished stays, side front

1. For the record, I know that the French First Empire dates 1804-1814 and the English Regency period ran 1811-1820, but I am using the terms in the expanded sense, to cover the neo-classical fashion of dress which was popular approximately 1795-1830.  My apologies to anyone who is bothered by this construction.  I have been known to flip out over similar misuses of the term "Victorian" (1837-1901) to denote "pre-1920", "1870 or later", and/or "looks sort of old".↩


Tuesday, February 3, 2015

Making a Regency Petticoat

The petticoat bodice combines the petticoat with a sort of short stays; but for use with my long stays and chemise, I need an actual petticoat.

Period Petticoats:
Early 1820s petticoat from the Museum of Fine Arts Boston.
 Petticoat, c. 1820-1825, MFA
Early 19th century petticoat, from The Met.
Petticoat, early 19th century
from The Met.

Early 19th century petticoat, front and back view, from janeausten.co.uk.
Petticoat, early 19th century, janeausten.co.uk,
also featured on 
The Oregon Regency Society,
but an original post with context has not been found.
 

The petticoat is basically a skirt.  Given that the stylish "waist" of the period falls at the underbust, the petticoat may have shoulder straps to hold it in place, or even an abbreviated sort of bodice.  The two (admittedly not closely-dated) examples with back views show significantly more gathering at the back of the petticoat than at the front, with what may be a drawstring or tie fastening the center back.  The description of the MFA (bodiced) petticoat mentions waist and neckline drawstrings and a tie closure at the back.

For my petticoat, I cut a rectangle of white cotton 45" x 90"; sewed it into a tube, leaving a 12" opening at the top back; and hemmed the bottom (1.5" doubled).  I then gathered upper edge by hand, prepared a waistband to my underbust measurement (measured over the corset), and enclosed the raw edge of skirt in the waistband.  While doing so, I concentrated the gathers towards the back, as with the bodiced petticoat--ie, half of the skirt gathered to the back quarter of the waistband.  Twill tape ties fasten the center back; this seemed easier than a button closure for dressing oneself.  Shoulder straps of twill tape are attached to the waistband.
Reproduction Regency petticoat with shoulder straps.

Reproduction Regency petticoat, full gathered back with tape closure.